Left:
TOM RAIDNA'S TOTO
Contents:
Contact info:
Jim Michalak
118 E Randall,
Lebanon, IL 62254Send $1 for info on 20 boats.
Jim Michalak's Boat Designs
118 E Randall, Lebanon, IL 62254
A page of boat designs and essays.
(15FEB98) This issue starts with a letter from Dale Dagger who built a Toto in Nicaragua. He had trouble with the bevels on one bulkhead. So I'll explain how I do bevels myself. Next issue, about February 28, we'll look into the why's of water ballast.
If you click on Eldritch Press.you will find the small boat section of Eldritch Press. There you will find lots of good stuff to read including Nat Bishop's books VOYAGE OF THE PAPER CANOE and FOUR MONTHS IN A SNEAKBOX. These are complete with all text, maps and drawings so be prepared for many visits. Nat Bishop traveled by canoe down the East coast from Canada to Cedar Key, Florida in 1875. Then in 1878 he took a 12' sneakbox rowing and sailing from Pittsburg down the Ohio to the Mississippi to the Gulf of Mexico on to Cedar Key again. He literally "wrote the book" on this sort of travel camping. There is still nothing like these books for the boat camper. And for the historian they present a first hand look at the 19th century including life in the post war South. There are lots of other great things to read at Eldritch. Most of it would be thought of as true "literature" leaving me to wonder how the small boat stuff got in there. Many thanks to Eldrich.
|
|
Left: TOM RAIDNA'S TOTO
|
|
|
NICARAGUAN BEVELS...
I got this letter and these jpgs from Dale Dagger down in Nicaragua:
"Jim,
"I bought plans for both Toto and Roar. I'm building Toto here in San Juan del Sur Nicaragua. I got the plans and materials and then got a chance to go with a film crew to retrace the route that Vanderbuilt used during the Gold Rush. Man what a beautiful country this is.
"I have perfect weather to work. I did the wales at night when the temp got down to the 70's. I'm having a real problem because I've got access to really hot computers at the end of a e 1 sat. downlink here in Managua. Free fast Internet. I'm trying to build a Web Page but I keep getting distracted looking at everybody elses. Here's a picture of Toto under construction.
"Oh, have you ever thought of rewriting the guide to the building? There are a few errors in the one on Toto. One mistake I made was I angled the sides of bulkhead 10 the wrong way. Would have been easy for someone to warn me of the possibity. I bet allot of guys would do it for free just to be a part of the whole thing. I really liked the essay on camping.
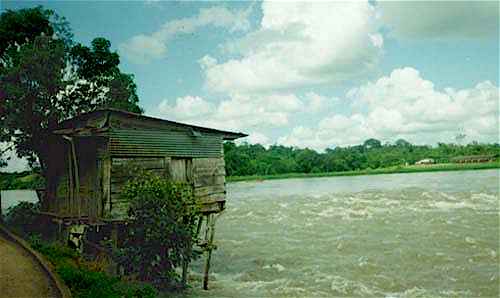
"The house is on the Rio San Juan in a town called El Castillo. It is here that the Spaniards built a fort to protect the rout to the Lake Nicaragua and hence the town of Granada. I wish I had a tape loop of the sound the river makes going by. It is one of the most beautiful and tranquil spots I've ever been.
DDagger"
ABOUT REWRITING THE INSTRUCTIONS...
I'm not at all against that. I do it when I know there are errors.
But there are at least two reasons why designers (I'm not the only one) don't keep their instructions up to date.
First, by the time a boat gets built and we find there is a problem, the design may have been around for several years. It's long been pushed to the back of the mind.
Second, it doesn't take long before you are convinced no one out there is reading any instructions. At least two Pencilboxes were built and sailing before someone told me my keyed instructions were all out of sequence. On all my drawings I suggest folks read Payson's excellent Instant Boats books. I visited one builder who kept asking questions that were well answered by Payson. "You might get Payson's Instant Boats," I said. "He answers all your questions." "Oh, I have it," he replied, "but I just glanced at it." Had I been a few minutes later in my visit, I may have seen a boat and house burning. He was about to pour a full tube of catalyst into a gallon can of polyester resin. You can get a very violent reaction in doing so. The instructions on the back of the can were very clear about that but he hadn't read them.
Still, I don't claim my instructions are great literature.
NOW ABOUT THOSE BEVELS...
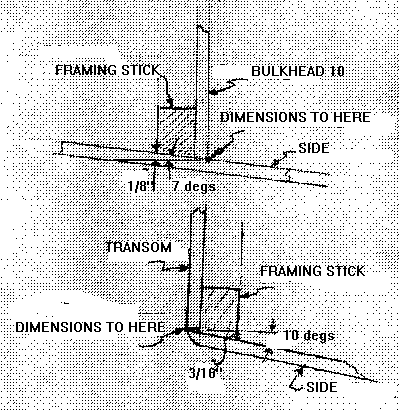
I did update the Toto drawing to include the full sized bevel drawings shown below. One is for the side edges of bulkhead 10 and the other is for the side edges of the transom.
You might ask why I use beveled sticks on a taped seam boat. The answer is that I personally find it much easier to set up a boat initially with glue and nails to firmly establish its shape without relying on wired seams. The photo of Dale working on his Toto is the stage I'm talking about. If done this way the assembly, especially the sides to bulkheads and transom, is very firmly screwed and glued together without resort to messy resins which will be used later in the actual taping of the seams. I think it's the easiest way and won't discourage anyone who thinks they have a better way.
Anyway, when I figure out the dimensions of the plywood piece that forms the shape of the bulkhead or transom, I take its dimensions off my lines drawing as if the piece had no thickness.
But the real panels do have thickness. So I rig it such that one face of the panel lies on the plane where I took the panel dimensions and mark that face "Dimensions to Here". Now if the side or bottom panels are sweeping in or out from the dimensioned face, then the other face of the bulkhead or transom will need to be smaller or larger than the dimensioned face.
Let's take the case where the adjacent panels are sweeping outward from the dimensioned face. We'll call this one an "outy". The transom bevel on Toto is as outy. The dimensioned face of the Toto transom is on the plane of the end of the boat and the transom's forward face needs to be slightly larger than the dimensioned face to allow for the outward sweep of the side panels, which measures 10 degrees at that point. How much larger? The Toto transom is supposed to be 1/4" plywood with a 3/4" thick framing stick, for a total of 1" thick. So to allow for the 10 degree bevel each side needs to have 1" X tan10 = .176" extra material which is 3/16" to most of us. But when I build one of these outy's myself, I pay no attention to that extra thickness. See the figure below to see how I do it on my own boats.
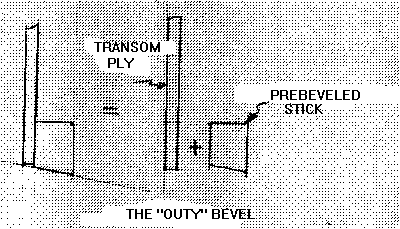
I've found the best tool to cut straight bevels is a table saw. First I cut the side sticks on the table saw to the correct bevel. Then I cut the transom (or bulkhead) panel out of plywood to the dimensions with no bevel, just a square cut. Then I glue and nail the beveled sticks to the plywood piece such that a straight edge along the beveled stick will just kiss the "Dimensions to Here" edge. That's it. I haven't fussed with that "extra material needed" measurement at all. This gives a nice straight edge to the right dimensions and it doesn't really get involved with thicknesses - if you use thicker or thinner wood than specified it will still fit.
"But," you say,"there's a little triangular area on the edge of the plywood that isn't right." True. I fill that with glue when the panel is glued and nailed to the side. That triangle isn't very big. On this 10 degree bevel it would max at .045". No problem. To me the glue there is really a hope of sealing the grain on the edge of the plywood, not a strength issue since a lot of that ply edge will be end grain anyway and about useless for glue strenght.
Now let's talk about the inny. Bulkhead 10 on Toto is an inny. (I suspect the trouble Dale had was that he made this one an outy the first try.) The basic dimensions of bulkhead 10 were taken 10' aft of the bow tip of the boat. That is the actual front face of the bulkhead, the face marked "Dimensions to Here". At that point the sides are sweepin inward 7 degrees as they go aft. This bulkhead is also 1/4" plywood with 3/4" sticks for a total of 1" thick. So the aft face of the bulkhead needs to be 1 X tan7=.12" smaller on each side edge than the front side edges.
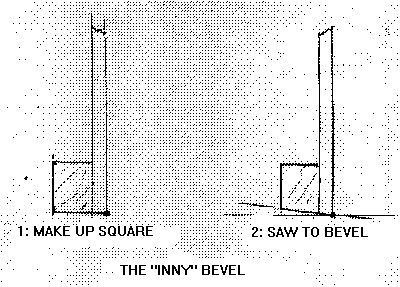
Innys are a little easier to picture. You could make all the edges square to the basic dimensions and then run them through a saw set to the proper bevel to shave off the extra material. I used to do them that way and still do on occasion. The problem I have is that I use a bandsaw for this which doesn't care to cut straight. And a large bulkhead is a beast to run through the saw all at once. You could try a saber saw or circular saw set to the proper bevel if you think you are good enough at it to keep the blade just kissing the edge marked "Dimensions to Here". I' not.
So I've gone to making the inny bulkhead the same way as I make an outy. First I prebevel the framing sticks with a table saw. Then I cut the plywood panel to shape with no bevel, just a square cut. Then I glue and nail the sticks to the sides of the panel. If the bevel is severe I do try to line up the face of the bevel stick with the "Dimensions to Here" edge of the plywood. Then I will have a small triangle of plywood protruding from the beveled face. I can trim that off later. In the case of a small bevel, I don't do that. I just line up the stick with the back edge of the panel. When I assemble it to the sides there will be a little triangle to fill with glue again. And the panel will be slightly wider than what the lines call for. In the case of Toto's bulkhead 10 the error would be .25" X tan7 = .03". Nothing to worry about.
Toto

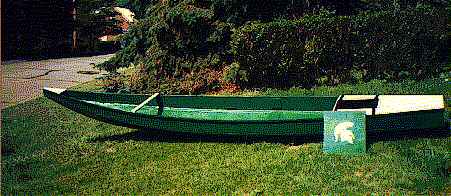
TOTO, DOUBLE PADDLE CANOE, 13' X 30", 45 POUNDS EMPTY
Someday I may get to put my full catalog on the net. For now I'll put one design in each issue.
The photo above is from Tom Raidna who has a neat boat building page at members.aol.com/buildboats. Tom's page also has construction shots of his Toto going together.
Toto has been my most successful design. Initially she was an experiment to test a new bow shape - a deep V bow that blends into a multichine well aft. There's a twist in the bow bilge panels and at the time I didn't know how to expand those panels on the drawing board. So I built her without them and then sized them by cut and fit. Then I recorded the shapes on the prints. Nowadays this sort of twisted paned expansion is routine on a computer to great accuracy (provided the input is accurate).
The boat is an easy prefab job from two sheets of 5MM lauan underlayment, still very cheap at maybe $12 a sheet from the lumberyard until the rain forests are gone. Marc Smith came to the 1994 Midwest Messabout with tow of these Totos strapped to the roof of his Birdwatcher. They were built by two twelve year old girls under Marc's guidance. Marc said the girls did all the work including using the power tools. And they paddled around the Messabout in them.
It's fun to compare Toto with the typical minimal dink because they usually come from the same pile of stuff and labor. Toto covered the 6000 foot long dam at Carlyle lake in 14 minutes with a moderate paddling effort for 4-1/2 mph. She's more seaworthy but she's wetter when pressed because of paddle splash. She has a buoyancy/storage chamber aft. It will keep your shoes and stuff dry while you splash around and I believe it has about 180 pounds of buoyancy volume if the hatch cover stays watertight. (But you can't "self rescue" in any boat like this without very special training. It's best to stay within a short swim or wade to shallow water.) The open cockpit is large enough to allow sleeping inside, as I have done many times. She's shaped for easy cartopping. In good conditions she'll paddle two adults. The long lean bow seems to ignore an overload, unlike plumb bows which can become cranky when immersed. She'll take you through some very rough stuff if you are solo. But the dinks have their place too. They can have sailing stability and many will find their elevated seating more comfortable. By the way, a boat like Piragua with a simple wide flat bottom won't be as fast or as seaworthy as Toto, but you might be able to stand up in Piragua. Don't expect to do that in a boat like Toto.
Plans come with complete instructions including the details of taped seam construction and a drawing of a simple paddle that works. (Marc Smith's girls used double paddles made from old vaulting poles with plywood blades bolted on. I tried their boats and paddles and they were quite good.) No jigs or lofting required. Blueprints plus instructions are $15.
Prototype News
Some of you may know that in addition to the one buck catalog which now contains 20 "done" boats, I offer another catalog of 20 unbuilt prototypes. The buck catalog has on its last page a list and brief description of the boats currently in the Catalog of Prototypes. That catalog also contains some articles that I wrote for Messing About In Boats and Boatbuilder magazines. The Catalog of Prototypes costs $3. The both together amount to 50 pages for $4, an offer you may have seen in Woodenboat ads. (If you order a catalog from an internet page you might state that in your letter so I can get an idea of how effective this medium is.) Payment must be in US funds. The banks here won't accept anything else. (I've got a little stash of foreign currancy that I can admire but not spend.) I'm way too small for credit cards.
Anyway..... Anytime a design from the Catalog of Prototypes starts getting built I pull it and replace it with another prototype. So that boat goes into limbo until the builder finishes and sends a test report and a photo. There are three boats in that catagory right now.
Scram Pram, a 16' multichine Birdwatcher type, has been completed and had its first sail near Savannah. I'm hoping for a good photo one of these days. The builder said it's hard to get good photos of your own boat and he's quite right about that. The surest way is to get a good beach shot of it.
And Skat, a 12' cat boat daysailer, is being built near Phoenix. Latest word from the West Coast Spy is that the boat has been glassed on the outside and ready to flip and finish.
The Kansas Boat Psychologist keeps plugging away at his Fusebox. He said his prairie savants kept looking for a pointy end and there ain't any. He is ready to flip the structure to start the bottom installation. I'm leaving Fusebox in the Prototypes Catalog for now because it has appeared on at least three web pages.
Here on the AF4 home front, the structure is pretty well done except for the blasted details. Luckily this boat has few details. I'm in the painting stage right now. The hull has been primed and but I've left the roof off for now as I paint the interior. There will be lots of sanding and more and more painting in the next few weeks. .
As for the bimini frame, I found I can bend heavy wall 3/4" PVC pipe fairly well with my kerosene Ready Heater. Placing the pipe a few inches from the heat outlet, it takes a minute or two to heat the pipe to softness, rotating the pipe to get even heat around it. The pipe attains a consistancy about like a rubber hose in the heated area and stays formable for a while. It bent quite well to about a 4" radius without bending around any form. It flattened a bit but I could handle it with gloves and push it back to a round shape. Strength seems fine. So a PVC pipe bimini frame looks for real. I think the end fittings, etc., will have to be wood secured into the pipe with small bolts or screws. This work will get done well after the launching.
Added a vent to bulkhead 2. It's about 5" x 8" and has a water trap. I'm sure it should be bigger. We'll see how it works.
Right now I'm 80 hours and $380 into the project. I've got maybe $50 in paint yet to buy. Kilburn Adams and friend came over to look at it this past week and I had it ready to flip with their help. We weighed it at that time at 270 pounds with all the major parts in place. Not sure why the last weigh in was at 300 pounds except perhaps that I had all my tools on board at the time.
It's gone fairly well and I feel like I'm entering the home stretch. I've chased my belt sander across the room just once with but one close call as to cutting the cord to the circular saw with the blade. So far only minor oaths have been required. So far so good.
SOME LINKS