
JOHN BELL'S PROTOTYPE SPORTDORY
Contents:
Contact info:
Jim Michalak
118 E Randall,
Lebanon, IL 62254Send $1 for info on 20 boats.
Jim Michalak's Boat Designs
118 E Randall, Lebanon, IL 62254
A page of boat designs and essays.
(15Jul99) This issue will start a short series about making a small polytarp sharpie sprit sail for Piccup Pram. Next issue, 1Aug99, should finish it.
|
|
Left:
JOHN BELL'S PROTOTYPE SPORTDORY |
|
|
RECAP...
Last two issues I wrote about some of the basics of the sharpie sprit sail. The next two issues will describe in detail how I made a polytarp sharpie sprit sail for my Piccup Pram. Piccup is now ten years old. Its first sail was a 55 square foot balanced lug sail made of real sailcloth. Later Piccup was used as a test bed for my first polytarp sail, a 74 square foot lugsail, which was a total success. Next came a series of three 68 square foot polytarp lugsails which progressed from the vertical broadseam shaping that I used with real sailcloth, to horizontal broadseam shaping, and then to using two radial broadseams. The 68 square foot sail is included in Piccup plans as a handout and I advise using it in lieu of the original 55 footer. This spring I tried my hand at my first triangular polytarp sail, a sharpie sprit sail for Piccup. The details follow.
WE HAVE A PHOTO!...
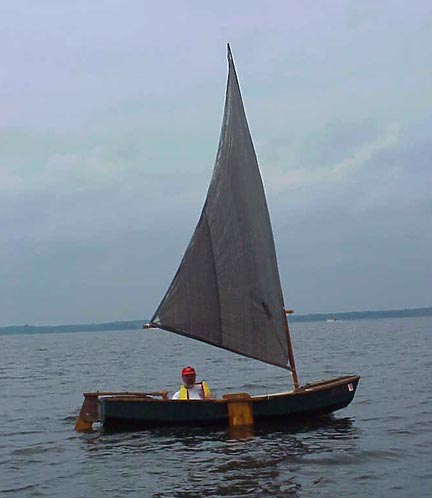
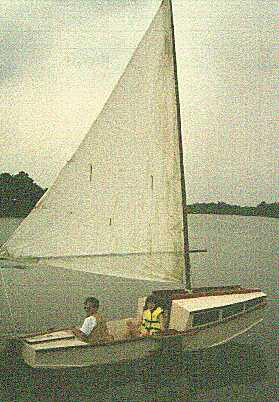
John McDaniel sent me this photo of me in the Piccup at our Rend Lake messabout just four weeks ago. This was the first messabout I can recall where we three days of great sailing even though the weather all around us was terrible. The photo was taken in fairly light wind but the sail's shape shows fairly well. It did quite well in all conditions right up to capsize strength wind. I see no need to change anything. As for longevity of a sail like this, it will take a few years to make a decision on that. I suppose I only could put maybe 20 or 30 hours a year on a sail like this because I spread my boating over several boats and because I have other good sails for Piccup. Anyway, in the photo you can see the grey polytarp with its characteristic "weld" lines. You can also make out the "mother dart" that runs up from the tack to the center of the sail. That is the only shaping dart in the sail. Here is how it's all done. I'm going to give all the details on shaping the sail so that if you want to make something like it but a different size, you can figure it all out.
THE BASIC SAIL SHAPE...
Figure1 shows the basic size and shape of the Piccup triangular poly sail. It's almost identical to the size of the sail Bolger/Payson used for Teal, Surf, etc., just under 60 square feet. The basic triangle is broken up into smaller triangles with the "hub" at point D. All of the sail's perimeter is in the plane of your screen but point D sticks outward 9" giving the thing a bit of a pyramid shape. The 9" z dimension of point D gives a "draft" of about 9% on a sail with a "chord" of 100". But the real life sail won't want to take a pyramid shape for two reasons. First we are going to sew the mother dart with a curve to it when the time comes just like a real sailmaker would use a smoothly flowing broadseam. Second, the flexible cloth actually won't support any sharp corners in its shape. So we get the smooth shape you see in the photo even though we start with crisp triangles.
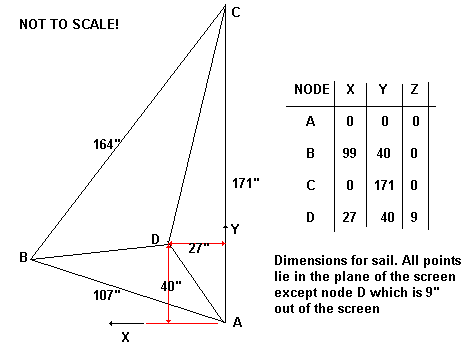
CALCULATING THE LENGTHS OF THE LINES...
Although the picture shown above is two dimensional, the proposed sail is really three dimensional. So to determine the pattern that will give us the three dimensional sail we want we must first calculate the length of all those lines that make up the sail. It's not hard. Here I have done it for the proposed sail:
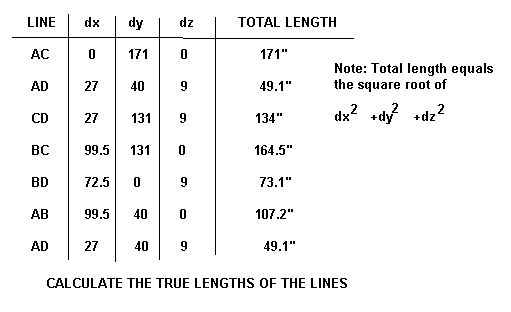
Each line is made up of x, y, and z components. Let's use line CD as an example. C has a location of x=0, y=171, and z=0. D has a location of x=27, y=40 and z=9. So the "x component" of line CD is the difference in the x values of its end points or 27". The "y component" of CD is 171-40=131". And the "z component" of line CD is 9".
To get the true lenght of the line you "square" each component (that is multiply it by itself), add the three squared numbers together, and then take the square root of that sum. For line CD we would get 27 x 27 =729, 131 x 131 =17161, and 9 x 9 = 81. Add those together gives 729 + 17161 + 81 = 17971. Then take the "square root" of 17971 to get the true length of the line as 134.0". This work goes in a flash with a $10 scientific hand calculator. You could also write a spread sheet to let your machine do it.
LAYING OUT THE PATTERN...
Once you have the true lenghts of the triangle segements figured out, laying out the pattern on polytarp is pretty easy.
The hardest part is stretching the polytarp tight and flat. Do your best. I prefer the grey polytarps sold at Walmart, 12' x 24' for $20. There is enough there to make at least two of these sails. The best thing to mark polytarp seems to be a "Marksalot". Having a fresh one handy is best as they get dry and cranky after a while. A chalk snap line is needed as are two measuring tapes.
So with the tarp stretched flat, establish line AC a few inches in from a long edge of the tarp. AC is 171" long so lay out that with a tape, mark the A and C points, and then snap a chalk line between. The chalk line won't be too durable so you might want to spot it in in a few places with the marker.
Next find point D. It is 134" from C and 49.1" from A. So pivot one tape at C set to 134" and pivot the other tape at A set to 49.1". Where those two tapes meet is point D. Mark it with your marker. You have established the true shape of triangle ACD. Continue with triangle CBD and then A2BD. Like this:
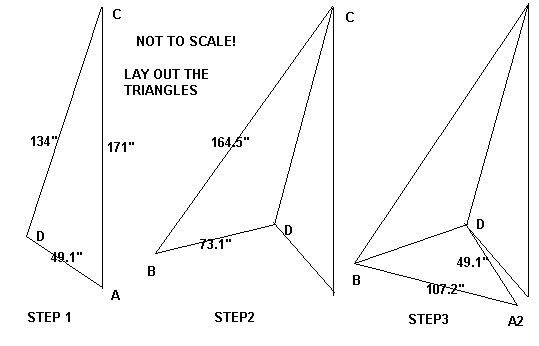
Mark all the points with marker and connect the outer points with the chalk line.
You will have a gap between A and A2. In this sail the gap is 4.4". This gap is very important, being the basis of the mother dart that will shape the sail. Mark it with your marker.
(Don't like doing your math? Reader Richard Spelling made a sail in this way by drawing the basic three sided shape on the porch, placing a block of wood equal to the desired draft in the D position, draping and stretching the tarp over the resulting mold, gathering up the dart and marking all for cutting and sewing.)
TWEAKING THE LINES...
We're not done yet defining the pattern but we're getting close. We need to "tweak" the leach and luff lines a bit for different reasons.
For one thing the line BC which forms the leach of the sail should be "hollowed out" a bit, 2" or 3" along its length, to prevent it flapping in strong winds. That's easily done.
The luff tweak is a bit more involved. What we have so far would work for a mast that is always and forever bolt upright. But real masts bow aft as the sail load is applied. And your mast may not be straight to start with. For a proper fit these things need to be accounted for.
My Piccup mast is rather interesting and is no where near straight. I had the basic lug mast on hand, about 11' long. It was an extended version of the original 9' mast. The extension was made by scarfing on a section of "found" oar that wasn't straight! To get the extra length needed for the taller sharpie sprit sail I did not scarf on another piece but started thinking about trying a "solent lug" approach that Phil Bolger has written about. It is a lot like the gunter rig but the yard is a lot longer and dangles down on its own from the hoist point because the hoist point is nearer the top of the yard. I used an old mizzen mast from my old Jinni as a starting point for the solent yard. But when I mocked it up I sort of said "who needs the halyard" and lashed the yard to the mast top and bottom so it functions as one crooked mast. It has worked flawlessly!
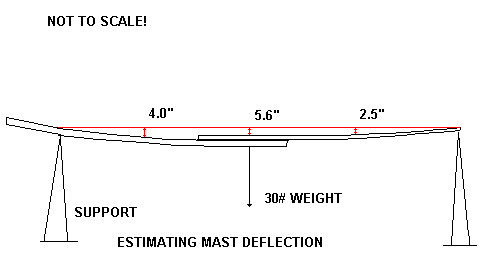
With all the complications of my mast you might think it hard to adjust for flexibility and straightness as we must do. But it is easy. I think the following technique was got from the SailRite "Make Your Own Mainsails" manual I got about 20 years ago but have now misplaced. Very simple. Support the mast on sawhorses where the sail's head and tack will be. Suspend a weight midway between those two points. The weight is equal in pounds to half the sail area in square feet. Then stretch a line between the starting points and measure the deflection at enough points to "map" it out. I just use three points as shown below:
FINAL PATTERN...
Now transfer the leach hollow and the mast deflection to the pattern like this:
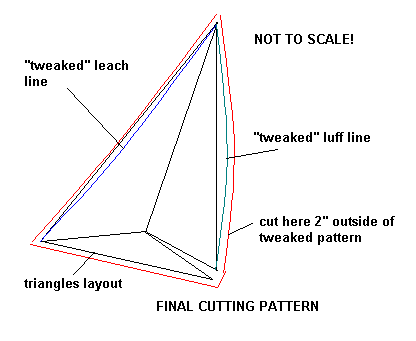
Mark a line about 2" outside the lines as shown to allow some material to fold over the edging. You are ready to cut!
NEXT TIME...
I'll show how to sew it all up.
PENCILBOX
PENCILBOX, CUDDY SAILING SCOW, 15.5' X 5', 300 POUNDS EMPTY
Pencilbox was one of my first designs, a bundle of functionality if not beauty. It was intended to be pulled behind a sub-compact car and be very easy to build and use. The prototype was built by Mark Bustemonte, then of O'Fallon, Illinois, about 7 miles from here. A very good chance for me to check how a first timer follows my plans, see the boat get built, and use it.
Pencilbox has a cuddy cabin which should sleep one comfortably and maybe be Ok for two in a storm. The cabin has a "walk through" feature. With the hatches secure I hope the boat will be safe in a knockdown, and with the flaring sides and wide decks, that she will recover without her captain going for a swim. (He'll get wet since the cockpit will flood a bit.) With the hatches removed Pencilbox will be the best beach boat around. You can stroll from the cockpit, through the cabin, and out the LST style bow to step ashore dry shod. Mark uses the open topped cabin as a secure play area for his little kids, of which he has many.
Pencilbox uses a hull shape that Phil Bolger has explained to us where the curve of the bottom is the same as the curve of the sides. The idea is that as all those surfaces flow through the water, the curvatures are the same and the water pressures are the same from sides to bottom. Then (hopefully) there is no reason for the water to swirl across the chine and raise a fuss. It's not a foolish theory and almost always gives a fast responsive boat by my experience. But the resulting hulls usually have a lot more rocker on the bottom than folks are used to seeing.
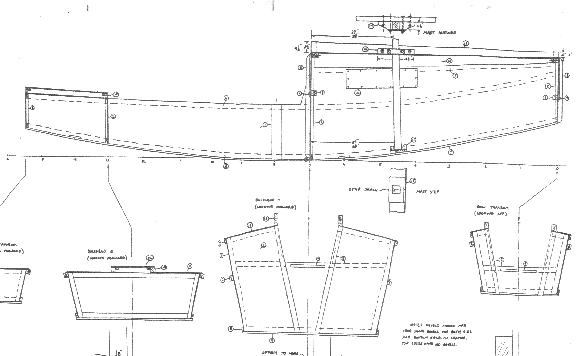
The sail rig uses the main sail from a Bolger Jinni, a sail that found its way into several of my designs including AF3. It steps off-center in the cabin walkway. (The mast step/partner set up is easily modified and should accept a wide variety of rigs.) The pivoting leeboard allows this boat to be driven full tilt across shallows and onto the beach. The leeboard leaves the 6' x 4' cockpit completely open.
Construction is very simple: nailed together in the old fashioned way with no twisted planks, hard bends, or lofting. She needs six sheets of 1/4" plywood and two sheets of 1/2" plywood.
Plans for Pencilbox are $25.
Prototype News
Some of you may know that in addition to the one buck catalog which now contains 20 "done" boats, I offer another catalog of 20 unbuilt prototypes. The buck catalog has on its last page a list and brief description of the boats currently in the Catalog of Prototypes. That catalog also contains some articles that I wrote for Messing About In Boats and Boatbuilder magazines. The Catalog of Prototypes costs $3. The both together amount to 50 pages for $4, an offer you may have seen in Woodenboat ads. Payment must be in US funds. The banks here won't accept anything else. (I've got a little stash of foreign currency that I can admire but not spend.) I'm way too small for credit cards.
Usually when a design from the Catalog of Prototypes starts getting built and is close to launch I pull it from the catalog and replace it with another prototype. So that boat often goes into limbo until the builder finishes and sends a test report and a photo.
Here are the prototypes abuilding that I know of:
Mixer2: Mixer2 is more or less the original Mixer with a rough water bow like Toto's. 12' x 3'9" and about 90 pounds. Has a sail rig. I got a call from a Colorado builder who wanter to learn to sail and apparently has the boat well along. He also built last year a Smoar which is a 12' version of Roar2 and was very satisfied with it. As I talked with him on the phone I got down on my knees and begged for photos.
RB42: This is an 18' rowboat meant for two. It's never been in any of my catalogs but the Canadian builder has it completed. Imagine the Oracle shown in the 1may99 issue stretched to 18' and you have it. Here are some photos. It looks like a V bottomed boat in the photos but the center has a narrow flat bottom plank so it is really a multichine. Very nice job! By now this boat is probably launched and tested. Waiting for a report.

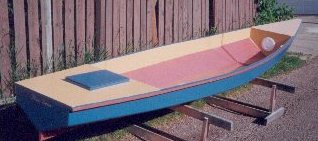
Mayfly12: A Mayfly12 is going together up in Minnesota. The decks are on and he's into the sailing bits. By the way, the sailing bits on almost any sailboat large or small consume about half of the effort in labor and materials. Just when you thought you were about finished!
AF4B: A builder in Virginia is building AF4Breve, a 15.5' version of the 18' AF4. I tried to talk him into building the 18' version but he had two very good reasons to go shorter - a short trailer on hand and insufficient building space for the larger boat. The AF4B is essentially a "scrunched" version of AF4 but comes from a whole new set of drawings.