
FRANK WINTER'S ROAR2 (best to lower that rowing seat a few inches)
Contents:
Contact info:
Jim Michalak
118 E Randall,
Lebanon, IL 62254Send $1 for info on 20 boats.
Jim Michalak's Boat Designs
118 E Randall, Lebanon, IL 62254
A page of boat designs and essays.
(1Aug99) This issue will complete the series about making a small polytarp sharpie sprit sail for Piccup Pram. Next issue, 15Aug99, will really finish this series with some more poly sail patterns for the record - a 74 square foot lug sail, and a 113 square foot lugsail.
WEBSITE ALERT...
Chuck Leinweber over at Duckworks Magazine is a builder and user of homemade boats and has a great website with lots of project info. He has just added a section on boats built by Dejan Petrovic in Sweden. The boats are interesting and thought provoking. Dejan is a regular reader of this site and I've enjoyed his participation. Thanks to both Dejan and Chuck!
|
|
Left:
FRANK WINTER'S ROAR2 (best to lower that rowing seat a few inches) |
|
|
RECAP...
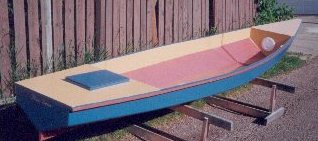
Last issue presented the basics involved in figuring out the flat pattern needed to make the 59 sq.ft. sharpie sprit sail, made from common polytarp, shown in this photo.
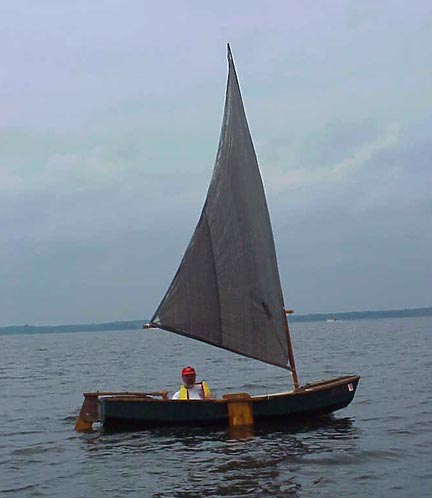
The pattern is calculated to provide a 10% draft to provide an airfoil shape. I received a question as to where the maximum draft point should be. It's a bit of a guess but usually that point is about 30% aft of the leading edge of a normal airfoil. Other than that I put it where it looks right to me. Place it too low on the sail and the material may not like to maintain the resulting "shelf". Too high and you will loose the draft effect in the lower part of the sail. (I know I'm not helping much with such vague advise.) Then I showed how to tweak the basic calculated pattern to allow for mast bending and leech flutter. The result of all of this is a pattern shown below, ready for your scissors.
BASIC MATERIALS AND TOOLS...
Here is what I used to make the sail in the photo. First a 12' x 24' grey polytarp from Walmart (about $20 with enough material to make at least two of these.) A 1 ounce cone of V-69 thread ($4.35) plus a bag of #3 "Handi-Grommets" ($4) from Sailrite at 1-800-348-2769. Plus about 50' of 3" wide fiberglass tape which I get from Wick's Aircraft Supply at 1-800-221-9425 for $20 for a 50 yard roll. I also used a very small amount of Dacron sailcloth for corner reinforcements. Actually if you buy the above amounts you will have enough for at least two sails of this size, so the cost of each sail might be something like $30.
In the last issue we talked about laying out the basic pattern with a chalk line, two measuring tapes, and a felt tip marker. Now all you need are scissors, the grommet setting tools (Sailrite has those too, and a home sewing machine. Best if the machine will do a zigzag stitch, the bigger the better. Most any home machine can sew polytarp easily.
A WORD ABOUT SEWING...
Most of you consider it "women's work" and don't think you can do it. But you can. I had no sewing experience before making sails. The best way to start is to read the machine's manual. Usually the manual is long thrown away so the next best thing to do is read the "thread path" diagram that is printed on the machine because the machine makers know the manual dies a quick death. Rig it up and practice. Use the biggest zigzag stitch the machine has (usually about .2" wide). Practice with different tensions on the thread. Don't expect the feeder to pull the slick cloth evenly through the foot - you will need to help it a lot by hand. Before you start a line of sewing pull the two loose ends of the thread away from the foot so they don't get tangled up in the new line you are starting. Oil the machine a bit. Don't know what else to say except to practice and swallow your pride and ask a woman for advice if you need it.
Sewing's not for you, you say. Others have tried all manner of tapes and glues with varying success but I never have and can't give any advice there. Sewing works very well.
THE GREAT MOTHER DART...
This sail has only one shaping dart. If you look closely at the Piccup Pram photo above you will see a dark line radiating form the sail's tack to the center. That is the mother dart. (There is a dark patch at its end where I goofed and had to sew in a doubler).
Here is what I suggest about the mother dart. It is about the most important sewing operation on the sail and you should practice it a few times on scrap (like I didn't do).
The following drawings lead you through the sewing of the mother dart.
In words, first you fold the cloth along the center of the dart which is formed by a triangle from points A, A2, and D, such that A and A2 are atop each other. Usually it is best to keep this fold well secured with paper clips or clothes pins.
The next task is to run a line of straight stitching from A to D, but not right along a straight line from A to D. Instead use a smoothly curving line, sort of like half a golf tee as shown in the drawing, starting at A and ending at D. The idea of the smooth curve is to give the sail a smooth shape. Actually, when have the line A to D sewn, you have completely established the shape of the sail.
Next pull the sail out tight across the joint. It won't lay flat anymore because you have sewn in its 3D shape. The dart you have sewn in will now be a flap of cloth. Fold it against the sail and sew it down with a zig zag stitch. Then sew over the straight stitch line with another line of zigzag stitches. You're done!
CORNER PATCHES...
The corners of the sail are where almost all the forces go in and out of the sail so they must be well reinforced to handle the load. I have found that two layers of 4 ounce sailcloth are enough for a small sail like this one. Two layers of polytarp aren't enough. I have used four layers of polytarp in corner patches with success but I feel this is one area where it doesn't pay to skimp. If you can't get a bit of real sailcloth to do the job, try a stiff heavy cloth maybe like canvas or heavy denim. Or six or eight layers of polytarp.
Here is how I do it:
So to make a two layer corner patch I use a single piece of sailcloth folded in half. Sailcloth should normally be cut with a hot knife to seal its edges and prevent unravelling but with the folded method you can use regular scissors because there will be no exposed edges on the patch. For the Piccup sail I made the corner patches 8" long on the edges that border the sail's edges.
The first step is to mark on the polysail where the patch will be. Then fit the cloth to the corner and trace the shape onto the cloth. Fold it over and secure the folded part to the first part. With sailcloth tape works well to secure the two folded layers together. Then cut the patch out both layers at once. Fit the patch into the tarp and secure temporarily with tape. Then sew it to the tarp with two lines of zigzag stitch as shown. That's it! It will be sewn further when we sew down the edging. If you look closely at the photo of the Piccup you will see the while patches in the corners.
THE EDGING...
Next comes the edging which includes a strengthening fiberglass tape and a folded over hem. Like this:
Start with the reinforcing tape. For this I use ordinary 3" wide fiberglass tape, the same stuff you use to make a taped seam hull. An even better edging might be say 1 or 2" nylon webbing but I've never tried it. The purpose of the edging is to strengthen the edge and especially to stiffen it. Here is how I did it:
First the 3" wide tape is folded in half to 1-1/2" wide. Then you place it flush to the edge pattern line and then you sew it down the middle with a zigzag stitch. In the corners the tape overlaps the corner patches. Fiberglass tape sews very easily.
Next you fold the 2" wide hem material over the glass tape and sew it down with a zigzag stitch. With a little luck that sew line will also pass through the glass tape.
You're done sewing!
THE GROMMETS...
Press a grommet into each corner. (It won't hurt to practice a bit with the grommet tools. The grommet should be tight in the material such that you can't spin it in the material, yet not so tight that it cuts the material.) In the corners you will be going through a lot of layers - two layers of polytarp, two layers of sailcloth, and up to four layers of glass tape if you are lucky. Then set grommets about every 15" on the luff.
I prefer to tie the luff to the mast with individual loops but you can lacing or any method.
Good luck!
NEXT TIME...
I'm going to show polytarp flat patterns for two lugsails, one of 74 square feet and one of 113 square feet.
VIREO
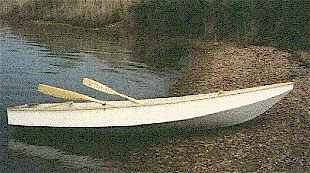
VIREO, LIGHT ROWBOAT, 12' X 45", 60 POUNDS EMPTY
This is a repeat of last year's view of Vireo. It is one of my personal favorites and I want to keep it up front.
Vireo is a very light and simple boat with lines that make for very surprizing performance. A while back I built a dink called WeeVee which was the usual 7-1/2' long. It had a V bottom full length and had to be quite deep in the V to get enough capacity (displacement) to carry anything. I've always thought is was one of the fastest rowing dinks ever built as it would go 4 mph with medium effort, unheard of for such a short boat. But the deep V made for problems, the worst being that it made beaching a challenge. The bottom of the V was 9" below the waterline in usual trim so as you approached the beach the center of the V would ground first usually well before you made the shore. And there you balanced precariously until you threw a foot over the side and got wet. It was OK when launching from a dock, of course, but I seldom do that. Later I found I could heel the boat over when approaching shore and get in a lot closer but it was always tricky. She was a bit tippy but that was no problem once you were seated.
So that's how you learn and things evolved quickly into Vireo. Vireo is over 50% longer than WeeVee but is still only 12' long. She has a long lean bow for splitting waves. The V of her bottom is a lot shallower than with WeeVee and although she still needs heeling when beaching, the angle of the heeling is greatly reduced.
I think this shape has great potential, perhaps is the fastest of of any simple plywood shape. Here is why I say that. I try to draw these such that at normal weights the chines will not push through the water, that is to say they are normally above the waterline. Only the two bottom panels flow through the water. Those two panels join only at the centerline and in straight motion no water would cross that joint. So the flow is smoothly down two gently curving panels with no joints or complications. In addition, the shape makes for a boat that cuts chop and likes to go straight. But the V bottom means it won't beach as well or be as easy to move around in as a boat with a flat bottom panel.

The first Vireo was built by Charles McMahan in Ohio. He used lauan underlayment and lumber salvaged from motorcycle crates or from the Ohio River. The Vireo in the photo was a delux version built by Frank Kahr of Providence, RI. Frank wrote me:
"Yesterday I accomplished a long term goat by rowing from Providence to Newport in a Vireo I built from your plans. This was trip of approximately 26 statute miles which took 6 hours, 12 minutes. I had a little help from a fair tide, but this was still a good time for a long trip made without great physical effort."
"I think the Vireo is a good balance of light weight, seaworthiness, and speed. A longer narrower boat would be faster, but would also be less stable and would have less spread at the oarlocks. I built mine from 6mm Okoume plywood with a permanent center rowing thwart. It weighs only 57 pounds and is very easily managed out of the water. I have built several other small boats and this one went together easily in about 30 hous. The plans were very clear."
Vireo plans are $15. Taped seam construction from three sheets of 1/4" plywood. No jigs or lofting required.
Prototype News
Some of you may know that in addition to the one buck catalog which now contains 20 "done" boats, I offer another catalog of 20 unbuilt prototypes. The buck catalog has on its last page a list and brief description of the boats currently in the Catalog of Prototypes. That catalog also contains some articles that I wrote for Messing About In Boats and Boatbuilder magazines. The Catalog of Prototypes costs $3. The both together amount to 50 pages for $4, an offer you may have seen in Woodenboat ads. Payment must be in US funds. The banks here won't accept anything else. (I've got a little stash of foreign currency that I can admire but not spend.) I'm way too small for credit cards.
Usually when a design from the Catalog of Prototypes starts getting built and is close to launch I pull it from the catalog and replace it with another prototype. So that boat often goes into limbo until the builder finishes and sends a test report and a photo.
Here are the prototypes abuilding that I know of:
Jonsboat: I suspect a few of these have been built but I've never gotten a report. Just got word of at least one more going together and hopefully we'll get a photo and a report.
RB42: This is an 18' rowboat meant for two. It's never been in any of my catalogs but the Canadian builder has it completed. Imagine the Oracle shown in the 1may99 issue stretched to 18' and you have it. Here are some photos. It looks like a V bottomed boat in the photos but the center has a narrow flat bottom plank so it is really a multichine. Very nice job! By now this boat is probably launched and tested. Waiting for a report.

Mayfly12: A Mayfly12 is going together up in Minnesota. The decks are on and he's into the sailing bits. By the way, the sailing bits on almost any sailboat large or small consume about half of the effort in labor and materials. Just when you thought you were about finished!
AF4B: A builder in Virginia is building AF4Breve, a 15.5' version of the 18' AF4. I tried to talk him into building the 18' version but he had two very good reasons to go shorter - a short trailer on hand and insufficient building space for the larger boat. The AF4B is essentially a "scrunched" version of AF4 but comes from a whole new set of drawings.
Herb builds AF3 (archived copy)
Hullforms Download (archived copy)