LARS HASSELGREN'S LARSBOAT
Contents:
Contact info:
Jim Michalak
118 E Randall,
Lebanon, IL 62254Send $1 for info on 20 boats.
Jim Michalak's Boat Designs
118 E Randall, Lebanon, IL 62254
A page of boat designs and essays.
(1Mar99) This issue will describe how I have done my own taped seam boats. Next issue, 15Mar99, will discuss things like the "prismatic coefficient".
NEAT WEB SITE...
I forgot how I found this one but it's pretty interesting. Click on the PakYak, a fabric kayak that folds up into a backpack. Quite detailed, if fact with imagination there may be enough info there to build one.
|
|
Left:
LARS HASSELGREN'S LARSBOAT
|
|
|
HISTORY...
I remember seeing taped seam construction first in an article in the old Small Boat Journal about Sam Devlin's efforts. That was probably about 15 years ago (time flies). But by then the method was old in England. I think it was "invented" by an Englishman in the late '50's and was quite common there by the 70's. The Mirror dinghy was done that way with kits meticulously made from plywood with notches and tabs to fit the pieces together like a balsa model airplane kit. I visited England in 1982 and saw hundreds of Mirrors stacked on end at Portsmouth. Around the same time kit makers like Clarkcraft were selling kits of kayaks made that way but they called the method "sewn seam" which I think threw some of us off. "Sewing plywood together with wire - that sounds hard!" I said to myself. Harold Payson and Phil Bolger tried it in the early 80's with several designs that are still around. Harold called it "tack and tape" because at the time he didn't like using wires to temporarily fasten the panels together. He used small nails and adhesive tape, then hot melt glue, but eventually came around to using wire like everyone else.
My own taped seam history started about 1985. I made a Payson/Bolger dory with taped seams even though it was originally designed to be made on a ladder frame with chine logs in the old fashioned way. Payson's book "Build Your Own Boat" had the complete dory plans and also included the side panel expansions! It was easy to build a taped seam version with no ladder frame. Harold used polyester resin in his projects probably for the same reason others have used it - it's cheap and available. So I used it too on that dory. I tried ordinary automotive Bondo to fillet the seams instead of the resin/filler mixes that Payson advised. That boat had but one layer of glass inside and out. I used it for about five years until it got crushed by another boat in a tornado. The transom tapes were ripped (but the polyester resin held), and the boat was sort of opened wide. I gave it to Jim Huxford who repaired it and still rows it. In many ways my boat Sportdory is a rework of that old dory.
Next for me came the Payson canoe, multichine taped seam boat. Also built of cheap plywood with polyester resin and automotive Bondo in the late 80's. It eventually went to Bob Archibald who may still have it.
Next for me was Piccup Pram in 1989. Cheap plywood and polyester resin and Bondo again. I still have it and use it. It's seen a lot of use.
Next was Roar (which evolved into Roar2) about 1990. Cheap plywood and polyester resin and Bondo. Still have it and it has seen a lot of use.
Next I think was Toto which sort of evolved from the Payson canoe. Cheap lauan plywood with epoxy resin this time but still with Bondo fillets. Still have it and it's seen a lot of use.
The last was WeeVee which used cheap lauan plywood and reverted back to polyester resin and Bondo. Still have it but it hasn't gotten the use of the other boats.
"What's with all the polyester resin and Bondo?" you ask. Anyone who mentions using these in the rec boatbuilding newsgroup gets pounded and made fun of. Even 15 years ago Payson was attacked for building with polyester. I didn't know any better and have really had no troubles. Whenever I use one of my polyester boats I tell it, "You'd better start falling apart soon. You're making those experts look bad and they are going to pound me on the newsgroup and make fun of me." So far my boats haven't listened.
Polyester has certainly worked OK for me. My boats are stored under cover as a rule (although some have been outdoors for months at a time). That may be a factor in their longevity with polyester. Where I live you can never expect to get your money back on a homemade boat, even the cost of materials. I think when we started 15 years ago we got polyester for $13 a gallon (good stuff too) while epoxy went for about $70 a gallon. Now we know where to get much cheaper epoxy. So now I advise epoxy although maybe it's only because I've caved in to the newsgroup. Of course if you are using expensive plywood, etc., you need to use epoxy.
But now to the main story - how I tape seams.
SECURING THE JOINT WITH WIRES....
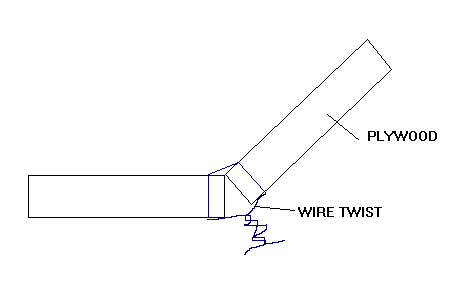
(This is how I do it. Others have their pet methods.) Not much too it. My boats are all designed from the inside out, so to speak. The dimensions are arranged such that the panels should make kissing contact on the inside edges as shown above. Usually the project is upside down at this time, sides, bulkheads stem and stern fastened together, and you are trying to put the bilge or bottom panels on with taped seams. You put the panels into position and drill pairs of holes about every 12" around the perimeter, about 1/4" in from the edges. You take pieces of soft wire, I prefer stainless steel aircraft "lock wire" but almost any wire will work if it is pliable, and cut lenths about 6" long and form them into a long U shape like a staple. Get inside the project and push the wire staples up through the holes so that the ends now stick out through the outside. Get outside with a pair of pliars and twist the wires until they tighten the panels together. If you overtighten you might break the wire or tear the wire right out of the wood. Eyeball the joints to make sure they are fair. You can open a joint up to maybe a half inch if it will help. If two panels are binding too tightly, you can run a saw down the joint to loosen it up. I think a small gap or V is preferred because it allows resin to flow in and seal the ends of the plywood. But the joint fit is really not too critical.
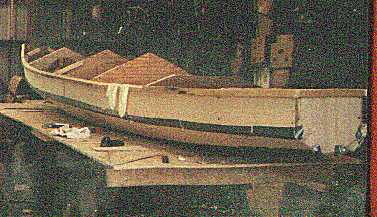
When all the panels are wired in I like to go over the outer joint with duct tape to further secure things and to provide a dam for future flowing fillets. Then flip the project upright. Here is what the prototype Larsboat looked like at this stage. You can see the duct tape and can make out the wires.
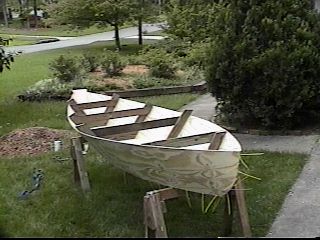
There are variations allowed of course. The spacing of the wire twists can be anything needed to secure the panel into position. You may need more wires in places. Some folks don't use wire. John Bell used nylon wire ties on his Sportdory as you see here:
Not all panels are edge to edge, of course. Bulkheads are sort of T joints and are a bit trickier to fit. They would join like this:
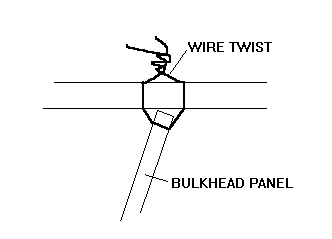
THE INNER SEAMS...
Flip the boat upright. Prepare to fillet and tape the inner seams by pushing the wires on the interior hard against the plywood with a screwdriver to make them easier to cover. (One disadvantage of using nylon wire ties might be that they won't stay hard against the plywood.)
Then precut the fiberglass tape to length and lay the pieces out in a logical way so you can grab them quickly when needed. I always use 3" wide glass tape. It has no adhesive but is only called tape because of its form. It's edges are treated to prevent unravelling. When loaded with set resin the edges will be bulkier than the center of the tape, leaving a ridge. Some folks don't like the ridge. Some folks cut glass cloth into strips to avoid the ridge. I've tried that too to it unraveled and I ended up with a lot of glass hair flying around. I prefer the ridge which is easily ground down after the resin sets.
THE REAL TRICK TO GETTING A GOOD TAPED SEAM...
...is to do a seam all at once if possible. That would mean putting down the fillet and then the tape straight into it before the fillet sets. If more than one layer of glass is involved you put the extra layers right onto the first ones before they set. This way you avoid all the nasty sanding you face if you let a layer cure first. (Any cured resin system must be sanded before applying another layer, or paint.) It saves a tremendous amount of work. And you can be sure the whole thing is bonded together. So when you start you must have all you stuff together and ready to go.
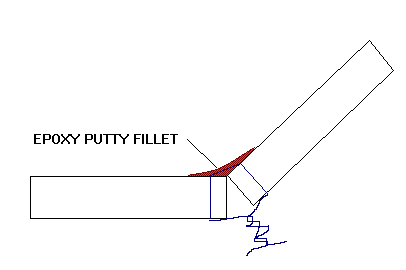
In epoxy here is how I would do the job. Mix up some unthickened slow setting epoxy and brush it on the joint with a disposable bristle brush to "prime" the joint. (Some say the prime is a waste since epoxy doesn't really penetrate wood as some ads imply.) Mix up another batch with filler to make filleting mixture about as thick as Bondo. I think most any common filler is OK since you won't be sanding it. See Dave Carnell's page down in the links to get his view on epoxy and fillers. Lay down a fillet of the thickened epoxy over the joint and right over the wires. For a filleting tool I would recommend a tongue depressor 1" wide. I've heard a 3D tool like a tennis ball on the end of a stick is even better. In my view the fillet has to be there for strength but it should not be too large, say no more than 1" wide. It need not be perfectly smooth now but you will have to scoop up stray globs with a putty knife. The fillet should look like this:
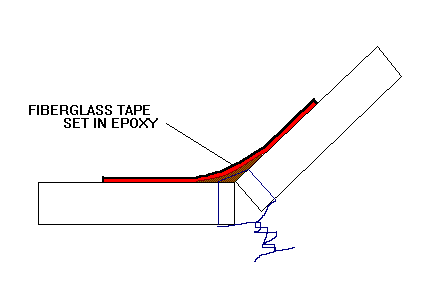
Next brush some more thin epoxy over the joint and put the tape straight on top. Brush in more resin to saturate. The tape and the brushing will help to smooth out the fillet. Doing it this way you will most likely need to do short stretches at a time, maybe three feet. No problem with slow epoxy. Just do a stretch and pick up again at the unfinished end. When this all cures you will have a good interior joint with no sanding!
Here are two possible problem areas: One is where a temporary form blocks the tape job. Let it go for now and just end the tape an inch or so each side of the form. Finish later when the outside is done and the forms can be removed. Second is at corners such as where side bilge and bulkhead all meet. Fillet the corner with putty. Cut the tapes such that they will all overlap about an inch at the corner. Paste them down one by one into the corner. You will find that the tape is flexible enough to conform to the corner shape and yet the overlap is plenty to provide continuity.
Here is how I would do the job in polyester. The Bondo will usually set faster than you can slap down the tapes with polyester resin. I'll bet an expert would know how to catalyze the Bondo and resin such that you could get the thing to cure all at once as with the epoxy. You might experiment. Unlike epoxy, with polyester you can vary the catalyst to get different curing times. If you don't feel comfortable doing that, do this: Make the fillets in Bondo and let it cure hard. Sand it smooth with rough sandpaper, either a strip rolled into a tube or taped to the edge of a board rounded to the proper radius. Another handy way to sand the interior fillets is with a 2" rubber disk in an electric drill with very coarse paper. Then paste the tapes down with polyester resin as with epoxy. (On Toto I pasted the tapes down with epoxy resin over the Bondo joint.)
TAPING THE OUTER SEAMS....
These are simple compared to the inner seams.
Snip off the wires as close to the wood as possible. Some builders pull the wires out, sometimes first heating them, but I never had consistant luck with pulling wires. Stainless or copper wires left inside won't rust. Plain steel wire will rust although that is really a only cosmetic problem.
Fair the outer seams with putty as required. Most likely you will have to let the putty cure hard and sand to shape, unlike the inner seams. Radius the seams too - you don't really want a crisp sharp edge.
It's best to mask off the sides or any place the resin might dribble and drip. It will always dribble and drip when you aren't looking. Don't expect to outsmart it.
Next cut your tapes to length. Brush the seam with epoxy and slap the tape down and saturate the tape with more epoxy brushed in. Like this:
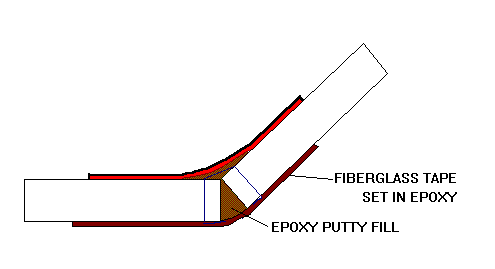
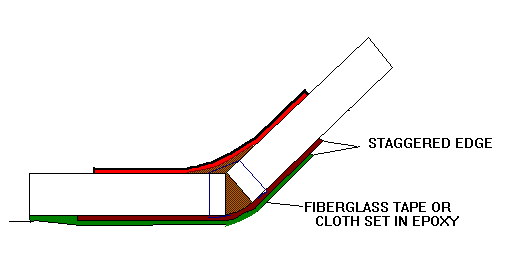
Usually I advise more than one layer of glass on the outer seams to allow for some abrasion. Often I will put a layer of glass cloth over the bottom panel for the same reason. I have never glassed the total exterior or interior of any of my boats. The second layer goes right over the first before the first cures. Saturate well. Look for dry spots that will appear white whereas saturated glass appears clear. The edge of the second layer should be staggered a bit from the first layer like this to prevent a big ridge on the edge.
FINAL WORK...
After cure, sand lightly but not through the glass. I do feather out the glass edges with a rubber disk sander in a drill with pretty coarse paper. Then I give the tapes a light layer or two of filler to fill any weave followed by another light sanding. Then I try to accept any remaining imperfections and paint the hull. You can wear yourself out being a perfectionist about this and you are welcome to do so. If your boat gets hard use you won't notice those imperfections at all after once or twice to the lake.
And remember those places where the temporary forms stopped the interior tapes. Once the forms come out, sand and rough up the ending points, fillet and tape those final gaps.
YOU'RE DONE!
NEXT TIME...
I'll look at the mysterious prismatic coefficient.
LARSBOAT
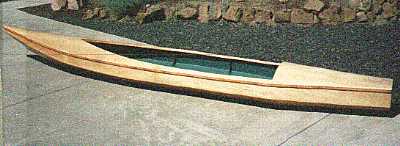
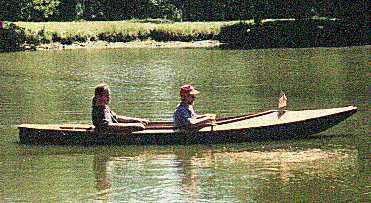
LARSBOAT, DOUBLE PADDLE CANOE, 15.5' X 30", 65 POUNDS EMPTY
Larsboat was built by Lars Hasselgren to replace a Folboat that had finally met its end. Lars wanted capacity for two, plus decking, as with his old boat.
I took Toto and lengthened it with a 30" plug in the middle to gain capacity. But lengthening a hull with a straight plug like this usually improves a boat in almost every way and Larsboat should be faster than Toto in good conditions. In this case the plug meant I didn't have to refigure the shape of the twisted bow panels as I would if I'd lengthened Toto with an overall stretch. (I can figure twisted panels pretty reliably now, but not back when Toto and Larsboat were drawn.)
The decking was quite simple because even the original Toto could take a forward deck of flat sheets with a center peak. I should add that I feel the decking is very optional. This prototype weighs 61 pounds and deleting the deck might cut another 10 pounds or so. The undecked boat also would have a better cartopping shape. I'd keep the stern chamber. It will ease your mind about taking a big wave over the stern.
This would be a preferred project for someonw who intends to do a lot of cruising and camping. In the Toto camping I've done the sleeping room has been OK, but the storage is limited. Larsboat would be better both because of increased capacity and because there is dry storage under the bow deck.
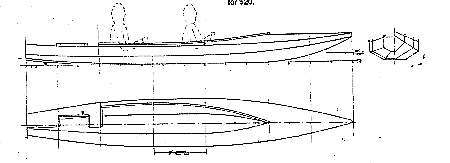
The basic hull is taped seam construction needing four sheets of 1/4" plywood for the decked version and three sheets for the undecked version. No jigs or lofting required. Plans are two blueprints with keyed instructions plus Toto's detailed taped seam instructions for $20.
By the way, the photo above is of Bob Smithson's Larsboat. He customized the decking a bit. I think he also built the boat of 1/8" ply to save weight. I've forgotten what his boat weighed but he did say it was sufficiently rigid for him.
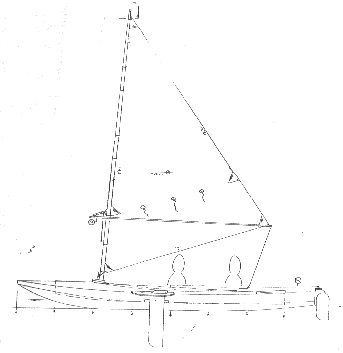
I also drew up a trimaran sailing rig for Larsboat called "Trilars" which is sold separately for $10. It is pretty much a clamp on rig except for the small mast step and partner. To date no Trilars has been built that I know of. (Trilars is no longer in my paper catalog.)
Prototype News
Some of you may know that in addition to the one buck catalog which now contains 20 "done" boats, I offer another catalog of 20 unbuilt prototypes. The buck catalog has on its last page a list and brief description of the boats currently in the Catalog of Prototypes. That catalog also contains some articles that I wrote for Messing About In Boats and Boatbuilder magazines. The Catalog of Prototypes costs $3. The both together amount to 50 pages for $4, an offer you may have seen in Woodenboat ads. (If you order a catalog from an internet page you might state that in your letter so I can get an idea of how effective this medium is.) Payment must be in US funds. The banks here won't accept anything else. (I've got a little stash of foreign currency that I can admire but not spend.) I'm way too small for credit cards.
Usually when a design from the Catalog of Prototypes starts getting built and is close to launch I pull it from the catalog and replace it with another prototype. So that boat often goes into limbo until the builder finishes and sends a test report and a photo.
Here are the prototypes abuilding that I know of:
IMB: Click here to visit Tim Webber's page and see some photos of the Texas IMB under construction. Then poke around Tim's web page a bit. I heard this week from the Texas IMB builder who said, "I want to let you know that IMB is alive and looking good. She is now right side up and sitting on her cradle. Soon this boat and carrier will be mounted on the small trailer I have ready......"
Fatcat2: There is an old timer (80 years +) in Minnesota who has completed the hull of a Fatcat2. Fatcat2 is a simple 15' x 6' catboat, gaff rigged and multichined. I think the sail rig will be done this coming winter. Not only has he finished the Fatcat2 hull but he has started a....
Twister. The Twister hull is pretty well cut and fitted, ready to tape. Walt lives north of Green Bay, working in an unheated shed. He tells me there will be no more building until things warm up again next year in late Spring. If you live up there and would like to contact Walt, let me know.
Mixer2: Mixer2 is more or less the original Mixer with a rough water bow like Toto's. 12' x 3'9" and about 90 pounds. Has a sail rig. I got a call from a Colorado builder who wanter to learn to sail and apparently has the boat well along. He also built last year a Smoar which is a 12' version of Roar2 and was very satisfied with it. As I talked with him on the phone I got down on my knees and begged for photos.
Herb builds AF3 (archived copy)
Hullforms Download (archived copy)