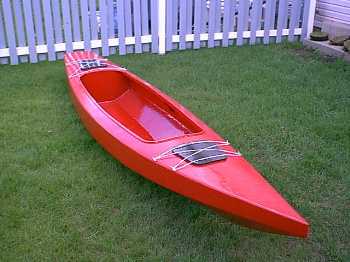
Rob Cole's Toto Deluxe.
Contents:
Contact info:
Jim Michalak
118 E Randall,
Lebanon, IL 62254Send $1 for info on 20 boats.
Jim Michalak's Boat Designs
118 E Randall, Lebanon, IL 62254
A page of boat designs and essays.
(1Aug00) This issue continues a series about sailing for nonsailors, this time about sailing to windward. Next issue, 15Aug00, will continue with sailing on reaches and runs. toto

|
Left:
Rob Cole's Toto Deluxe. |
|
|
SAILING FOR NONSAILORS 2
SAILING TO WINDWARD...
I'm going to start the sailing lessons with thoughts about sailing to windward. I know there is a saying that "gentlemen never sail to windward" but the rest of us usually have to. The reason it is important is that you often spend most of your time sailing to windward. In general your progress to windward is only one half or one third that of sailing downwind in the same breeze. For example, if you had four hours available to you and had to start by sailing downwind, you might sail downwind no more than an hour, then turn around to slog back into the wind for the next three hours.
FIRST, GET PREPARED...
Don't take a new sailboat to a lake without first setting it up in your yard, sail and all. Do it several times and make sure everything is in working order. I know the neighbors will think you are nuts but at least you will be close to your tools and materials to make needed changes. Hey! One of the first homemade boats I ever saw was a small catamaran at Carlyle Lake. But I never got to see it sail because the builder, after having assembled the project on the beach, found he had left his sail 60 miles away back home!
As you practice setting up the rig, take careful note of sail trim. By that I mean to get the sail shaped as well as possible. That almost always means setting the halyard and tack lines really tight to eliminate wrinkles in the sail. That is usually easier for a triangular sail than for a four sided sail like a lug or gaff sail. And remember, the stresses in the sail change with wind speed and loading in the boat. So a sail set up in light winds may not do well in high winds. I always prefer to set the sail too tightly and then relax things later if required. Almost everything conspires to relax the tightness of your rig as you sail.
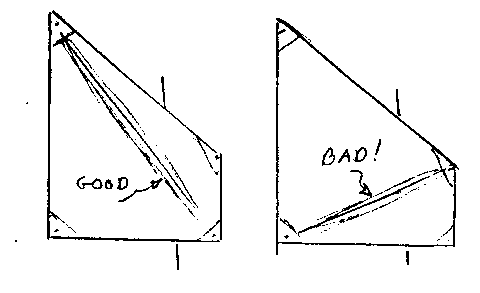
Remember this picture from an issue a while back. If you have a lug or gaff sail try for the "good" girt.
Here is a photo of Jerry Scott's IMB on its first sail:
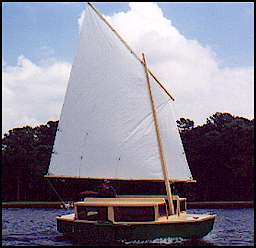
This sail is set up about perfectly. There seems to be little twist to the sail which always harms the sail's drive. There is a very small girt running from the throat towards the clew. I'd bet that girt totally disappears sailing on the other tack where the yard and sail will not drape over the mast.
Here is something else that is very important to check in these dry tests: Make sure all your main sheet, which is the line which controls the boom, is easily at hand when you are seated properly in the boat.
By the way, even in these dry tests the boat can capsize, especially since you may not have any crew weight in the boat. I've heard of large boats being blown off their trailers when the skipper raised the sails in a dry test.
Lastly, keep tinkering with things until you are satisfied. I guarantee that any little problem you might have in the back yard could be a big problem on the water.
NOW CHECK THE WEATHER...
The grand breeze that makes the big boats go fast is not what you want. The best wind to test almost any small sailboat is about 7 knots. Lighter is better than stronger although once the wind gets below about 5 knots some boats will be sluggish to the point where they may not steer well and certainly won't be interesting to sail. A lot of boats will have enough sail to capsize a new skipper if the wind gets over about 10 knots and often the water can start getting rough in that wind.
I know that doesn't sound like much of a window, 5 knots is too little and 10 knots too much. Here is why that is true. The force on the sails is proportional to the square of the wind speed. So if you double the wind speed from 5 to 10, the force on the sail will go up by a factor of 4. If the wind gusts from 5 to 15, the force on the sail will jump by a factor of 9. It's a big change.
My own feeling is that good wind conditions are so important to a new solo sailor that they are worth waiting for and taking a day off from work to capture. Listen to the NOAA radio in your area for the forecast and for the actual winds. When conditions are just right, call in sick and go sailing. Don't show up for work the next day with a fabulous tan.
When you are learning to sail alone, don't do things that could add pressure to the situation, like taking along a group of non sailors or entering a race.
LAUNCHING TO WINDWARD...
I think launching a boat to windward off a shore is one of the most difficult things to do. One advantage of launching into the wind is that if things go wrong you will get blown back to where you started!
I'm assuming you have a boat small enough to push off the shore. As we go along I'll update the text to suggest how to deal with a larger boat.
Actually I don't recall ever seeing the following description in textbooks. I think the textbooks all start with the assumption that you are launching from a dock or from anchor.
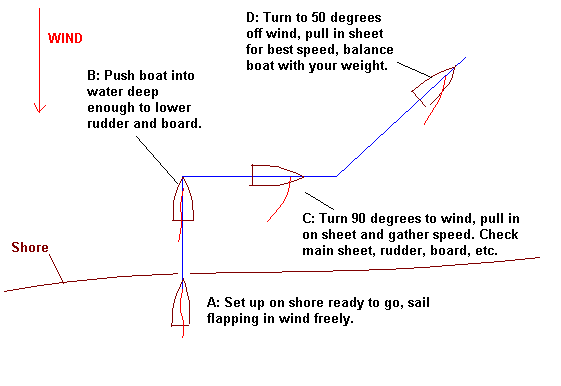
First lets start at A, with the boat completely set up on the beach. Have it facing directly into the wind with the sail flapping in the breeze. Make sure all is ready, the sail tightened to its best trim, the rudder and board (leeboard, daggerboard, or centerboard) all ready to be dropped or pushed into position. Also make sure that any seating areas are prepared, all the clutter cleared away and the mainsheet loose and not underfoot or fanny. If you are sitting on cushions make sure they are in place. The point is that once in the water everything has to be ready to go in a few seconds.
Next you have to push the boat out into the water to position B. Here the water must be deep enough to get your rudder and board almost all the way down. She is still pointed into the wind. You can often walk a small boat out this deep and still hop in. My favorite way of getting to B is by getting the boat out deep enough to float, jump in, grab an oar and push out. With each push of the oar you will get a feel for the depth of the water.
Once in B make sure the rudder and board are pretty well down, make sure there is no clutter in the boat in your way, especially that the main sheet is free, and get seated.
Give the boat one last push or give a flip to the rudder to turn the boat 90 degrees to the wind as in position C. Pull in on the sheet a bit to fill the sail and the boat should move forward. Here is the reason for all this posturing: A boat can't sail to windward without a bit of forward speed. The rudder usually needs about 1 mph steerage speed to be effective. The board usually needs a little more, especially as the boat is turned to windward and the side loading caused by the sail becomes significant. That is why you arrange things to get speed right off the bat and you make sure the rudder and board are down. (Never tie or cleat the main sheet, at least not while you are learning, and never in blustery winds. Hold it in your hand. You will be able to feel every tug of the wind.)
All this has to be done in a few seconds or you will get blown back to shore. I've always shown weighted rudders on my boats for that reason - they take care of themselves. Rudders with wingnuts don't work when launching this way because the skipper has to hang himself off the stern and fiddle with the thing just when he has to take care of the sail and the board all in a few seconds.
Once the boat is moving and things are in order, turn to about 50 degrees from the wind. Pull in on the sheet until you feel you have maximized your speed. One of the best ways to check your speed is to look at your wake. "Feeling" speed without looking at the wake can be deceptive - you can feel yourself blasting along but when you look at the wake you find yourself creeping along, not moving at all, or maybe even going backwards!
Continue on in that direction and double check your rudder and board to make sure they are down all the way. Check your sail trim for any gross errors. If there is a gross error return to shore and fix it. I've seen lug sails hoisted with the yard on one side of the mast and the boom on the other side! The most likely error will be twisting of the sail that is limiting your forward drive. Often problems like that are impossible to fix while afloat in a small boat. You can't leave the tiller to fix things. We all have plans to run the control lines into the cockpit for easy handling but the longer control lines themselves would contribute greatly to the sail twist - longer lines stretch more.
(In a large boat the usual procedure is to run the boat under motor straight into the wind as the sails are hoisted, effectively putting it into position B. Once the sails are up the boat is turned to about 60 degrees off the wind with the motor still running, the sheets tightened to fill the sails. Once all is in order the motor is shut off and raised, assuming it is an outboard. Trying to sail with the outboard down will result in a very slow and unresponsive boat.)
You're sailing to windward - almost...
TACKING...
Most low tech boats aren't going to sail much closer to the wind than about 50 degrees. To get to a goal straight to windward you need to zigzag towards it. "Tacking" like this:
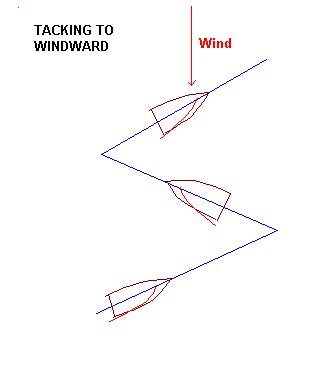
You can see why sailing to a place to windward takes a lot longer than going downwind. Even if the boat were as fast close hauled to windward as downwind, which is usually not true, the zigzag tacking makes the actual path a lot longer. If you were tacking 60 degrees to each side of the wind that path would be twice the straight line distance. If you could tack 45 degrees to each side the path would be 1.4 times the straight distance, so you can see the value of a boat that is close winded. But a boat going 60 degrees off the wind can be a lot faster than the same boat at 45 degrees off the wind. So a lot of experimentation is in order.
I'm usually in favor of sailing about 60 degrees off the wind for two reasons. First the effect of waves, especially on a low tech hull, is to slow the boat a lot. Usually the waves are perpendicular to the wind so the closer you sail to the wind, the harder you hit those waves. Secondly, if you are sailing in shifting winds, very common where I live, sailing really close to the wind makes for a lot of work. If you sail 45 degrees to the wind and the wind shifts 15 degrees, you will come to a full stop if you don't swerve to hold the angle. But at 60 degrees off the wind, that wind shift will still gives you forward thrust and you can hold course.
Sailing really close the wind is called "pinching" and usually there is little future in it because you don't go fast at all. It can come in handy sometimes when trying to clear a fixed object.
One thing to keep in mind as you tack is that the sails produce no forward thrust as you swing through the wind so the maneuver is done with momentum. You must have enough forward speed to get through to the other side. Shallow light flat bottomed boats and catamarans are the worst in that they lose momentum quickly. Rough water really can make tacking a challenge in that case and really rough water can make tacking impossible.
Here is how to tack a small boat. Get settled on the current tack at good speed and make sure all is in order, rudder and board down, no clutter in the boat, sheet free and not under you. Smoothly and quickly deflect the tiller about 40 degrees to rotate the boat through the eye of the wind and onto the other tack. As you go through the wind you will have to shift your weight over to the other side of the boat to keep the boat level or heeled correctly (most boats sail best with about 15 degrees of heel). Sails like the ones I draw are "self tacking" meaning they require no handling as you rotate the boat. Simply keep the mainsheet in hand at the same position. Once on the new tack pick up a little speed and let everything settle down.
HERE ARE A FEW THINGS THAT CAN GO WRONG...
You can get the mainsheet wrapped around something, including yourself, or you might end up sitting on it. Always make sure it is free and in a condition that allows you to release it quickly.
You can get overpowered by a gust of wind. If you do nothing you might capsize. Release the mainsheet and turn into the wind. Both of those actions will depower the sail. Try to keep the boat moving forward, though. Remember that if you stop completely the rudder will give you no control.
The rudder and board can pop up. Both will result is sloppy handling and the inability to complete the tack. Keep an eye on them and if the boat starts to handle oddly always check them first.
The boat won't complete the tack, stalling before getting through the wind and falling back on the original tack. This is usually called "missing stays" for some reason. First check to see that the rudder and leeboard are all the way down. Then go back on the original tack, gather A LOT of speed and try again being sure to move the rudder quickly and smoothly and with a good amount of deflection. A boat with a shallow hull and a deep narrow leeboard will spin like a top given half a chance.
The boat won't tack no matter what! This is almost always a sign that the sail/board alignment is not correct. In particular the sail is usually too far forward or the leeboard too far aft. We designers try to get it close but these items can require some fine tuning. Most likely this will mean a trip back to the shop to fix.
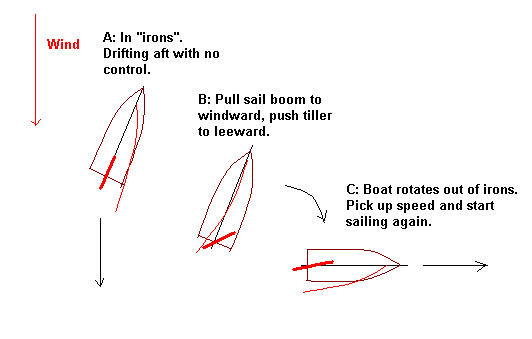
Sometimes a boat will go "in irons". This usually happens while pinching but could also happen while tacking. What happens is that the boat stops just short of windward and sticks there. With no speed your rudder will not be effective and some boats become quite stable in this condition and you sort of feel trapped. My first boat was a Hobie 16 with no jib and we spent about a half year in irons. With a little boat you can often get out of irons by taking an oar and twisting the boat to a new heading. The classic fix is to let the boat build up some speed in reverse, which it will usually want to do. Then you pull the boom to windward while you push the tiller to leeward, the result being the boat wanting to rotate around the rudder to point downwind. Then you let the boom swing out to leeward and head off downwind to gather speed, get steerage and try again.
FINE TUNING...
One last thing to check as you sail to windward in a new boat is the feel of the "helm". In a well balanced boat the tiller should be tugging on your hand a bit as you sit to windward. If you let go the the tiller, it will swing away from you and the boat will head up into the wind and stall. That is called a slight "weather helm" and is ideal. Too much weather helm can wear you out, pulling on you all the time. If you have too much weather helm you can usually fix it by shifting the sail forward a slight amount, or shifting the board aft.
If the tiller pushes on your hand as you sit to windward, you have "lee helm". If you let go of the tiller, the tiller swings towards you and the boat starts to head downwind. Lee helm is considered unsafe and is usually harmful to windward sailing efficiency. But the feel of the boat can change a lot with different wind speeds, in particular the more a boat heels the more weather helm develops. A SMALL AMOUNT OF LEE HELM IS VERY COMMON IN VERY LIGHT WINDS. The cure for lee helm is to move the sail area aft or move the board forward.
NEXT TIME...
I'll show some finer points about sailing on reaches and runs.
ORACLE
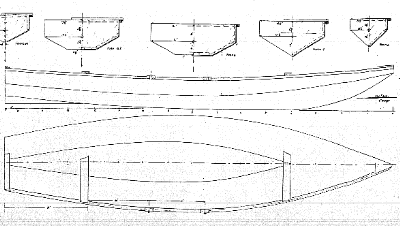
ORACLE, LIGHT ROWBOAT, 15.5' X 45", 80 POUNDS EMPTY
Oracle might have been called Roar3. It's a bit longer and lower than Roar2 so it looks sleeker. In truth it is closer in shape to Toto than to Roar2. I'm pretty sure it will be a visual imrovement over Roar2. Hard to say if it will be a practical improvement.
There are a couple of things I'd like to point out. First involves the way I drew the lines of Oracle. I make card models of my designs which help me to check the panel expansions and allow me to get a 3D check of the shape. The models are done in the same scale as the drawing, in this case 1/8 size and the model is fairly large. So I know that Oracle has nice curves all over. But if you look at the end view in the lines drawing you will see all straight lines!
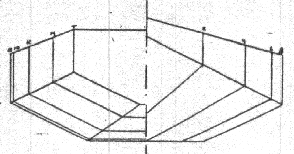
In a way this is a throwback to the original "instant" boats which had hull panels made from straight saw cuts.But it's easy for a designer to make the jump to more flexible shapes, that is hull shapes which can look like about anything you might imagine made from plywood. Back when I started drawing boats I noticed that some of the nicest shapes in 3D had end views made totally of straight line segments. Don't ask me why. Not only does it give a nice shape, but the designer's job can be simplified. For example with Oracle I might start by drawing the top view. Then I might sketch in the side view needing nothing more than an idea of what the stem, midsection, and stern will look like. Next I draw the end view which will include those three elements all connected by straight lines as you see in the end view above. In normal mechanical drawing it only takes two views to totally define an object. So without even drawing the side view of the boat, the shape is defined. It only remains to go back and figure it out. Of course, if you don't like the resulting side view, you will tinker with it. Then you will have to go back and adjust the end view and the top view, etc., etc.. Happy is the designer who hits it right the first time through.
The second thing I'd like to point out is the locations shown for the oarlocks. I almost always show the oarlock sockets mounted outside the hull on a good pulling boat. That allows better spread of the locks and thus slightly longer oars. It allows you to dip the oars without rubbing them on the wales. The only disadvantage I see is that if you use a boat like this to come along side another boat, you wll present to that boat the only metal fittings you have on your craft. So a true tender should have the oarlock sockets mounted inside the wales where they won't scratch anything. Also, any dimensions I show for lock locations are only suggestions. You really should fine tune the socket locations to keep the boat trimmed level at your favorite rowing location. For that matter, I never show seats in my boats having found that a boat with a flat bottom plank like Oracle's will accept a rowing seat/ditty box that allows for endless adjustments and a totally open interior. And once you've found that best location, fasten some cleats to the boat where your feet like to be to act as foot braces.
Oracle is built from the same pile of stuff as Roar2. Four sheets of plywood with taped seams. No jigs, no lofting.
Plans for Oracle are $12 until one is built and tested.
Prototype News
Some of you may know that in addition to the one buck catalog which now contains 20 "done" boats, I offer another catalog of 20 unbuilt prototypes. The buck catalog has on its last page a list and brief description of the boats currently in the Catalog of Prototypes. That catalog also contains some articles that I wrote for Messing About In Boats and Boatbuilder magazines. The Catalog of Prototypes costs $3. The both together amount to 50 pages for $4, an offer you may have seen in Woodenboat ads. Payment must be in US funds. The banks here won't accept anything else. (I've got a little stash of foreign currency that I can admire but not spend.) I'm way too small for credit cards.
Here are the prototypes abuilding that I know of:
Caprice: A brave and experienced builder in Texas is making the 25' Caprice water ballasted sailboat. A big project.Here the hull has been glassed, painted and turned and is now ready for interior work.
< WIDTH="302" HEIGHT="254">
We also have the start of a Jon Jr, a 12' x 3' personal sized jonboat, down in Texas. Here is the latest photo with the bottom going on.
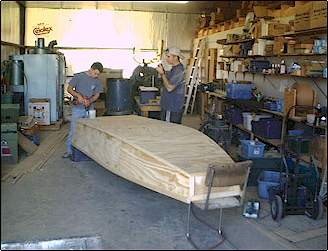
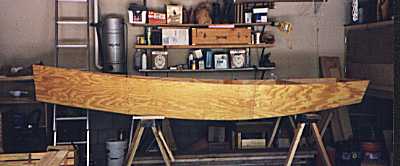
Mayfly12: A Mayfly12 is going together up in Minnesota. It is now completed and has been sailed. Waiting for final photos. Here is a construction photo from last summer.
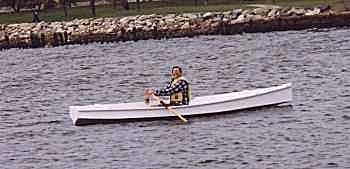
Robote: Robote is supposed to be a fast somewhat extreme rowing boat based on my old WeeVee design, thus it has a deep V bottom but is stretched out to 14' long with a very pointy bow. It was drawn as a custom job but if it works out I'll put it in the catalog. The boat is now complete and launched but waiting for final photos and test results. Here is a preliminary photo on its first row with builder Frank Kahr at the oars:
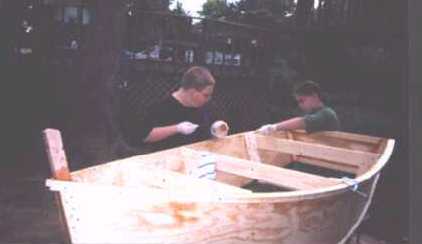
Slam Dink: Here are a couple of kids working on the prototype Slam Dink. I'm told bending the chine logs into position was quite a chore requiring several tries - not unusual for a short fat boat.
Herb builds AF3 (archived copy)
Hullforms Download (archived copy)
Plyboats Demo Download (archived copy)
Table of Contents