
Richard Poletti says his Tween rows well in either direction.
Contents:
Contact info:
Jim Michalak
118 E Randall,
Lebanon, IL 62254Send $1 for info on 20 boats.
Jim Michalak's Boat Designs
118 E Randall, Lebanon, IL 62254
A page of boat designs and essays.
(1Feb00) This issue presents some thoughts about hollow spars. Next issue, 15Feb00, will rerun some ideas about bevels.
|
|
Left:
Richard Poletti says his Tween rows well in either direction.
|
|
|
HOLLOW SPARS
HOLLOW SPARS...
At first thought you might think that hollowing out spars is something you work hard at to save a lot of weight in the spars, and that could be true. But I've found that sometimes the hollow spar is the easy one to build and that you seldom save much weight. First a little theory:
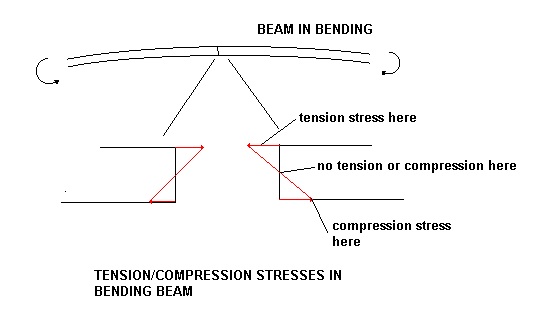
The above figure shows the pattern of stresses in a beam that is under pure bending. Here the material is still in the "elastic" range, which is to say it it is not so highly loaded that it won't spring right back to its original shape once the load is removed. What is significant here is that compression and tension stresses develop that resist the bending and that the stresses are highest in the outer fibers of the beam. In the middle, at what is called the "neutral axis" there is no bending stress at all. You might think that the outer fibers are doing all the work, the inner fibers almost nothing. That would be just about correct in the conditon of pure bending but in real life the middle fibers do other important things. So you can't just remove the middle fibers totally but you can skinny them down in a beam meant to take mostly bending loads. The classic way to take advantage of the situation is with a I beam, where the outer fibers are thick and wide while the middle fibers are reduced to a thin web.
Similarly a tube has had its middle fibers removed. It does not have the bending strength of an I beam but has the advantage of being able to take bending loads in all directions because of its symmetry (unlike the I beam which is optimized for bending in just one plane) and is the optimum shape to handle torsion loads.
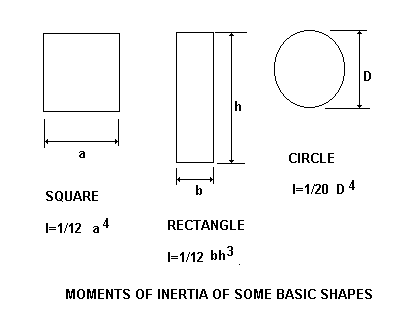
It's actually pretty easy to determine the effect of hollowing out a spar, which is to remove a lot of those middle fibers that don't do much, on strength and stiffness. The effects are pretty much related to the "moment of inertia" of the section which is fairly easy to calculate. Some of the sections you might use for a spar are shown above.
The reason the moment of inertia tells you so much is that in a beam under a bending load, the stress and deflection are both directly related to the moment of inertia. For example, all other things being equal, if you double the moment of inertia of a beam's cross section, both the stresses and the deflections will be cut in half.
So the next question becomes, "How does hollowing out a spar affect the moment of inertia of the spars cross section?
The answer is that you can figure the moment of inertia of the hollowed out cross section, provided the cross section is still symmetric, by subtracting the moment of inertia of the hollowed out area that you removed from the full unhollowed moment of inertia. Here are some examples:
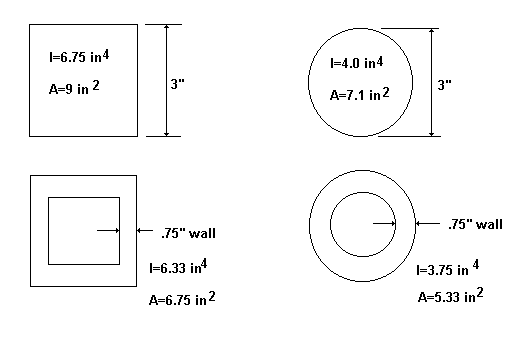
Two things to point out here: First the moments are not reduced in proportion to the amount of material removed. You lose material a lot faster than you lose strength. For the 3" square the tube version reduces the section area by 25% but the reduction in the moment of inertia is but 6% Such a good deal!
Second, the square section is a lot stiffer and stronger than the round section with same width. The 3" square has 26% more area but its moment of inertia is 69% larger. Such a good deal! Some sail types like the lugsail or spritsail or even the sharpie sprit sail can use a square mast with little loss in sail efficiency. If your round mast flexes too much, convert to a square one! Can't do that with a gaff rig though because the gaff jaws insist on a round or octagonal mast.
By the way, another way to look at all of this is to see the effects of going to a smaller diameter mast. You quickly get yourself in trouble. The stiffness is proportional to the fourth power of the diameter or mast thickness. If you reduce the mast from 3" to 2", the mast stiffness is reduced by 80% !!
WEIGHT SAVINGS??...
Some types of masts are hard to make hollow, round masts in particular. Usually the mast is made in two halves and the center of each half hollowed out and then the two are glued back together. Some sections of the mast might not be hollowed out in order to have some beef there for fittings. So it's a bit of work. Indeed making a round mast is a bit of work even when solid.
Let's look at a typical mast to see how much weight is really saved. Let's use this one as an example. It is round and I've shown the diameter at distances along the mast along with the section area at those points.
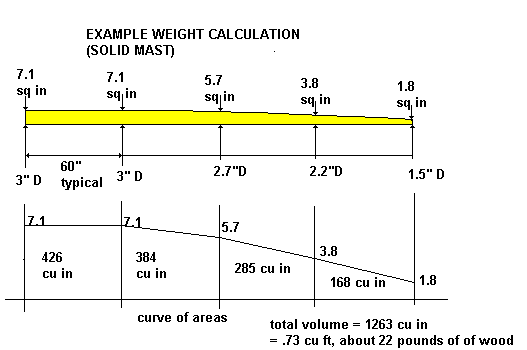
The example shows the solid mast. The method of figuring the weight is to calculate the volume and then figure the weight from the density of wood which is typically about 30 pounds per cubic foot. The figure shows the volume calculated with a quick "curve of areas" where the area at each section is plotted along the length of the mast. The area under that "curve of areas" is the volume of the mast. Add them up and you get the volume of the total. In the example the mast would weigh about 22 pounds if solid.
You can use the same technique to figure the volume of about anything, including a hole. Here we'll use it to figure the volume of the hole in the center of the mast if it were hollow such that it had a 3/4" wall.
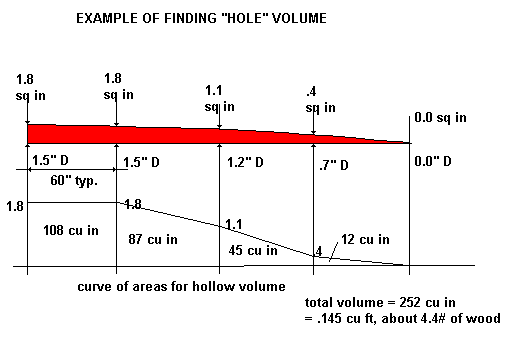
The proposed hollow amounts to about 4.4 pounds of wood. The hollow mast will weigh about 17.5 pounds instead of 22 pounds assuming it has no beefed up solid sections for fittings. Whether the work involved in hollowing out the mast is worth the trouble is something the individual must decide. But you can see that this mast has its weight reduced about 20%, its stiffness and strength reduced by about 6%.
BUT IT'S NOT ALWAYS EXTRA WORK...
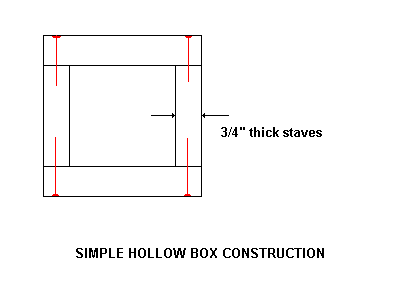
I've built two hollow masts, one for my Birdwatcher and later another for my Jinni which had been coverted from a sharpie sprit to a balanced lug. I built hollow to allow an easier construction and not to save weight, although the hollow masts were lighter. Both used simple box construction from 3/4" boards like this:
The Birdwatcher mast was 5" across and the Jinni mast 2-1/2". The staves that formed the walls were scarfed to length first and then cut with a circular saw to the proper taper one at a time. Then the masts was assembled with glue and nails like simple boxes, 24' long in the case of the Birdwatcher and 14' long for the Jinni mast. By doing this I avoided having to saw and shape the taper of sticks that would be way to thick to cut with my saw, as it was I never cut any wood more than 3/4" thick.
Both masts worked quite well. The original Jinni mast was square in cross section even though it was a sharpie sprit sail. I doubt that the small square mast disrupted airflow as you might think. The Birdwatcher mast was supposed to be octagonal and hollow - a fairly involved building effort. You might think the 5" square mast that I built would really disrupt the airflow to the sail. To minimize the disruption I turned the mast 45 degrees to the axis of the boat like this:
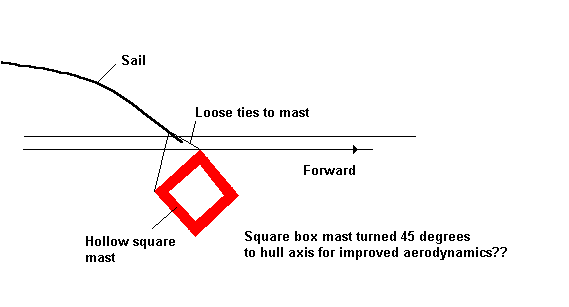
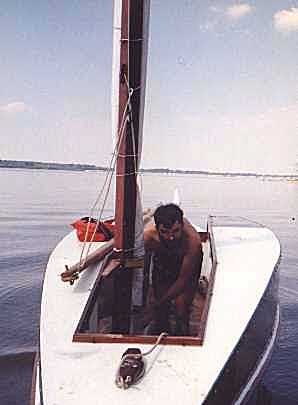
I thought it worked out very well. The sail is laced to the mast and is somewhat free to align itself from side to side, unlike a sail that is trapped in a groove or track on the aft face of the mast. (Phil Bolger has written several times that a sail set on the mast with loose mast hoops as in the old gaff days has the best aerodynamics. More modern streamlined masts with sail track or grooves often are supposed to swivel on the deck at each point of sail to allow proper mast/sail alignment. You can see how complex the details can become.) One day I was out sailing in Birdwatcher and snapped a photo looking up the leading edge of the mast. The sail flowed right off the mast as in the above diagram. Alas, I can't find that photo. Here is one in which you can make out the "diamond" mast. (I think you can also see why I've stuck with the slot top cabins and offset masts that characterize the Birdwatcher layout):
So in this case I felt I had it all: light hollow mast, easy construction, and good aerodynamics. Still, I hardly ever draw hollow spars on plans because the drawings can get really complex and I don't want to deny anyone the challenge of brainstorming a new way to make a hollow mast. There seems to be no end to the ways of making one.
NEXT TIME...
I'll update an essay about bevels in plywood boats. This will be one of five or six essays that will be rerun every year which present really basic building or boating information.
SLAM DINK
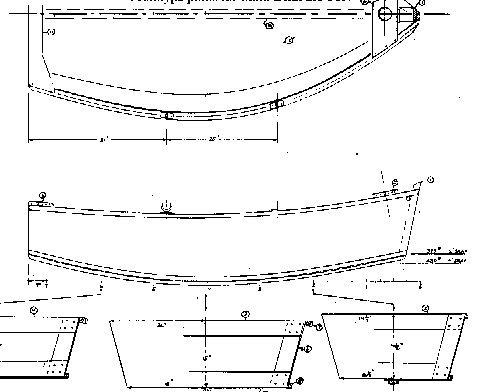
SLAM DINK, ROW/SAIL DINK, 7' X 4', 70 POUNDS EMPTY
Slam Dink is a tiny flat iron skiff. It's got a flat bottom, a pointy bow, and slightly flaring sides. The bottom is given lots of rocker to keep her ends out of the water when loaded. The stem and stern will just touch the water at 400 pounds displacement. The boat should weigh about 70 pounds empty, so with some oars and two normal sized adults it should make do.
It should also be a good children's boat with the warning that if it turns over there is no chance of self rescue in deep water, and that is true of almost any boat that does not have a lot of built- in flotation. Alas, if you build significant flotation into a 7' dink there is no room left for the crew and you lose the lightness that a successful dink must have. So they are always limited in that respect.
Construction is of the old fashioned glue and nail variety with just a smattering of fiberglass/epoxy to help seal the corners. That makes it a good first timer project, as does its small size. It will be an inexpensive project too, being made from two sheets of 1/4" plywood, including the sailing bits.
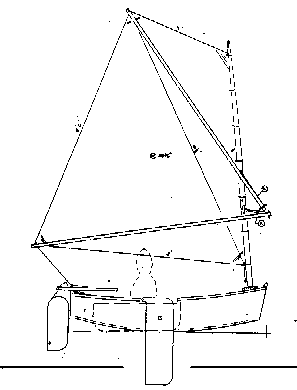
As for the sail rig, this is my first venture into the old sprit rig. The sprit rig is probably the easiest to stow having short spars and the sail tied to the mast. No special fittings are required, it's all wood and cloth and rope. I'm quite certain that the mast has to be rigid for it to set right to windward in strong winds and I gave Slam a full 3" diameter mast. The sprits must be set up hard to prevent sail twist and having a sprit to hold the clew down should also help. Setting this sail on such a small boat will probably be strictly a shore operation, especially getting the peak sprit into position. You will often see this type of sail without a boom but that will only work on a wider longer boat which can bave a different sheet anchor for each point of sail.
Prototype plans for Slam Dink are $15.
Prototype News
Some of you may know that in addition to the one buck catalog which now contains 20 "done" boats, I offer another catalog of 20 unbuilt prototypes. The buck catalog has on its last page a list and brief description of the boats currently in the Catalog of Prototypes. That catalog also contains some articles that I wrote for Messing About In Boats and Boatbuilder magazines. The Catalog of Prototypes costs $3. The both together amount to 50 pages for $4, an offer you may have seen in Woodenboat ads. Payment must be in US funds. The banks here won't accept anything else. (I've got a little stash of foreign currency that I can admire but not spend.) I'm way too small for credit cards.
Here are the prototypes abuilding that I know of:
Jonsboat: Greg Rinaca near Houston sent this photo of his completed Jonsboat, land bound until he rounds up a motor.
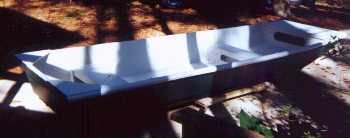
Mayfly12: A Mayfly12 is going together up in Minnesota. The decks are on and he's into the sailing bits. By the way, the sailing bits on almost any sailboat large or small consume about half of the effort in labor and materials. Just when you thought you were about finished! (Just talked to the builder and the project is on hold until next spring while he moves into his new house.)
AF4B: A builder in Virginia is building AF4Breve, a 15.5' version of the 18' AF4. I tried to talk him into building the 18' version but he had two very good reasons to go shorter - a short trailer on hand and insufficient building space for the larger boat. The AF4B is essentially a "scrunched" version of AF4 but comes from a whole new set of drawings. The prototype is in the final building stages where the sanding and filling and painting seem endless. (Just heard anew from the builder. Seems his property and priorities have been temporarily rearranged by Hurricane Floyd. So progress on AF4B is now on hold.)
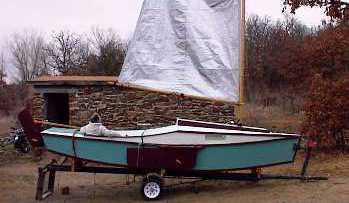
AF2: Richard Spelling has had his AF2 out sailing a couple of times and you might be able to see it sail at Rich's site. So far so good, including some wild high wind sailing with a polytarp sail! I think he's is still tweaking the sail and we're both climbing up the learning curve for a gaff sail, but the boat handled well and he reports tacking through 90 degrees as is. Waiting for an "in the water" photo. Here he is trailer sailing as we do in the midwest during the winter:
AN INDEX OF PAST ISSUES
Herb builds AF3 (archived copy)
Hullforms Download (archived copy)
Plyboats Demo Download (archived copy)