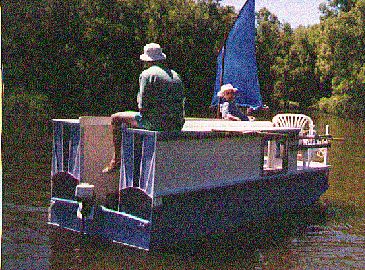
CHRIS CRANDALL'S HARMONICA
Contents:
Contact info:
Jim Michalak
118 E Randall,
Lebanon, IL 62254Send $1 for info on 20 boats.
Jim Michalak's Boat Designs
118 E Randall, Lebanon, IL 62254
A page of boat designs and essays.
(1nov00) This issue presents thoughts about hatches and vents. Next issue, 15nov00, will start a discussion about electric boats.
|
|
Left:
CHRIS CRANDALL'S HARMONICA
|
|
|
Hatches and Vents
REMEMBER THIS - HATCHES AND VENTS NEED TO BE NARROW, UP HIGH, AND ON THE HULL'S CENTERLINE...
All of your boat's hatches and vents, any opening to the inside of a sailing boat's hull, need to be narrow, high and on centerline. Here is why.
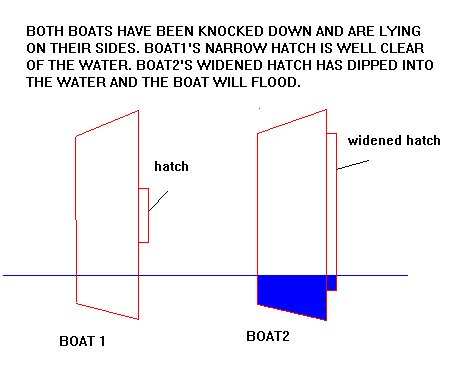
Boat 1 has been knocked down 90 degrees and has its hatches on centerline. As long as it doesn't roll inverted water won't enter the water tight volumes required to float the boat high on its side. If the boat has raised draining decks and enough ballast it should self right and shed all of the water like a duck and continue sailing with nothing added but a scared skipper.
Boat 2 is the exact same boat but has its hatch widened a lot or placed off centerline. If the hatch is not water tight the boat will flood and the boat will founder (not "flounder" - even the National Geographic gets that wrong all the time).
It's as simple as that!
BUT I'VE SEEN IT HAPPEN...
A few years back Bob Archibald stopped by with a Bolger Micro project he had found in New York. Very nice job, too. It was made from slick mahogany plywood and on his trip Bob had been stopped by someone who thought the unfinished Micro was a fancy hot tub! But I saw a problem right away. Where Bolger had placed a single vent on centerline on the aft bulkhead, the builder of this Micro had substituted two vents, one on each side of the bulkhead like this:

If this Micro had been knocked down (OK, so that isn't easy to do) the boat would have flooded through those side vents.
And just last year Bob showed up again with a Bolger Martha Jane he had bought up north. This boat was complete and had been sailed for a few years. Again right away I saw a problem. Where Bolger had designed solid watertight aft decks, the builder had made the aft deck side seats removable. Lift them up and they were like lockers, completely open to the interior. Again, if this boat had capsized and the locker lids were not water tight, this boat would have flooded big time because the openings were about 2' wide and 6' long! There have been fiberglass production boats built this way too. Like this:
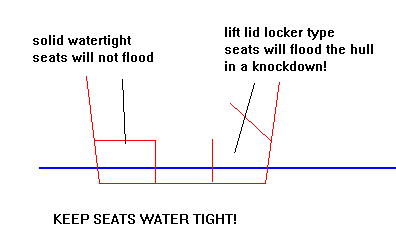
So the basics are simple. Your boat will flood through its openings. Keep them as small as possible and on centerline and you will stand half a chance of not swamping (or sinking!) in a knock down.
NOW FOR SOME HATCH AND VENT DETAILS...
All of my sailing boats, except for the tiny dinks, have air boxes which provide emergency buoyancy. I don't think any part of a boat should be sealed solid. To do so prevents airing out the moisture and water that might accumulate and cause rot.
The air boxes are almost always used as storage boxes, too. It's true that anything you put in there will decrease the emergency buoyancy. But let's say you put 50 pounds of stuff, which is a lot of stuff, in Piccup Pram's aft or fore locker. Those lockers have about 6 cubic feet of air inside, and each would need about 360 pounds on top to submerge the locker. So with the storage you still have 310 pounds of emergency buoyancy. It's a good trade, I think. The stuff in those boxes is out of the way, never underfoot, and usually stays dry. Now for a hatch for access to the storage area.
I think really proper hatches have coamings and covers like this:
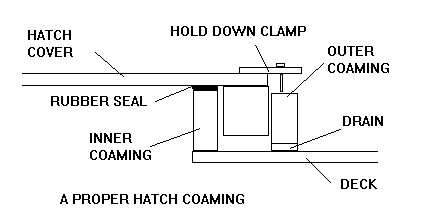
The ideal has a double coaming, one inside the cover and another outside the cover to delfect water as a first defense. The outer coaming has drain holes here and there to drain water that makes it into the slot. The hatch cover has a lip extending down into the slot between the two coamings, a rubber seal over the inner coaming, and a positive way to clamp the cover down hard.
Removable commercial deck plates like the ones that Beckson makes also are pretty good, I think, and not too expensive. The larger ones will allow you to reach a hand into the air box to place small items, but that is about it.
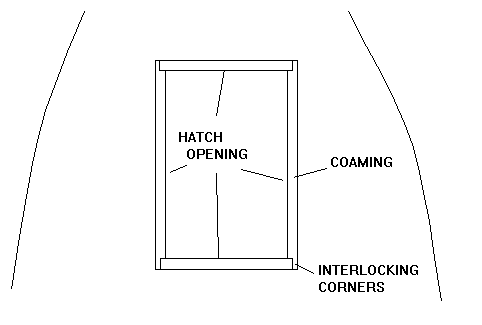
I've used very simple hatches on my boats, like Piccup. A simple coaming is made around the opening as shown in the figure. The ends are interlocked so that hopefully there will be no leaks.
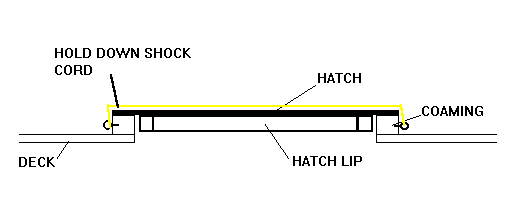
The hatch covers that I have used are even simpler. They aren't nearly as effective as the ideal cover/coaming system but here in the Midwest we can get away with it in the same way we get away with using common plated hardware. For fair weather sailing these things work. For green water they won't. Anyway, my hatch covers simply have an inner lip usually made of 3/4" square wood that locates the hatch in the coaming opening. I use no rubber seal. Here is what it looks like:
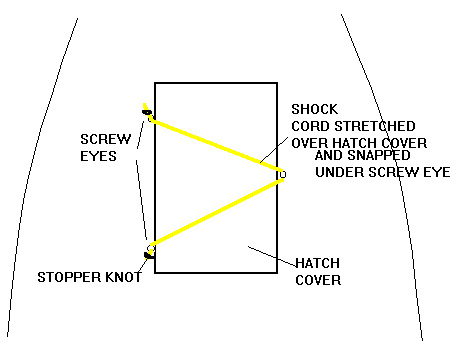
The cover is held down with a shock cord stretched over it. The shock cord "hardware" is actually small eyes screwed into the coaming. There are usually three eyes, two on one side of the opening to which the shock cord is attached simply by passing it through the eye and tying a stop knot to retain it there. The third eye is on the center of the opposite side of the hatch. The secure the hatch cover you simply stretch the cord over the cover to the third eye and snap it over the eye (no through it). From the top it looks like this:
Vents in cabins are pretty important. I think the one in the front bulkhead of my AF4 is about 4" deep and 8" wide and that is enough to keep me alive inside with the other openings all covered over. Vents need to be high and on centerline as mentioned earlier. And they should have a rain trap to keep rain and spray out of the boat. Here is a simple rain trap that I copied from Bolger but it has probably been in use a long long time:
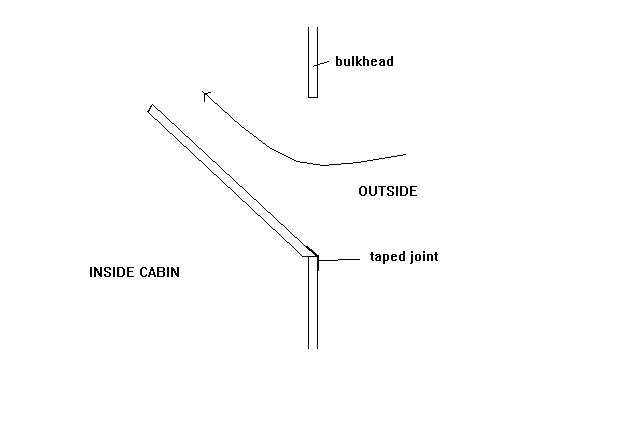
Construction is pretty simple. There are two triangular sides made of 3/4" lumber which form the sides of the vent. The third side is just a plywood piece epoxied to those side pieces and held in place with two small screws. The external seams have epoxy fillets and the bottom seam sealed with glass tape set in epoxy. A screen piece over the outside is a nice touch although I've gotten by with a scrunched up piece of mosquito net stuffed into the vent from the inside. Indeed, if the breeze through the vent is too much for you, stuff a (clean) sock or two into the vent to "adjust" it.
WALKWAY COVERS...
The walkway slots that I use in a lot of my designs present an interesting situation. Here is such an opening on the minishanty Harmonica:
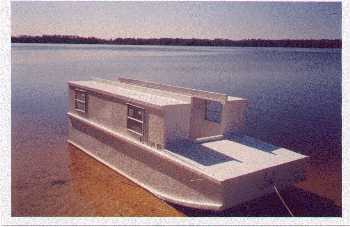
On AF4's predecessor I made a set of plywood hatch covers that interlocked and could be held in place with shock cords as described above. They worked, but I gave up on them and went to a fabric soft cover that snapped in place and used bows to prevent water from pooling on the flat fabric. Karl James made a set of plywood covers for his Jewelbox. Later he went to a fabric cover also but kept the hard covers for trailering, the hard covers being left with the tow vehicle when the boat is sailing. Pete James tried fancy segmented hard covers that slid to the side somehow. But he also replaced that with a soft cover. I think the moral of the story is to try a soft cover first for these slotted walkways. They can be rolled up compactly with their bows inside. If you bump them from the inside there is no harm done. No, you can't stand on them.
There seems to be general agreement that Sunbrella is not the cloth to use on these flat covers. It has a weave that will allow a spray of water to come through in a hard rain. Cheapo guys like me use a cover made of polytarp with no problems. There are woven cloths like Docksider and Aqualon that have a film applied that will not allow water through.
Marc Smith came to our messabout with a Birdwatcher with a fabric cover over the slot. He had some neat bows that he had made of small diameter PVC pipe like this:
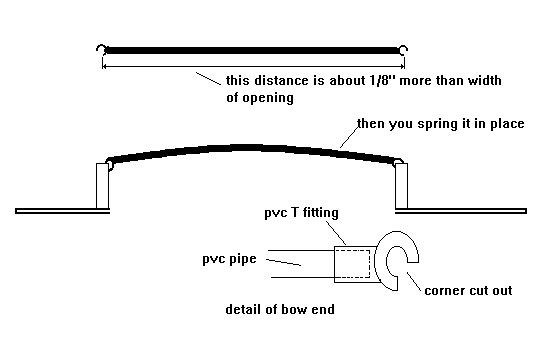
It cost nothing and it worked very well.
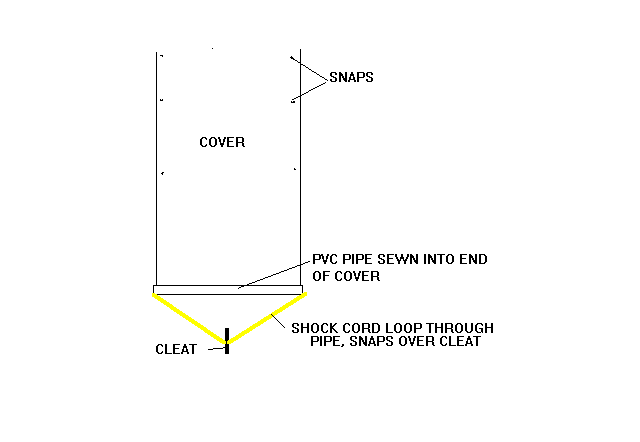
But wait a minute! If you make a fabric cover that snaps in place from the outside, how do you secure it from the inside? What I have done is to put the snaps in place so you can secure it all around from the outside, but the ends also have a small pvc pipe sewn in a hem with a shock cord loop running trough it. About 6" from the end of the walkway or door opening I put a small cleat or eye around which to snap the shock cord loop. To secure the cover from the inside, you snap everything except the last 2' or so, a space large enough to pass through. Then from the inside you grap the loop and snap it over the cleat. Like this:
TRADITIONAL SLIDING HATCHES AND DROPBOARDS...
Well, I've decided to not get into those right now. A topic for another day. But...
NEXT TIME...
I'll start a discussion about electric boats.
Harmonica
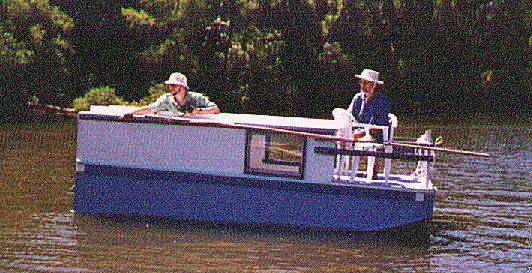
HARMONICA, MINISHANTY, 13' X 5', 400 POUNDS EMPTY
Harmonica is a tiny shanty boat that sleeps two in its cabin. There is a porch up front suitable for lounging and a small room in the stern for the kitchen and the water closet. I think it is arranged so that two people could wait out an all day soaker without feeling too pressed. For protected waters only. I've been asked more that once if Harmonica would be OK in the Ohio River, etc.. My answer is no. In calm weather you might get away with it but you always run the risk of huge wakes, especially from large motor yachts. The prototype Harmonica was built by Chris Crandall of Lawrence, Kansas.
This boat was originally called Fusebox. It was intended to be an electric boat for the wonderful little conservation lakes we have around here. But later I thought that the electric scheme was strained because few trolling motors could push this box on a windy day. And because I noticed that none of the local conservation lakes have electric plugs at the docks, so recharging the batteries there would not be possible. Putting a gallon of fuel on board is a lot easier than taking an 80 pound battery home. Chris used a 1 horse Tanaka and that was about the minimum required, pushing the boat at 2 or 3 mph. At the same time I would say that 5 hp would be a reasonable maximum. You don't need much power or speed because you never can go more than a mile in any direction in the lakes I'm thinking of.
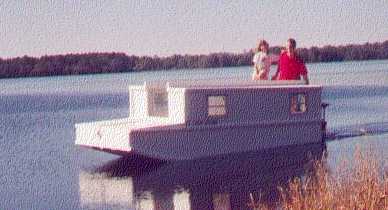
I also heard from John Applewhite, of Gainesville, Fl., who built the Harmonica shown in the photo above. He had quite a bit of shantyboat experience and also some electric experience. He used a 3 hp Minnkota and two golf cart batteries, probably about 200 pounds of gear. John said this electric is used nearly all the time with great satisfaction but he also has a small gas outboard on the transom as a backup.

John also wrote, "...The entire family (two adults and two children) has spent the night on Steel Will. I put 1x2's between the slats in the two forward bunks and created a single bunk that is five feet wide. We have found that the thick cushions sold to cover lawn furniture very adequate mattresses for boats."
Harmonica soaks up four sheets of 3/8" plywood and six sheets of 1/4" plywood and uses simple glue and nail jigless construction. Blueprints with keyed instructions are $25.
Prototype News
Some of you may know that in addition to the one buck catalog which now contains 20 "done" boats, I offer another catalog of 20 unbuilt prototypes. The buck catalog has on its last page a list and brief description of the boats currently in the Catalog of Prototypes. That catalog also contains some articles that I wrote for Messing About In Boats and Boatbuilder magazines. The Catalog of Prototypes costs $3. The both together amount to 50 pages for $4, an offer you may have seen in Woodenboat ads. Payment must be in US funds. The banks here won't accept anything else. (I've got a little stash of foreign currency that I can admire but not spend.) I'm way too small for credit cards.
Here are the prototypes abuilding that I know of:
Caprice: A brave and experienced builder in Texas is making the 25' Caprice water ballasted sailboat. A big project.Here the builder plugs away at the aft deck.
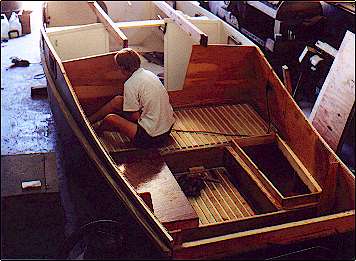
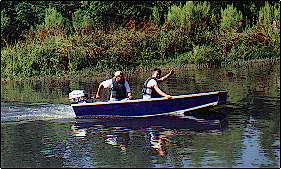
Jon Jr has been completed by Joe Leinweber and Dan Ellis and tested to a certain degree. Click here to read about the test and the surprize ending! ("The waters are only safe until next time!")
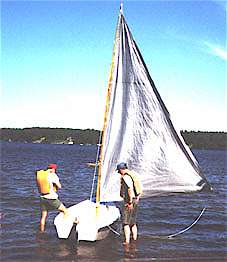
Mayfly12: A Mayfly12 is now completed and has been sailed. Waiting for final photos but here is an initial photo.
AN INDEX OF PAST ISSUES
Herb builds AF3 (archived copy)
Hullforms Download (archived copy)
Plyboats Demo Download (archived copy)