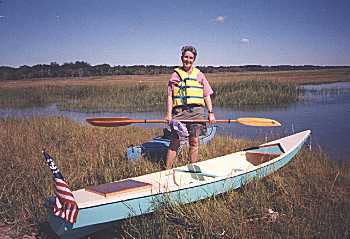
A big smile for Al Fittipaldi's Toto.
Contents:
Contact info:
Jim Michalak
118 E Randall,
Lebanon, IL 62254Send $1 for info on 20 boats.
Jim Michalak's Boat Designs
118 E Randall, Lebanon, IL 62254
A page of boat designs and essays.
(15jun01) This issue talks of ways of building a wooden boat. Next issue, 1jul01, will continue the topic.
FREE TO A GOOD HOME...
...Jeff Blunck has started a big boat project and wants to give his Frolic2 to a good home to make room. Read about it all at his web site .
|
|
Left:
A big smile for Al Fittipaldi's Toto.
|
|
|
WOODEN BOAT CONSTRUCTION 1
WOOD...
I'm going to try to briefly explain the ways in which wooden boats haver been made.
The ANCIENTS...
Way way back in prehistory small boats were made as dugouts. A large log was whittled down to the shape of a boat and used as such. It's still being done in parts of the world although today's dugouts can have big gasoline horsepower clamped to the stern and might be made with chain saws. Imagine carving a boat from a solid tree with stone age tools! I suppose a boat made that way was quite a valuable thing.
American Indians made canoes of wooden framework covered with bark. The canoe that you buy at the discount store or from LL Beans is an aluminum or plastic copy of those old canoes - the shape and size is the same. The bark canoes were probably lighter than most modern ones but a lot more fragile. I think the French voyagers of old used very large bark canoes. They had speed and ability and knowledge to take them on incredible trips including down the Mississippi River, AND BACK to Canada. Perhaps on the old river, with no wing dams or barge traffic, it was possible to canoe against the Mississippi current, but today the upriver trip is strictly the realm of powerboats since the current at St Louis is said to be 5 to 10 knots.
Bark canoes are still made by the wonderful historical folks who try to keep this knowledge alive and very real. I suppose most would use steel edged tools but remember that the real old ones were made with stone tools. There was a book written 5 or 10 years ago called "The Voyage Of The Ant", I think. I've forgotten the author. Some chapters were presented in Messing About In Boats at that time. What a wonderful story! The author set out to make a bark canoe using stone age tools that he also made himself. He gathered the rock for the tools and chipped them to shape. He found the limit of a stone axe was just a small tree, say 3" in diameter. He was told by experts that the birch trees needed for suitable bark were no longer to be found in Connecticut but a few trips through the woods found plenty. It was all sewn together with pine tree roots, as I recall, dug by hand from a hillside. Pine tar to seal the seams was a problem until he found that only for a brief time each year do the trees give off the tar, and then it is copious. Anyway, the canoe was built and taken on a voyage the length of the Connecticut River.
Skin boats were also built by old cultures. The Eskimo skin boats are widely copied in fiberglass these days, their shape still the ideal for the job. In Europe skin covered coracles were paddled and in Ireland the skin currach was used in the open sea. I visited Ireland in 1980 and tarred canvas was used in place of skin but the basic boat was the same. (One fine old fellow was experimenting with 1/8" plywood over the wooden frame with taped seams.)
All the boats mentioned so far were made with no fasteners or glue. Imagine building a large wooden boat that way. The Egyptians did it! Fifty years ago archeologists found near King Cheop's tomb a sealed stone cellar containing the makings of a ship. The ship was built about 2500 BC. Not only is it the oldest ship ever found, it is perfectly preserved! They thought it might have been the very boat that brought the king's mummy to its tomb. Then it was disassembled and stored. Sort of a kit boat, the first known and 143' long when assembled. No, the king never got around to building his kit boat in his afterlife. Perhaps a proof that there is no afterlife, but let's face it - there are boat builders alive today who would put the project off 4500 years. Besides, the King might argue that his brain had been removed and was in that beautiful jar over yonder.
The Egyptian boat was built they say from the outside in. The large cedar planks were flown in from Lebanon and carved to shape to fit together as a shell. How to join the planks without fasteners or glue? They used pegs to join the planks edge to edge and then tied them together like this (some of the 4500 year old lashings were still in place):
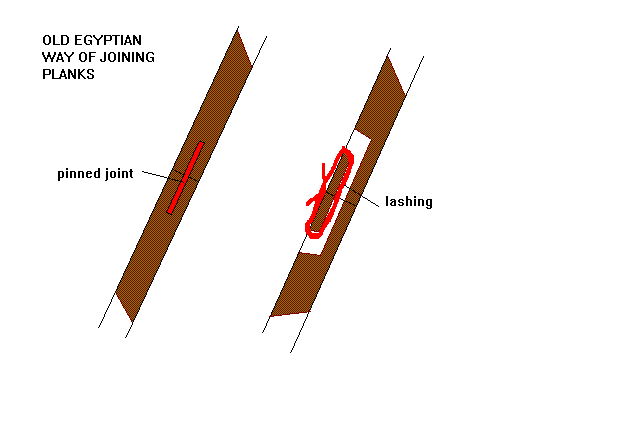
Note that the lashings were invisible from the outside. They say that ribs were fitted in time after the shell was complete and lashed in place but the boat had nothing like a keel.
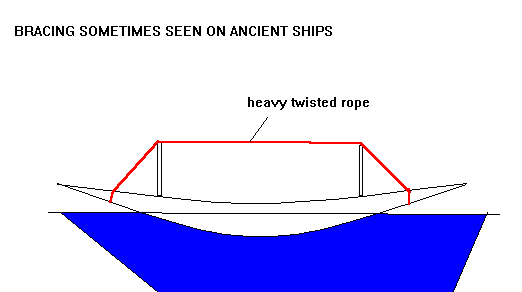
Sometimes Egyptian ships are depicted with a system of stiffening that has a huge twisted rope running over beams above the deck that pull up on the stem and stern placing the entire hull in compression and bending. I don't think the Cheops boat had or needed that system, but any planked boat that does not lock adjacent planks together edge to edge can have problems with warpage over time where the bow and stern droop, the process is called "hogging", and the twisted rope would serve to stop it.
I think the system of lashing planks together was also used in Chinese Junk construction, the process impressed Marco Polo so little that he decided to walk to China instead! And the lashing system was used in mideast dhow construction until quite recently - maybe still in use.
Boats of the Romans and Greeks are being found all the time, sometimes in very good condition for a wooden object thousands of years old. Construction was of shaped planks fitted over a keel with ribs, a construction that is used to this day. This is usually called carvel planking. Here is how it works.
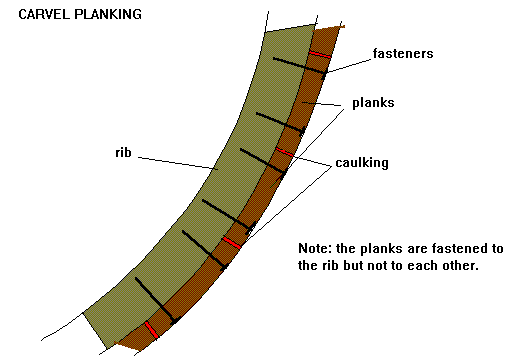
A skeleton of the boat is made with keel, stem and stern pieces, and lots of ribs. Most of this lumber is stout stuff and in the old days it was hewn out of big logs with axes and adzes. Today that work might be done with chain saws. The parts are all fastened with big nails or wooden pegs (tree nails or trunnles) in addition to being notched together in about every way. Lots of muscle and expertise required. Then the hull is planked up. The boards next to the keel and stem and stern fit into notches and all fastened to the framework. But the individual planks are not fastened to each other edge to edge. The seams between were usually not totally watertight and the joint was payed or filled with compounds like cotton and tar. When the boat is launched it may leak until the wood swells and closes the leaky seam. The planks then press against each other and are compressed. The ribs are under tension and the forces can be so great that the failure mode might be the ribs failing in tension, or the rib/plank fastener failing in tension at the turn of the bilge and allowing the planks to pop loose and bulge outward. It is a lot like a barrel with the hoops inside instead of outside.
In some ways the carvel boat is like the reed boats of the ancients. The boards can in time slide edge to edge and the hull loose its ridigity and loose shape. I suppose the Egyptian rope and post method fought that tendancy. Ships of the past few centuries, like the USS Constitution, have changed shape in this way and tricks are used in rebuilding to bring them back into shape. I think the Constitution was given elaborate diagonal braces.
Another trick seen is the use of a second layer of planking that might be parallel or diagonal to the first. The Herreschoffs did that about a hundred years ago. You can imagine how rigid the result is. But in the days before modern glues and sealants you might think it would be a rot problem. Even with today's materials it might be a rot problems.
Carvel construction is still in use today. An experienced builder can work to almost any shape with fairly cheap materials, although you would think that his wood is not as good as his grandfather's but his glues, fasteners, and sealants are better. Smaller modern carvel boats often have small ribs that are not carved to shape. Instead the keel and forms are set up to make a skeleton or mold of the boat. Wood planks called ribbands are fastened to the form to flesh out the shape but unlike the final planking the ribbands are spaced well apart and not permanent. Then the ribs, which might be something like 1-1/2" square green oak, are steamed to a great degree of flexibilty and quickly pushed to shape inside the skeleton. When they cool and dry they take the shape permanently, no carving required. They say the right man with the right wood and the right steam box can rib out a fairly large boat in less than a day. But the ribs of the big old ones like the Constitution were more or less hand carved out of trees by strong talented men with axes. The ribs are so large and close together on some boats that she is almost solid wood before the planking goes on. With the planking on the walls might be 2' thick! It boggles the mind! But that was big bucks shipyard construction for hundreds of years.
By the way, carvel boats rely on swelling of the wood to seal all those seams so they may not make good trailer boats. They need to stay wet to stay tight.
MODERN CARVEL PLANKING??
Here are some modern changes in use to carvel planking:
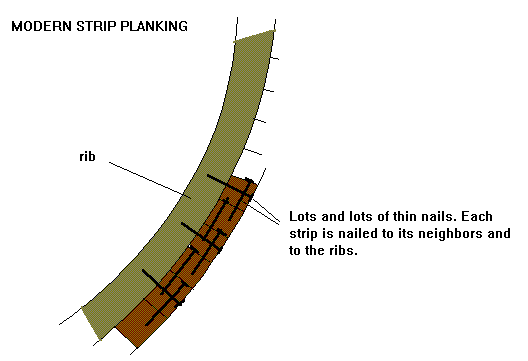
Imagine a hull designed to be planked up with lumber 1-1/2" thick and 3" wide carvel style. The planks are not joined edge to edge with each other as in the old style. Now a new builder comes along and planks the same shape but with lumber 1-1/2" square. Twice as many sticks are required of course, but now he can put long narrow nails along the edges and lock each stick to its neighbor. This is usually called "strip planking". As the builder works he can seal the joints with sealant or even epoxy. He may not have to bevel any edges since his thick sealant should keep water out and the nails ensure that the joints won't flex. A boat built this way becomes sort of a monolith and may not need the usual ribs, etc. to keep its strength. Indeed I've seen in Bolger's books this plan done with no ribs or internal framing when the hull is built. Instead the shaping molds are external and the strips laid inside the molds. Large boats can be done this way.
Now imagine strip planking done on a small boat, say a 15' canoe. The strips are 1/4" thick and 1" wide laid over a skeleton mold. The strips are glued edge to edge as the building goes but no nails are used - the strips are too thin for that. Instead the strips are secured with common small staples until the glue sets. Almost any shape can be done this way due to the flexibility of the strips. After the glue sets the (thousands of) staples are removed and the surface sanded. Then the inner and outer surfaces are given a layer of fiberglass set in epoxy for protection and strength. Boats built this way can be very beautiful since the wood will show nicely through the glass coatings. They can be very light. In the early days of this sort of building polyester resins were used instead of epoxy and ordinary white glue used to secure the joints. None of these materials are "waterproof" by commercial standards but they worked fairly well since the boats were stored indoors and got only occasional use in the water.
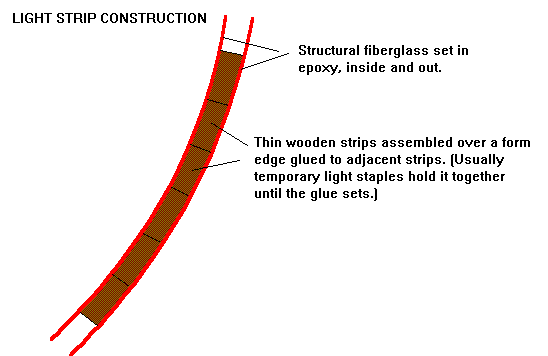
You can carry this method a step more with many layers of glass inside and out to get a true composite sandwich hull. The next step would be to use water proof foam instead of wood to get a really high tech non wooden boat.
Here is another modern take on carvel construction. Remember the double planked carvel hull where a second planking layer is placed over the first at a diagonal angle to get rigidity? That can be done today over a skeleton form using thin veneers of wood that can be several inches wide, the veneers glued together with thickened epoxy. Sort of like custom shaped plywood when done. Very little need for internal ribs and such since the result is a monolith. This is usually called "cold molding". The method was once called the Ashcroft method after the man who popularized it way back in the days before waterproof glue. I recall seeing a WWI Albatross airplane at a museum once and suspect its fuselage was made this way. Indeed I'm nearly positive that Lockheed used the system in the early days of aviation but "hot molded" the wood in a female mold shaped to the fuselage. I suppose from there you can substitute glass and resin instead of wood and glue and get today's modern fiberglass hull, but the wood part made in the same mold would by nature be lighter and stiffer.
If you care to read up on carvel planking you might start with Howard Chapelle's great book "Boatbuilding"
ENTER THE VIKINGS...
Over 1000 years ago a new type of construction appeared in the lands of the Vikings. Today it is called clinker or lapstrake or shiplap. They had great long straight trees to work with and I think I read somewhere that they split the boards out of the log instead of sawing or chopping. They had iron nails, too. The clinker boats had planks that fastened overlapping each other and were nailed together along their entire length. So each plank was fastened edge to edge unlike with carvel planking. One of my old books says there were ribs that were lashed to the skin but smaller boats built this way can often omit the ribs. And the planking was bent to shape and was lighter than anything the carvel boats of the time used so the entire boat was much lighter. Add to that a long fast shape and the Vikings had boats that were a lightyear ahead of the competition.

To my mind the clinker boats of the Vikings are still in most ways the optimum type of wooden boat! Since the planks overlap a fair amount, fussy edge to edge fitting is not required except near the ends of the hulls where all those overlapping planks still need to fit into the stem and stern posts and the keel. That is where the expertise is and special tools too, such as planes with cutting blades on their corners instead of on the center face of the bottom. And a clinker boat is usually sprung over a form, athough I've read that experienced builders can build one by eye without a form! Today's clinker builder might use plywood planks, less likely to split than solid wood, and might glue it all together with epoxy and omit the nails.
And clinker boats don't rely on staying wet to stay tight. So they make good trailer boats. Many plywood clinker boats were mass produced (such as the Lymann) in the 40's 50's amd 60's right up to the total acceptance of fiberglass hulls.
One of the best books on the clinker subject I have seen is Tom Hill's book "Ultralight Boatbuilding". He presents a method of cutting the bevels for the lapped joints that is both very quick and understandable.
NEXT TIME...
...We'll look at the flat iron skiff and beyond.
JONSBOAT
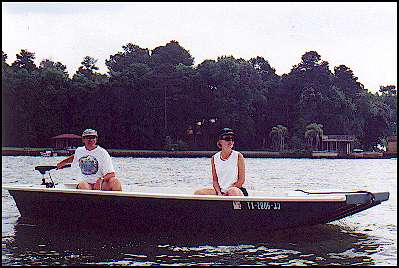
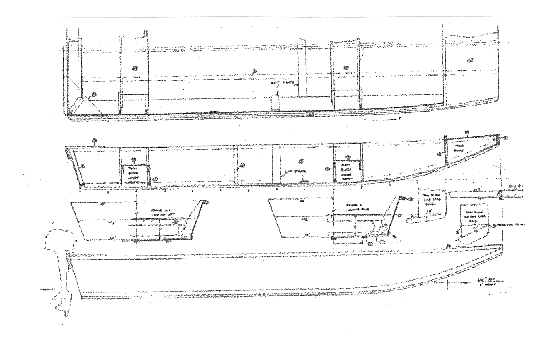
JONSBOAT, POWER SKIFF, 16' X 5', 200 POUNDS EMPTY
Jonsboat is just a jonboat. But where I live that says a lot because most of the boats around here are jonboats and for a good reason. These things will float on dew if the motor is up. This one shows 640 pounds displacement with only 3" of draft. That should float the hull and a small motor and two men. The shape of the hull encourages fast speeds in smooth water and I'd say this one will plane with 10 hp at that weight, although "planing" is often in the eye of the beholder. I'd use a 9.9 hp motor on one of these myself to allow use on the many beautiful small lakes we have here that are wisely limited to 10 hp. The prototype was built by Greg Rinaca of Coldspring, Texas and his boat is shown above when first launched with a trolling motor. But here is another one finished about the same time by Chuck Leinweber of Harper, Texas:
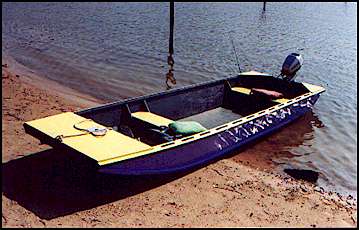
In the photo of Chuck's boat you can see the wide open center that I prefer in my own personal boats. To keep the wide open boat structurally stiff I boxed in the bow, used a wide wale, and braced the aft corners.
I usually study the shapes of commercial welded aluminum jonboats. It's surprising to see the little touches the builders have worked into such a simple idea. I guess they make these things by the thousands and it is worth while to study the details. Anyway, Jonsboat is a plywood copy of a livery boat I saw turned upside down for the winter. What struck me about that hull was that its bottom was constant width from stem to stern even though the sides had flare and curvature. When I got home I figured out how they did it and copied it. I don't know if it gives a superior shape in any way but the bottom of this boat is planked with two constant width sheets of plywood.
Greg Rinaca put a new 18 hp Nissan two cycle engine on his boat, Here is a photo of it:
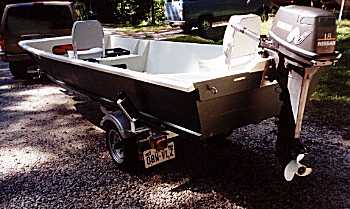
The installation presented a few interesting thoughts. First I've been telling everyone to stick with 10 hp although it's well known that I'm a big chicken about these things. Greg reported no problems and a top speed of 26 mph. I think the Coast Guard would limit a hull like this to about 25 hp, the main factors being the length, width, flat bottom, and steering location. Second, if you look closely at the transom of Greg's boat you will see that he has built up the transom in the motor mount area about 2". When I designed Jonsboat I really didn't know much about motors except that there were short and long shaft motors. I thought the short ones needed 15" of transom depth and didn't really know about the long shafts. Jonsboat has a natural depth of about 17" so I left the transom on the drawing at 17" and did some hand waving in the drawing notes about scooping out or building up the transom to match the requirements of your motor.
I think the upshot of it all is that short shaft motors need 15" from the top of the mount to the bottom of the hull and long shaft motors need 20". There was a lot of discussion about where the "cavitation" plate, which is the small flat plate right above the propellor, should fall with respect to the hull. I asked some expert mechanics at a local boat dealer and they all swore on a stack of tech manuals that a high powered boat will not steer safely if the cavitation plate is below the bottom of the hull, the correct location being about 1/2" to 1" above the bottom. But Greg had the Nissan manual and it said the correct position is about 1" BELOW the bottom. Kilburn Adams has a new Yamaha and its manual says the same thing. So I guess small motors are different from big ones in that respect.
But it seems to be not all that critical, at least for the small motors. Greg ran his Jonsboat with the 18 hp Nissan with the original 17" transom for a while and measured the top speed as 26 mph. Then he raised the transom over 2" and got the same top speed!
There is nothing to building Jonsboat. There five sheets of plywood and I'm suggesting 1/2" for the bottom and 1/4" for everything else. It's all stuck together with glue and nails using no lofting or jigs. I always suggest glassing the chines for abrasion resistance but I've never glassed more than that on my own boats and haven't regretted it. The cost, mess, and added labor of glassing the hull that is out of the water is enormous. My pocketbook and patience won't stand it. Glassing the chines and bottom is a bit different because it won't show and fussy finishing is not required.
Plans for Jonsboat are $25.
Prototype News
Some of you may know that in addition to the one buck catalog which now contains 20 "done" boats, I offer another catalog of 20 unbuilt prototypes. The buck catalog has on its last page a list and brief description of the boats currently in the Catalog of Prototypes. That catalog also contains some articles that I wrote for Messing About In Boats and Boatbuilder magazines. The Catalog of Prototypes costs $3. The both together amount to 50 pages for $4, an offer you may have seen in Woodenboat ads. Payment must be in US funds. The banks here won't accept anything else. (I've got a little stash of foreign currency that I can admire but not spend.) I'm way too small for credit cards.
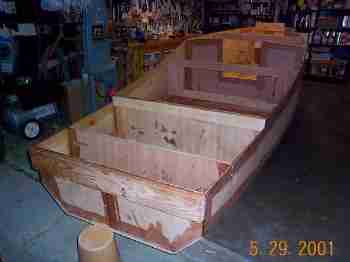
Caprice: Chuck Leinweber of Duckworks Magazine has finished the prototype Caprice. Here is a photo. Waiting for some shakedown cruises and a report.
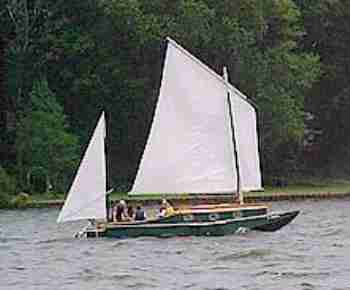
Normsboat: This is an 18' sharpie being built by Cullison Smallcraft in Maryland. You should be able to check on it by clicking through to his web site at Cullison SmallCraft (archived copy, actual site no longer active). He is presenting an excellent photo essay of how to assemble a flattie. This boat has been launched and I'm waiting for photos and a test report.
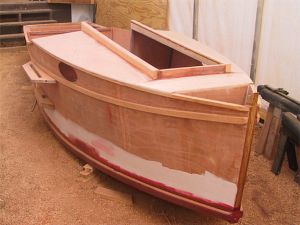
Vamp: I received word that a prototype of the little rowboat Vamp is completed up in Utah. Hopefully photos and test report soon.
Family Skiff: A Family Skiff has been started in Virginia.
HC Skiff: One of these is going together in Massachusetts.
Electron: An Electron has been started in California.
AN INDEX OF PAST ISSUES
Herb builds AF3 (archived copy)
Hullforms Download (archived copy)
Plyboats Demo Download (archived copy)