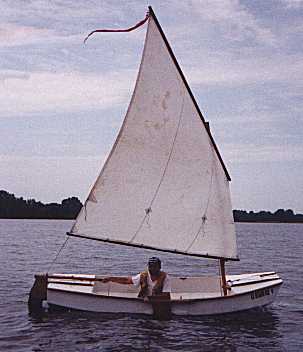
Me in my Piccup at a Rend Lake Messabout.
Contents:
Contact info:
Jim Michalak
118 E Randall,
Lebanon, IL 62254Send $1 for info on 20 boats.
Jim Michalak's Boat Designs
118 E Randall, Lebanon, IL 62254
A page of boat designs and essays.
(15nov01) This issue will present the last part of an essay by a reader Rob Rohde-Szudy about building Piccup Pram. Next issue, 1dec01, will present thoughts about powering boats per the Coast Guard.
AN ANNOUNCEMENT FROM GARTH BATTISTA OF BREAKAWAY BOOKS
"CALL FOR PHOTOS
Breakaway Books will be publishing BOATBUILDING FOR BEGINNERS (AND BEYOND), by Jim Michalak, in June of 2002. They would like pictures of people building and enjoying Michalak designs. Any good photos you have (prints, please) are welcome.
Send them to:
Garth Battista, Publisher, Breakaway Books, P.O. Box 24 / Biruk Road #AT7, Halcottsville, NY 12438
Garth will sort through to see what photos work best in the layout or on the cover, and will give a free copy of the new book to everyone whose photo is used in the book. He promises to return each and every photo to its owner. If you send in photos, include your name and address, the boat design, and any interesting stories or details. (Unbridled exclamations of praise for the designer and his boats are also welcome.) Thanks!"

|
Left:
Me in my Piccup at a Rend Lake Messabout.
|
|
|
Building Piccup Pram by Rob Rohde-Szudy
(Well here we go with the first article ever written by a reader for this webpage. It's usually a bit embarrasing for a designer to read something like this about his own design. In my own defense I'll add that Piccup Pram was my very first design and I hadn't caught on to some of the problems that might appear in the builder's shop. On the other hand after Piccup Pram I got convinced that most builders don't read instructions and can figure their way through any situation. As you will see Rob had little trouble figuring it out as he went along. So my instructions continue to be a general guide and not a straight jacket....JM)
Building the Piccup Pram - Part 2
Jim Michalak has designed the ultimate "first boat". It is light, convenient, easy to handle, stable, roomy, inexpensive and easy to build. What more can one ask?
Well, not much more than a little guidance in the building stages! This is the second part of a 2 part series that provides some insight for first-time builders.
I should also mention that everybody and their brother, from canoes to speedboats to giant fin-keel yachts all seem to have to come over and comment on Piccup! I think it is the fact that a lugsail, especially a dark brown one, sticks out of the crowd so much. You can see the longing in their eyes when they ask if I built it myself!!!
OK, cutting to the chase...
Tiller
This will not apply to everyone, but it is worth considering making the tiller longer if you like to sail alone and fast. I find I have to sit just about right over the leeboard to trim the boat most efficiently, and that makes it pretty hard to reach the tiller. With two people, however, the longer tiller could be in the way when tacking. Something like a hiking stick would, of course, work, but I think they are rather fiddly to use. Something to consider. Speaking of the tiller, note in the photo the French whipping (nylon twine) on the grip. It allows you to varnish the wood, which keeps the water out! Also note the rudder lanyard cleat, and the faired hole further back. I run the sheet through the hole so it can be cleated by simply holding the tiller down, lifting the tiller to let the sheet out. It is important that this hole be drilled at the pivot point of so the sheet doesn't pull the rudder to the leeward.
Tiller

Cary Hinge
Later in this issue, you will read about me getting myself in trouble with my aversion to paying for bronze hardware. It is not always a good idea to follow this aversion, but I did successfully avoid buying pintles and gudgeons for hanging the rudder. I used the "Cary Hinge" made of wood, epoxy and recycled seatbelt webbing. Details are to be found at http://marina.fortunecity.com/breakwater/274/2001/0715/index .htm#SMALL BOAT RUDDERS or check Jim's "Way Back Issues archive" under "Rudders, about". One addition I must make: I recommend that the "pintle" be tapered. Mine is straight up and down, and it is rather hard to get in and out. It should, however, have a lock to prevent it unshipping in a knockdown. I drilled a hole though the 'gudgeon' and 'pintle' athwartships, and I run a 6" scrap of 14 gauge copper wire (from Romex electrical wire) through it and bend the end so it can't fall out. (The picture was taken before I did this.)
Cary Hinge

I built it by ripping the bevel into 4 strips of 2x4. 2 were epoxied and screwed together with the seatbelt webbing that was already epoxied between the laminations of the rudder stock. Once this was cured and sanded, I used it to place the other two on a scrap piece of 1/4" plywood and screwed and glued them down with Weldwood. Then I cut away the excess plywood and belt-sanded the edges. With the bottom flat I added the bottom plate in the same way - this plate is not necessary if you taper the whole assembly. Then you have a 'pintle' and 'gudgeon' make of wood. Dry fit them on the boat, making sure the rudder, not the gudgeon, lines up with the skeg. (They're offset, remember?) The exterior shapes of these pieces of wood are unimportant, except that as much be cut away as possible to allow the rudder to swing through a wide angle. One good point I must mention, is that if you cleat the sheet as I do - by passing it through a hole in the tiller and squeezing it down - this arrangement provides a perfect piece of wood to press it against!
Cleats
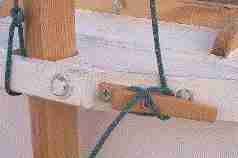
JM's cleating system is nice and simple, but I like to be able to separate the halyard from the tack line and this requires two cleats at or near the mast step. I put a 4" nylon cleat on the mast for the halyard, and use the mast step cavil for the tack line. I like David Beede's clever PVC cleats - http://catalog.com/bobpone/cleats.htm - they would be great for someone who really needs to keep it cheap. However, I like making wooden cleats and had some leftover maple flooring as well as some nice locust. Check out Jim's link to "The Cheap Pages" where there is a great article on DIY wooden cleats. I made a Butler cleat for the tack line from their design that I mounted on the mast partner. I also made the tiller lanyard cleat (eyeballed form Jim's drawings), a jamb cleat for the leeboard pendant (from "the Cheap Pages"), and a padeye for the yard (again, eyeballed from Jim's drawings). For the halyard and cartop rack, I used vinyl cleats from West Marine. They are inexpensive and don't crack your knuckles and shins the way metal cleats do. (This is perhaps the greatest strength of wood cleats, by the way!) ALL cleats and other fittings should be bedded in at least varnish or paint, preferably something thicker, to keep the water from under them.
VERY Handy Tack Cleat!
Tack Cleat
Rowlock Experiment
OK, so I'm cheap, but I simply could not handle paying $50 or more for rowlocks and sockets when mankind has rowed for millennia with simple, cheap THOLE PINS!!! In fact, Jim told me that Phil Bolger swears thole pins are a better rig than oarlocks! Bolger knows this stuff better than most, so I'm inclined to take his word for it. It didn't turn out perfectly, but I had to try it. Here is my experience.
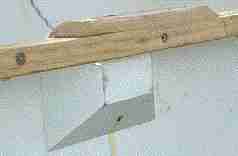
I used 1/2" steel rod for the thole pins and added a strip of hardwood (about 6"x1.25"x.25") on top of the gunwales to protect them from the oars - well tapered fore and aft so they would slip over the car rack (relatively) easily. I also added a hardwood "pocket" under each thole pin location. On the port side, these are sized 1.25" thick and taper to meet the hull, leaving about 3/4" full thickness wood fore and aft of the pin hole. On the starboard side, it is a little trickier, since both thole pins go through the leeboard doubler. I added a small hardwood cap, about 1.25"x2"x1/2" under the pin locations. Learn from my mistake here! A square oar loom does not turn easily on a flat surface! The pad should be either hollowed so the squared loom of the oar turns easily, OR it should be cut at an angle so the oar automatically meets the water at about 15 degrees from vertical, OR the oar should be made rounder. If you don't do this (like I didn't), it is somewhat difficult to keep the oar in the water when pulling. It should also be made taller than I did. The placement of the outer leeboard guard demands that the oars operate from a little higher up than the gunwale, especially if you are rowing on anything but very calm water. (I really chewed up a leeboard guard finding this out!) If you are trailering, there would be no reason not to make the pads taller and better shaped. However, if you are cartopping (like me), it seems that you'd be better off using the standard oarlocks.
Here's a view of the thole pad and reinforcing pocket:
Thole Pocket
Here's a another view of the pad, including the cleat I made for the leeboard lanyard:
Thole-Cleat
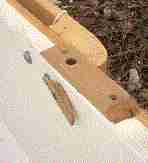
More on construction, if you're still game: When boring for the pins, drill first with a small bit ALL THE WAY THROUGH. This lets any water drain out. Make sure you are going straight with this first hole - I didn't get it quite right. I probably should have clamped a piece of wood to the gunwale to act as a guide, so I could just keep the bit parallel to the wood. (Live and learn...) Then, enlarge the hole to maybe 1/4" all the way through. THEN bore to the full thickness. Make sure to check your hole size with your pin size in scrap lumber first. A 1/2" bit does not necessarily provide a tight fit for a 1/2" rod! This will require some experimenting on scrap wood, I'm afraid. The more annoying part is that the thole pin really needs to be TAPERED to be able to pull it OUT of the wood, especially when the wood is wet! This means some work with the grinder, smoothing it on a belt sander. Any galvanizing will be long gone, so you will probably want to paint or otherwise coat the metal, especially if you use the boat on salt water. You also need to make some rope grommets to keep the oar located against the pin. This is NOT optional!!! The tighter the better! I found that a second loop over the pin can make the oar REALLY tight, and was very helpful.
The bottom line? If you cartop, DEFINITELY use standard bronze oarlocks. They are worth the investment. If you are trailering, you could experiment with thole pins, but you'll experiment for more time than is worth it. I recommend paying the money for the oarlocks. (Then again, you might come up with a better way of doing it than I did.) I will probably grind off the thole pin hardware this winter and Bondo and repaint the works.
Another Rowing Issue
In a small boat like Piccup, you really have to think about where to PUT things! I like the oars to stow IN their locks, but out of the way. The easy way to do this only requires a foot or two of shock cord, 2 hooks and 2 small screw eyes. Install the screw eyes in the fore bulkhead at about the same level as the mast partner, but just inside the gunwale. The oar blades can be laid on the foredeck (sort of hanging off of it) and held down to the screw-eyes with the shock cord.
Coamings
Speaking of the foredeck, I would like to suggest one refinement. My home lake can get DAMN choppy, to say nothing of powerboat wakes, and I find it annoying when spray runs slowly down the foredeck and into the cockpit. (Chinese water torture?) I suggest adding a low coaming to the foredeck - just another piece of clear 1x2 fitted from a little in front of the aft edge of the fore hatch, to a little in front of the fore bulkhead. This would be a simple way to redirect this spray and I don't THINK it would interfere with cartopping. It is on my list for things to do in the Winter, so I'll let you all know how it works!
Rig Tuning
OK, I somehow screwed up on the mast step and partner. The mast wound up not being raked aft enough, resulting in lee helm. Jim says that it has a tendency toward lee helm in light wind, but raking the mast cures this. I normally glue just about everything together, but in this case, I would recommend simply bedding the partner in paint, in case you need to add a shim under it. There might be a way to figure this all out in advance, but with a light boat like this, how you use it changes a lot of things about the balance, so it is probably better to get the balance by trial and error in this case, because it accounts for the way YOU sail. Another option, of course, is an adjustable mast partner. (Let me know if you come up with a slick design!) Perhaps simplest, Jim has a slightly curved mast that places the sail area a little aft. In any case, making the mast a little extra along makes all of these adjustments much easier! I'll be storing my mast with some weight on it this winter to gain some curve!
Related to this, the point where the boom is loosely tied to the yard is more important than Jim makes it sound. I found that my lee helm was being made worse by the fact that my tie-on point was about a foot and a half aft of where it probably should have been! Also, it is shown to ways in the plans, with the cleat forward of and aft of the mast. In practice, it is probably right AT the mast, or as close to it as you can come. I made this tie-on a little easier by running an eye-bolt through the boom (with the eye on top) and tying a 1/8" line to it with a snap hook on the other end. Just run it around the mast, snap - done!
Boom Parrell
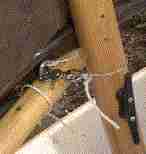
It will save time if after you sew the sail, you mark the 33% and 40% locations along the hem at the head of the sail. Then you will easily know where the sail should meet the padeye on the yard when you are tying it on. If the 33% mark is visible from the deck, you will also know how close it is landing in relation to the mast when in use. A good marker would be a small strip of tape. Again, when you put that padeye on - only bed it in varnish, because you might need to move it!
Speaking of sewing the sail, do SEW it. I wouldn't trust the double-faced-tape method very far. A mechanical fastening is nearly always better than a chemical one.
There are two other lines that will make your life a LOT easier!!! A THROAT DOWNHAUL and a LAZY LIFT. When raising a balanced lug, the peak of the yard wants to flop down into the water or onto your head. I simply tied a length of 1/8" nylon line loosely between the forward ends of the yard and boom, and I hold this to keep the front of the yard down (rear of the yard up!) when raising of lowering sail. This becomes pretty important to keep under control if you have a lot of wind! Of course, it is very convenient if that sail gets lowered into a lazy lift! I simply bolted a cleat onto the boom about 2/3 of the way from the mast to the aft end, tied one end of a 1/8" nylon line to the cleat, ran it through the masthead (with the halyard) and back to the same cleat. It should go slack when the halyard takes the weight of the rig. It makes it MUCH easier to drop sail and row in!!!
One more thing, Rope may be expensive, but always buy longer lengths than you think you need! A line 6" too short is totally wasted. A line too 3 feet too long has extra for tying the bailer to! Also, don't underestimate the amount or line it takes to get enough turns around a cleat to be secure - my tack line wound up a little too short for comfort!
Summary
I hope that this might prompt some boat builder 'wannabees' to become boat builders. This is a great boat to start with, and I can tell you that it gets a whole lot of attention from all of the big yacht sailors who have only seen a lug rig in books! You should see the looks when I just pop it on top of the van and drive off while they are still trying to motor into their mooring and hail a tender from their club!
I hope to submit another installment sometime before Spring about the various neat accessories I am cooking up for the Piccup. In the meantime, if you are thinking about building, now is the time to stop thinking and start studying the plans!
Submitted by: Rob Rohde-Szudy, Madison, WI, robrohdeszudy@hotmail.com
NEXT TIME...
I'll present some thoughts about powering boats per the Coast Guard.
Contents
Piccup Pram
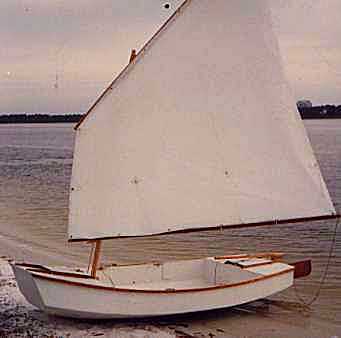
PICCUP PRAM, SAIL/ROW PRAM, 11' X 4.5', 90 POUNDS EMPTY
Piccup Pram was the first boat of my design to get built, back in 1990, I think. I still have the prototype and use it regularly. I designed it to be the best sail/row boat I could put in the back of my short bed pick up truck. But I found it to be a good cartopper, too. It has capacity and abilities I had previously thought impossible in a 90 pound cartopper. The photo above shows the original 55 square foot sail on Pensacola bay a long time ago. Piccup is a taped seam multichine hull which can take a fair amount of rough water.
Piccup continues to be one of my most popular designs and I get nice photos from builders. Here is one of Richard Donovan hoping for more wind up in Massachusetts.

Richard's Piccup has the larger 70 square foot sail that prefer myself. It's the same as the original but is 2' taller. This balanced lug sail sets on a 12' mast and rolls up easily for storage on its 9' yard and boom. The idea was to be able to store the rig easily in the boat during rowing and it works. There is a pivoting leeboard and kickup rudder on the boat and they can be left in place raised while rowing. Converting to full sail takes a couple of minutes as you step the short mast, clip on the halyard and tack lines, hoist the sail, lower the boards, and off you go. And the balanced lug sail reefs very well although reefing any small boat is best done on shore.
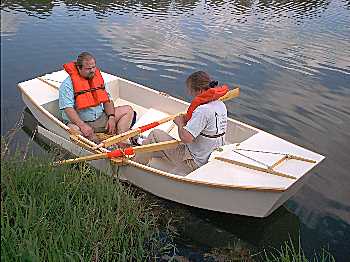
Here is a Piccup by Vince Mansolillo in Rhode Island, a nice father/son project. Piccup will be large enough to hold both of them. You can see the large open frameless cockpit, large enough for sleeping. And you see the buoyancy/storage boxes on the end.
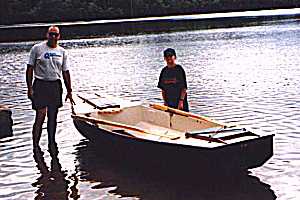
But Piccup will take two adults as seen in the photo of Jim Hudson's boat. Jim's boat has a polytarp sail as does my own Piccup.
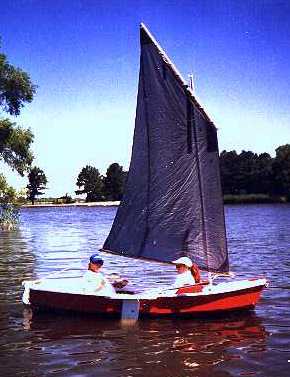
These boats have proven to be good for sail rig tinkerers (be sure to read and apply the Sail Area Math essay before starting). Here I am in Piccup with a polytarp sharpie sprit sail. The rig is different from the originals but the hull here is totally unchanged (except for paint) from the original shown on the beach at Pensacola.

I think my own Piccup has had about six rigs of different sorts and was always the test bed for the polytarp sail experiments. But, hey!, that's nothing compared to the tinkering Reed Smith did with his out in California. Here is his Piccup rigged as a sharpie sprit yawl!
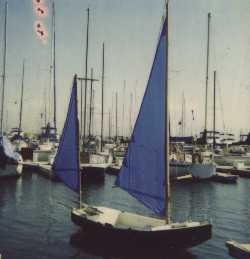
Piccup Pram uses taped seam construction from five sheets of 1/4" plywood. Plans for Piccup are still $20.
Prototype News
Some of you may know that in addition to the one buck catalog which now contains 20 "done" boats, I offer another catalog of 20 unbuilt prototypes. The buck catalog has on its last page a list and brief description of the boats currently in the Catalog of Prototypes. That catalog also contains some articles that I wrote for Messing About In Boats and Boatbuilder magazines. The Catalog of Prototypes costs $3. The both together amount to 50 pages for $4, an offer you may have seen in Woodenboat ads. Payment must be in US funds. The banks here won't accept anything else. (I've got a little stash of foreign currency that I can admire but not spend.) I'm way too small for credit cards.
Here are the prototypes abuilding that I know of:
Family Skiff: A Family Skiff has been started in Virginia.
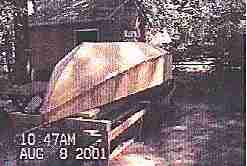
HC Skiff: One of these has been completed and sailed in Massachusetts. Here is one of the first photos - very pretty boat, I think. The builder has gotten many great comments from other boaters and it occurred to me that this boat was called the "Oystering Skiff, Cape Cod, taken off at Orleans (Massachusetts), Aug 7, 1933" in Howard Chapelle's great book American Small Sailing Craft, where I got the lines. So this is sort of a retro photo with classic boat in its classic Massachusetts setting.
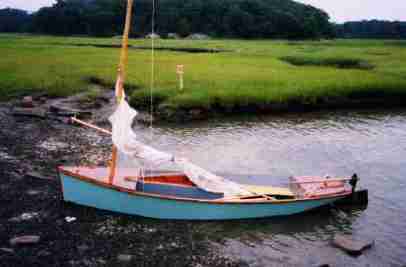
Electron: The California Electron is coming along quite nicely indeed.
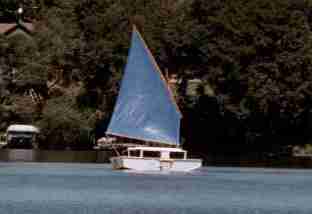
Mayfly: The prototype of the original 14' Mayfly is finished in New York state. Here it is on its first sail (Long Island Sound).

A Jewelbox Jr has been completed (with a lug rig) in Idaho. Waiting for good photo and some more testing but so far so good says the builder.
AN INDEX OF PAST ISSUES
Herb builds AF3 (archived copy)
Hullforms Download (archived copy)
Plyboats Demo Download (archived copy)