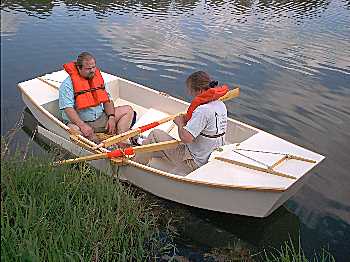
Rob Rohde-Szudy's Piccup Pram.
Contents:
Contact info:
Jim Michalak
118 E Randall,
Lebanon, IL 62254Send $1 for info on 20 boats.
Jim Michalak's Boat Designs
118 E Randall, Lebanon, IL 62254
A page of boat designs and essays.
(1nov01) This issue will present the first part of an essay by a reader Rob Rohde-Szudy about building Piccup Pram. Next issue, 15nov01, will present the second part.
AN ANNOUNCEMENT FROM GARTH BATTISTA OF BREAKAWAY BOOKS
"CALL FOR PHOTOS
Breakaway Books will be publishing BOATBUILDING FOR BEGINNERS (AND BEYOND), by Jim Michalak, in June of 2002. They would like pictures of people building and enjoying Michalak designs. Any good photos you have (prints, please) are welcome.
Send them to:
Garth Battista, Publisher, Breakaway Books, P.O. Box 24 / Biruk Road #AT7, Halcottsville, NY 12438
Garth will sort through to see what photos work best in the layout or on the cover, and will give a free copy of the new book to everyone whose photo is used in the book. He promises to return each and every photo to its owner. If you send in photos, include your name and address, the boat design, and any interesting stories or details. (Unbridled exclamations of praise for the designer and his boats are also welcome.) Thanks!"

|
Left:
Rob Rohde-Szudy's Piccup Pram.
|
|
|
Building Piccup Pram by Rob Rohde-Szudy
(Well here we go with the first article ever written by a reader for this webpage. It's usually a bit embarrasing for a designer to read something like this about his own design. In my own defense I'll add that Piccup Pram was my very first design and I hadn't caught on to some of the problems that might appear in the builder's shop. On the other hand after Piccup Pram I got convinced that most builders don't read instructions and can figure their way through any situation. As you will see Rob had little trouble figuring it out as he went along. So my instructions continue to be a general guide and not a straight jacket....JM)
Building the Piccup Pram - Part I
Jim Michalak has designed the ultimate "first boat". It is light, convenient, easy to handle, stable, roomy, inexpensive and easy to build. What more can one ask?
Well, not much more than a little guidance in the building stages!
Here is some advice from my experience and Jim Michalak's advice when I had questions.
Oars
Do NOT build the oars first!!! They are much harder to build than the boat! Use the mast as a warmup for the oars, since its shape is less complex. For both, be EXTREMELY picky about the lumber you use. It will save you a lot of headaches to pay extra for straight, tight grain. Also make sure your tools are razor sharp. It is always a pain to practice on scraps, but I can tell you I wish I had. When you have really nice lumber, it can be pretty heart breaking to see that not-quite-figured-out block plane chop off a piece you wanted to keep! Make sure you follow the directions for oar building in JM's article at http://marina.fortunecity.com/breakwater/274/1999/0101/index.htm - they are far more complete than the instructions in the plans for Piccup. Additional hints: When you draw the centerlines, draw them on BOTH sides of the oar AND the ends, once they are cut out. Make sure you cut the shaft laminations oversize and use small finish nails to align while gluing!!! They tend to want to bow the wrong way and unbalance the oar. You do not want one side with not enough wood. Finally, these are very high quality, lightweight, durable oars, but they take some time to build. (They are worth it too, if you have seen the clumsy clubs they charge $50 for in the marine stores!) If you want to out on the water fast, consider buying oars (You'll still need to tune them up a LOT) or building "quick and dirty" oars with these instructions: http://catalog.com/bobpone/oars.htm - they won't last as long, but they work.
Building the Hull
I think the most important thing for ease of construction of having a good batten BEFORE you start. This is an essential tool and you should build it first. You need a piece that is fairly flexible, but that bends EVENLY. It helps if it only bends well in one direction. I recommend going to the library and checking out Boatbuilding by Howard I. Chapelle. In the chapter on lofting, he gives a very good description of how to make a batten. You can also find this in The Dory Book or the appendix of Classic Small Craft by John Gardner. (Both of these guys were instrumental in the small boat revival we currently enjoy and are well worth the reading anyhow!) For my batten, I used a piece of quarter round house trim that I had handy. I wish I would have taken the time to build a real batten, because I think it probably would have saved time in the long run.
Cutting out the plywood parts is quite easy, but definitely draw BOTH lines for each bulkhead. That way you do not have to keep looking back at the blueprints to figure out whether that bulkhead goes fore or aft of the line like I did!
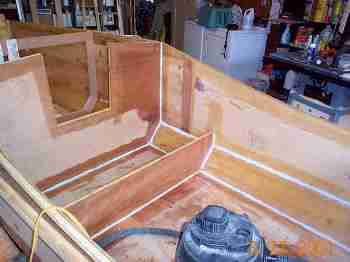
The only tricky bit of the framing setup was the framing sticks mounted to the tops of the bulkheads. A few pictures are worth many words.
Bow transom framing stick:

You'll notice that I leave some extra wood ABOVE the sheer, to plane it flush. In fact, leaving some extra wood and trimming it at the last possible moment is pretty central to all of boat building!!!
Also, here is how I made the temporary form:
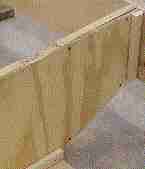
The stringers (chunks of wood you screw the sides to) are regular 1x2's. The one for the bilge panel in the picture is on the opposite side of the bulkhead so I wouldn't have to fit the corners. I used sheetrock screws for the temporary fastenings. (If you happen to use hardwood, you have to drill for even sheetrock screws.)
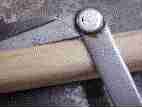
The bevels are given at 1:1 scale on the blueprint, so all you need to do is match the angle of some hinged device to the prints and trace the angle onto the wood. I used a divider, as shown below, but a regular folding ruler would work too. For that matter, a dull hacksaw blade snapped in half and a screw would also work.

(An interesting side note: JM mentioned that the original Piccup did not have these frame stringers, but they help stiffen the hull quite a bit. He is the only designer he knows of who uses this hybrid with wood stringers and stitch and tape.)
I used butt blocks as detailed in the plans. They make fairing a little tricky, since the panel tends to bulge out a little at the butt strap. The stitching will only partially control this problem, but you will also probably need duct tape or a Spanish windlass. Next time, I would consider using fiberglass/epoxy butt joints or glued scarph joints, since the hull didn't come out quite fair for me with the butt blocks. (Probably just my impatience!) Another advantage of butt or scarph joints is that there is not lump on the floor of the boat to de-stabilize whatever you sit on when you row! Other than that, the stitching was really easy and fast. The side panels stitched to the bulkheads determine the shape of the boat. Then the bottom is added and trimmed to fit at the bow and stern.
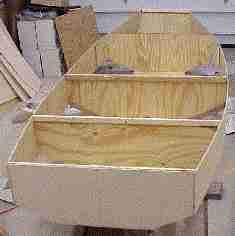
Then the bilge panels are added the same way
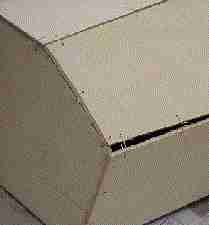
Easy!!!
(Another interesting side note: JM remarked that a company had wanted to make kits for the Piccup and could not understand why they could not cut the panels to the final dimension to begin with. The reason is simple. Even a slightly wavy cut or uneven stitching amidships could prevent the edges from meeting up at the ends! Since such small changes do not affect the performance of the boat, it is far easier to cut it to fit.)
Seam Taping
This seems really hard for the first 5 minutes and then gets MUCH easier! Make sure you mix filleting putty stiff enough because it will mix with the coat of epoxy already on the wood and slide around and not hold its shape. The 'priming coat' should be quite thin. It is FAR better to wait for this first coat to partially cure to 'stiff' before applying the fillet, then letting the fillet get 'stiff' before taping. Otherwise the fillet takes on thin epoxy and gets runny. This means uneven joints that are nearly impossible to sand smooth and require TONS of Bondo. If you want to keep your boat light, patience is a virtue! Trust me!
Knees, the great mystery
One thing that Jim does not explain too well in the plans is how these knees are to be installed and what they are to be made of. I made them from 1x6 scrap left over from the oars (I used 2 8' 1x6's because I couldn't find a good 14' 1x6!!!). I pointed the grain straight into the corner, reached under and traced the angle. Then I used a bevel guage to capture the angle of the sheer to the transom and cut that line. The bevel from the side to level is small enough that I just sanded it in with a drill and 40-grit sanding disk. Expect to do this to make the other bevel fit too! I put 2 stainless steel deck screws through the transom and 2 through the wale into these knees, along with a liberal coating of Weldwood.
Mast Step
Worry about the mast step AFTER you have stitched the hull. Take the angle off the boat with a bevel gauge and rip the bevel in mast step stock. (Note - you can make your own bevel gauge with two ends of a dull hacksaw blade and a nut and bolt to secure them together through the manufacturer's holes!)
Wales
JM calls for clear redwood for the rub rails in the plans. This wood has become nearly impossible to find. It appears, sadly, that he have cut them all down. JM recommends clear stock of a soft wood, pine, spruce, or perhaps cedar. I used clear pine. He says this is the hardest part of building the hull, but I thought it was pretty easy. Just dry fit them before you mix up any glue!
Fitting the Leeboard
This is a bit hard to follow in the plans. Do NOT trust the dimensions given for determining where to drill the hole!!! The small errors add up and make it difficult to predict exactly where this will be, SO here's how you place the hole. 1.) Clamp the board in the "up" position so the lanyard ear projects above the gunwale and the rear edge of the board is parallel to the gunwale 1" below it (just below the gunwale doubler). 2.) With a pencil, trace the bottom edge of the lower leeboard doubler (line A). 3.) Remove the board and make a line parallel to line A, 3/4" toward the trailing edge of the board (line B). 4.) Clamp the board in "down" position so the top end of the board is parallel to the gunwale and projects above it by the width of the lanyard ear, plus maybe 1/8" for clearance. 5.) With a pencil, trace the bottom edge of the lower leeboard doubler again (line C). 6.) Remove the board and make a line parallel to line A, 3/4" toward the top end of the board (line D). 7.) Drill your hole at the intersection of lines B and D. 8.) If you have not already drilled a hole in the lower leeboard doubler for the leeboard axle, make marks through the hole in the up and down positions to positively locate the point to drill.
Finishing
The sanding, Bondo-ing and painting are by far the hardest parts. They are really mind numbing and remind you how smart you were to take on a boat as small as you did!!! Jim is right, too - don't try to make it a yacht finish. You'll go crazy. Stitch and tape building does not lend itself to perfect seams!!! You can't put a perfect finish on an imperfect substrate! (Seriously, if you want perfection, I suggest you deal with the fact that it will take a LONG time and build a lapstrake or strip-planked boat. It will take just as long to get a stitch and tape boat perfect.)
However, it may be worth the money to get "real" marine paint and varnish. I hear that marine enamel takes much more of a beating than the oil based house paint I used. It normal cartopping and use, I have scraped off a LOT of paint! I may be looking into better paint when I run out of this stuff. I used Man-O-War marine spar varnish, which you can get at Menard's in my neck of the woods, and held up pretty well, as varnish goes. However, Epifanes makes a varnish that DOES NOT NEED SANDING between coats!!! It will be expensive, but after discovering how I hate sanding, I think it is probably worth whatever they want to charge me. The time savings is tremendous!!!
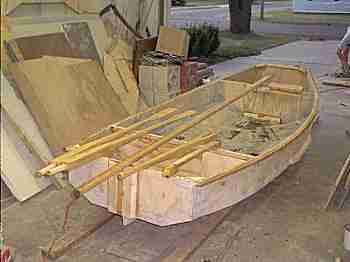
Summary
I hope that this might prompt some boat builder 'wannabees' to become boat builders. This is a great boat to start with, and I can tell you that it gets a whole lot of attention from all of the big yacht sailors who have only seen a lug rig in books! You should see the looks when I just pop it on top of the van and drive off while they are still trying to motor into their mooring and hail a tender from their club!
In the next part of this article I will discuss the Cary hinge, cleats, my rowlock experiment and rig tuning. In the meantime, if you are thinking about building, now is the time to stop thinking and start studying the plans!
Submitted by: Rob Rohde-Szudy, Madison, WI, robrohdeszudy@hotmail.com
NEXT TIME...
I'll present we'll present the rest of the essay about building Piccup Pram.
Contents
Af4Grande
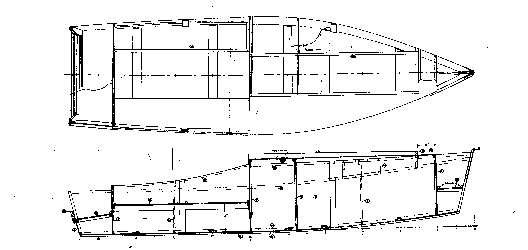
AF4GRANDE, POWER SKIFF, 21.5' X 6.5', 700 POUNDS EMPTY
Af4 Grande is a 20% scaleup of the original AF4. Scaling a design can be interesting. If the design is scaled up by a factor of 1.2 as it was here then the areas of all the panels are increased by a factor of 1.2 squared (1.2 times 1.2) which is 1.44. With a plywood boat, if you keep the panel thicknesses the same as the original, you would expect the hull weight to also increase by that amount. In thecase of AF4G that is about what I did. I used the same skin thicknesses that Max Wawrzyniak used on his AF4, 5/8" bottom and 3/8" elsewhere. He said the weight of the bare hull was about 425 pounds. So I would expect the 20% scaleup to weigh about 1.44 x 425 = 612 pounds. In this case, it isn't quite so simple and I'm guessing the bare AF4G hull would weigh about 700 pounds since the larger boat has built in seats and another bulkhead and some thicker framing. By the way, I would expect the cost of the project both in labor and materials to increase in the same proportion as weight.
With that weight in mind we might add 120 pounds for a motor larger than AF4's 10 or 15 hp and a bit of fuel. So the minimum weight now is about 820 pounds. Let's add another 80 pounds of misc. gear and we're up to 900 pounds without crew. Add maybe 500 pounds for a small family and then we have an all up weight of 1400 pounds. There seems to be a general rule of thumb for powerboats that it takes a horse for every 50 pounds of weight to plane and then you need 28 hp for this boat. The Coast Guard gives advice about powering boats and this one would max at 35 hp based on length, width, and the fact that it has a flat bottom which can be prone to handling problems if overpowered. On the other hand, this boat used solo and stripped might weigh in at 1000 pounds total and do quite well with 20 hp. In my experience with AF4 these hulls will plane with less than a horse for each 50 pounds. AF4 planes with about 7 hp at about 600 pounds total, a horse for 85 pounds. But if you try to plane it with 7 hp you have to run full throttle all the time. Better to run a 12 hp motor at 60% throttle. Using the same number for the 1400 pound AF4G the 28 hp motor might plane the loaded boat at 60% throttle. All this is preliminary guesswork.
Here is another interesting thing about the straight 20% scaleup. All of the volumes increase by a factor of 1.2 cubed (1.2 x 1.2 x 1.2) which is 1.73. So the interior volume of the AF4G is 73% greater than that of the AF4. Not only that but the volume of water the boat displaces can be in the same proportion which means it can be heavier by 73% and look the same in the water. So scaling up a boat gives big increases in room and capacity. On the other hand, scaling a boat down can result in a shocking decrease in capacity. For example if you were to scale down a 15' rowing dory by 20% to 12.5' you might expect the capacity to go from say 400 pounds to 230 pounds (400/1.73=230) and it quickly becomes barely a one person boat!
Construction is simple nail and glue like the original AF4. AF4 Grande needs nine sheets of 3/8" plywood and five sheets of 5/8" plywood. I don't think these boats need epoxy coatings if they are stored under cover. The chine corners need to be armored with fiberglass set in epoxy and inner seams given a fillet of thickened epoxy to keep water from creeping into the seams.
AF4 Grande plans are $25 until one is built and tested.
Prototype News
Some of you may know that in addition to the one buck catalog which now contains 20 "done" boats, I offer another catalog of 20 unbuilt prototypes. The buck catalog has on its last page a list and brief description of the boats currently in the Catalog of Prototypes. That catalog also contains some articles that I wrote for Messing About In Boats and Boatbuilder magazines. The Catalog of Prototypes costs $3. The both together amount to 50 pages for $4, an offer you may have seen in Woodenboat ads. Payment must be in US funds. The banks here won't accept anything else. (I've got a little stash of foreign currency that I can admire but not spend.) I'm way too small for credit cards.
Here are the prototypes abuilding that I know of:
Family Skiff: A Family Skiff has been started in Virginia.

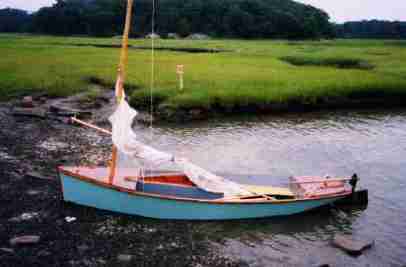
HC Skiff: One of these has been completed and sailed in Massachusetts. Here is one of the first photos - very pretty boat, I think. The builder has gotten many great comments from other boaters and it occurred to me that this boat was called the "Oystering Skiff, Cape Cod, taken off at Orleans (Massachusetts), Aug 7, 1933" in Howard Chapelle's great book American Small Sailing Craft, where I got the lines. So this is sort of a retro photo with classic boat in its classic Massachusetts setting.
Electron: An Electron has been started in California.
Mayfly: The prototype of the original 14' Mayfly is finished in New York state. Here it is on its first sail (Long Island Sound).

AN INDEX OF PAST ISSUES
Herb builds AF3 (archived copy)
Hullforms Download (archived copy)
Plyboats Demo Download (archived copy)