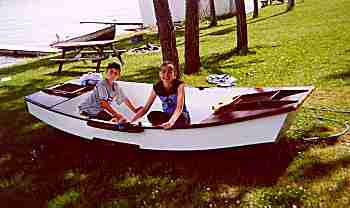
Doug Bell's (Winnipeg) kids think about dad's Piccup Pram.
Contents:
Contact info:
Jim Michalak
118 E Randall,
Lebanon, IL 62254Send $1 for info on 20 boats.
Jim Michalak's Boat Designs
118 E Randall, Lebanon, IL 62254
A page of boat designs and essays.
(15jan02) This issue will will begin a series about assembling an "instant" boat. I think the subject will absorb the next three issues.
ON LINE CATALOG OF MY PLANS...
... can now be found at Duckworks Magazine. You order with a shopping cart set up and pay with credit cards or by Paypal. Then Duckworks sends me an email about the order and then I send the plans right from me to you. The prices there are $6 more than ordering directly from me by mail in order to pay Duckworks and credit charges. The on line catalog has more plans offered, about 65, than what I can put in my paper catalog and the descriptions can be more complete and can have color photos.

|
Left:
Doug Bell's (Winnipeg) kids think about dad's Piccup Pram.
|
|
|
Making A Hull 1
THOUGHTS ABOUT MAKING A JIGLESS BOAT....
FIRST....
If you are making a sailboat and intend to make you own sail, be sure to make the sail before you start the hull. Here is why. The sail and hull usually need about the same assembly area. That is to say if you are building a boat that is 16' long and 5' wide you will need a clear work space that is about 20' x 10'. Usually you will need about the same area to make the sail for that boat. So if you clear that work space and make your sail first, you can bundle it up and stow it in a closet or in a corner while you work on the hull. If you make the hull first you will be out of luck for a work space to make your sail since you will need that space to store your hull. Not to mention having the space spattered with glue and paint. So make your sail first and get that over with in your head. Having the sail done will give you a jump start on making your hull.
NEXT, TEMPORARY FORMS....
Look over your plans and see if there are any temporary forms. Usually these will be made of lumber, sometimes plywood, and will be discarded after the hull has reached a point where they are no longer needed. You want to make these frames and forms first.
I suggest you make the lumber forms first. Take one of the sheets of plywood that will be used for the hull panels and draw the shape of the forms on it. Here you aren't going to cut the plywood, only use it as a platform to assemble the lumber forms. Cut the lumber to fit the full sized layout on the plywood and screw it together so it fits. Usually an acceptable tolerance for something like this is 1/16" but you can get away with more sometimes. The last step is very important: be sure to mark bold centerlines on both sides of the forms and on the top and bottom edges too. Temporary forms seldom have bevels on any edges.
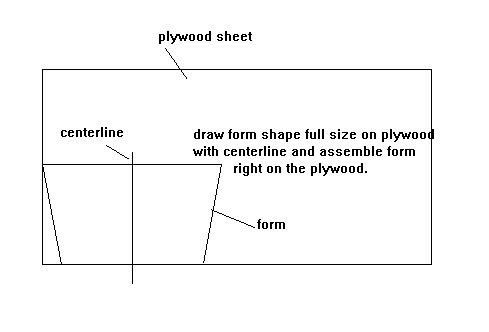
Sometimes the temporary forms are made from plywood. In that case lay out the form full size on the plywood, complete with its centerlines, and cut it out with a circular saw or with a saber saw. You will need to attach cleats around the perimeter, usually 3/4" x 1-1/2" and attached with screws, to screw the hull panels to and to stiffen the form. As always, mark centerlines boldly.
Store your forms flat against a wall.
STEM...
Now is a good time to make a stem piece. (Pram shaped boats will not have a stem piece. And double ended boats may have both a stem piece and a similar stern piece).
Normally on my designs the stem is made from a piece of 2x4 lumber (which is 1-1/2" x 3-1/2" in reality). You should make the stem piece longer than required with the idea of trimming it to length later in the assembly.
You need to cut the sides of the stem piece on a bevel. I usually dimension the stem bevel both with degrees and with inches, and I usually show the stem cross section full sized. The best tool for this job is a table saw although a circular saw or bandsaw, or even a saber saw will also do the job. Set the saw at an angle that will cut the bevel correctly in one pass and slice off one side. Then set the saw fence carefully so that when you slice off the other side at the proper bevel the piece also have the correct total width. And as with the forms be sure to mark the centerlines on all sides of the piece.
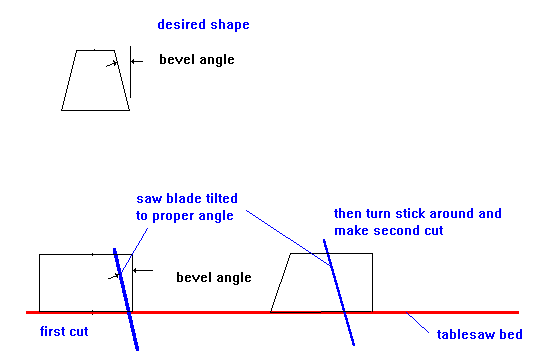
You can also make the stem piece bevels with a plane as was usually done in the old days. In this case draw the shape of the piece on all four sides and work it down a shave at a time. Don't forget the centerlines.
SIDES...
It is time to cut plywood. Look over the plywood panel layout drawing for a while. The parts almost always fit together like a jigsaw puzzle on the plywood sheets. It would be nice right now to cut out the bulkheads and transom(s) but often you can't do that without first laying out the shapes of the larger hull panels. (Why is it done that way? I've found the most effecient way to lay out the pieces from the standpoint of getting the boat out of the least number of plywood sheets is to start by drawing the largest panels first and then fitting the smaller ones on what is left over.)
Here is how to lay out the shape of the side panels.
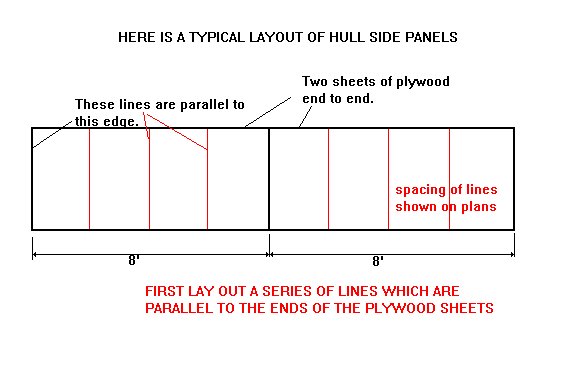
What you are going to do is enlarge the scale drawings right onto your plywood sheets. The scale drawings have sort of "digitized" the curved shapes by laying out a grid of sorts. Often there are dimensions every foot or two. Look on your drawing and see what the spacing is. Then place your plywood sheets on the floor and draw lines across the sheets at that interval. These lines need to be perpendicular to the bottom length of the sheet. You might check them with a square, but usually (not always so you have to check) plywood is made very accurately both is squareness and in size. And once you have verified that the edges of the plywood are square, then you can lay out the grid lines with great accuracy by just making them parallel to the ends of the sheet as shown. It's very easy. If your side demands two sheets of plywood, then you lay them both down on the floor end to end and lay out the grid making sure the two sheets never shift.
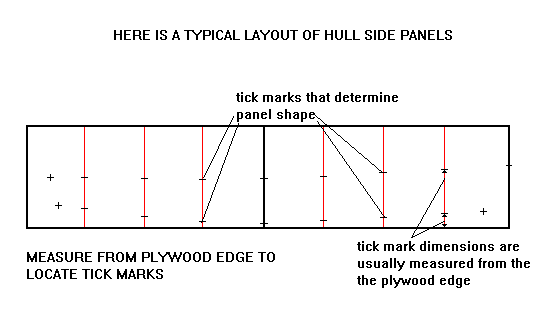
Next step is to lay out the actual curved lines that give the shape of the hull panel. That is done by making tick marks at just the right places on those grid lines you just drew and connecting them. On my plans almost all the tick marks are measured up from the bottom of the plywood sheet. So you can hook your measuring tape on that edge and make the required ticks on each grid line. It might look like this:
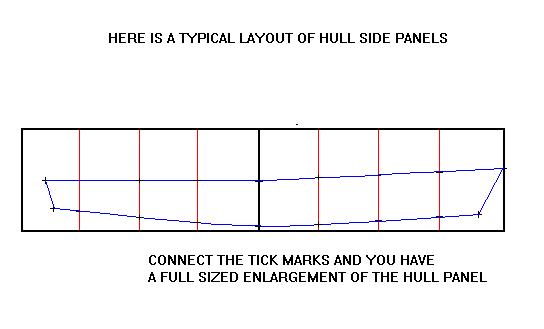
Last, lay a batten down on the plywood and bend it through the tick marks and secure the batten in place with weights (bricks can work OK if the bend isn't too severe) or with temporary nails or screws. Then draw through the tick marks with a fairly dark pencil or pen. You have enlarged the shape of the panel!
It should look like this:
(What is a batten?? Just a long flexible stick. The best ones seem to be about 3/8" x 3/4" in cross section with no knots. It doesn't have to lay straight on its own - it can have a natural curve and still be a good batten. Often you can see a really good batten in a larger piece of wood. For example if you have a 16' 1x4 piece of lumber with one knot free edge, you might rip off that good edge and save it as a batten. Once you get a good batten, save it!)
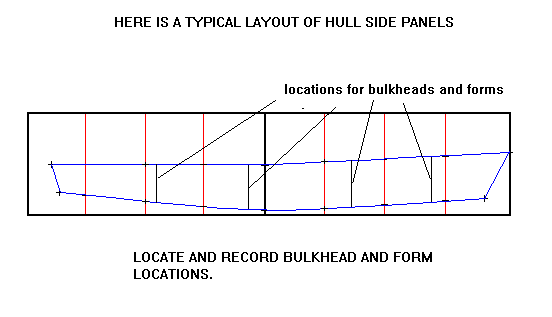
There is one last important step in laying out most hull panels. Many also must have the location of the bulkheads and forms drawn in. Locate them as shown on the plans and draw the locations boldly on the panel layout, like this:
Now you are done with one panel! You will need to make a mirror image of it on other sheets of plywood. You don't need to do the layout all over again, although you could if you wanted to. You could also use the first panel as a pattern for the mirror image panel. You could cut out the first panel and trace around it to shape the mirror image. Some builders clamp the first pattern over another layer of plywood and cut them both out with one cut! I think all of those methods will be fine. Just remember that the mirror image must indeed be a mirror image and not a straight copy of the first panel - butt plates used to connect the sheets and lines locating bulkheads and forms need to be on opposite sides of those mirror images.
CUTTING OUT THE HULL PANELS..
You have a few options now. You can go ahead and draw in all the bulkheads, etc., everything that you can before you cut out the hull panels that you have just layed out. (You won't be able draw in the last "cut to fit" items such as the decks and bottom panels in some cases. ) Or you can cut out the major panels and then lay out the remaining parts on the remaining plywood pieces. Either way is OK.
As to cutting out the hull panels you have also have options. You can cut out the pieces with the idea of gluing them together with butt plates later. Or you can often glue the big plywood panels together with butt plates before cutting out the hull panels. Doing that can be more accurate than gluing the panel sections together after first cutting them out, but sometimes the layout on the plywood sheets does not allow it.
Either way cutting out the large plywood panels goes like this. Raise the plywood off the floor with sacrificial bits of lumber, such as 1x4's, so your sawblade stays clear of the floor. Set your circular saw so it cuts to a depth about 1/4" deeper than the thickness of your plywood, and saw away. A circular saw with its blade set about 1/4" deeper than the plywood thickness will easily cut most boat curves. That is one way to do it. I suppose another way is to place the panels on saw horses one at a time and cut them out a few feet at a time. You can cut one out with a saber saw that way. But a circular saw with a good sharp blade seems to give smoothest cuts.
Once the larger hull panels have been cut out, the plywood pieces that remain should be more managable and you can lay out the remaining bulkheads, etc., and cut them out.
MAKING THE BULKHEADS...
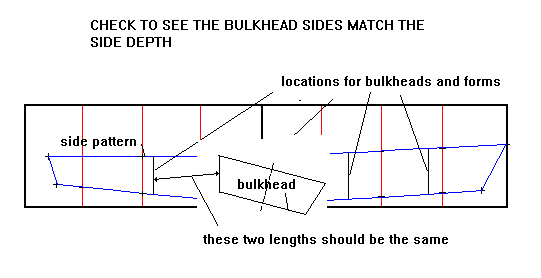
Lay out the bulkheads and cut them out with a circular saw or a saber saw. Here is a bit of boat building reality. The length of each bulkhead's side should match the depth of the hull when installed at its proper place. Now that you have the hull sides cut out and have the bulkhead locations marked on the sides, take a minute and measure the depth of the side panel there. For the bulkhead to fit properly that depth should match the length of the bulkhead's side edge. Check the length of the bulkhead's side edge to be sure. Don't be surprised if it isn't quite right. There are lots of assumptions and tolerences involved in these lengths and getting them to come out exactly correct is rare. But once you measure the depth of the side panel at the bulkhead location, you can often adjust the bulkhead prior to cutting it to allow for the variation. It is a lot easier to do it now than after the bulkhead has been assembled with its framing sticks.The usual "adjustment" is to add or subtract some material from the top and/or bottom edge of the bulkhead. Like this:
The perimeters of the bulkheads usually have framing sticks, 3/4" x 1-1/2" lumber usually on a small boat. I've written an essay about making the bevels on the edges of bulkheads. There are several ways to do them. You will need to look at the drawing to see the angle of the bevel and to see which way the bevel slopes.
The framing sticks can be beveled before or after they are assembled to the bulkhead's plywood. The sticks should be both glued and nailed to the bulkhead but it always pays to "dry fit" the sticks in place. With today's dry wall screws that is easily done. Here is how I would assemble a typical bulkhead. I would cut the bevels on the sticks before assembly on a table saw. Then I would cut the sides sticks to be long and dry fit them to the plywood panel, first holding them with clamps, then drilling some lead holes for drywall screws, then fix the sticks to the plywood with two drywall screws per stick. Remove the clamps.
Next I would carefully fit the top and bottom framing sticks, install them with screws, and then trim the ends of the side sticks to length and to match the beveled edges of the top and bottom sticks. (Often a hand hacksaw with a metal cutting blade does a very good job at making these fussy end cuts.)
Lastly I would remove one stick and butter it with glue. Slightly thickened epoxy is best but Weldwood plastic resin glue will work. So will PL Premium, the only tube glue that I would try at this time. Put the piece back on the assembly and reinstall the screws. It will go back exactly into its original position. Drill some lead holes for nails at about 6" spacing and drive in some nails. You can now remove those two screws and drive nails in their holes.
Glue the remaining sticks in place the same way but make a point of getting a wad of glue in the areas where the end of one stick meets the side of another. I think that is the most likely place for leaks and rot to get started.
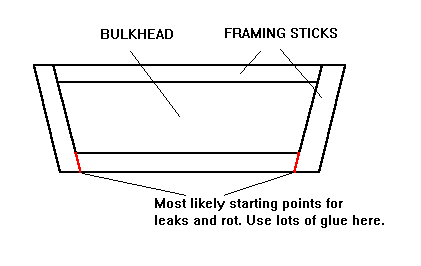
Set it aside to cure. After cure be sure to mark centerlines boldly.
TAKING STOCK...
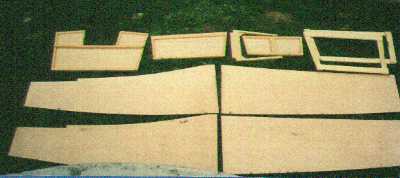
At this point you have the sides cut, the frames, stem and bulkheads assembled. You are ready to start assembling your hull! Here is what the pile looks like for an AF3, photo supplied by Pierre-Yves Gabi in Switzerland:
NEXT TIME...
...Putting the pieces together.
Contents
FOLDEROL2
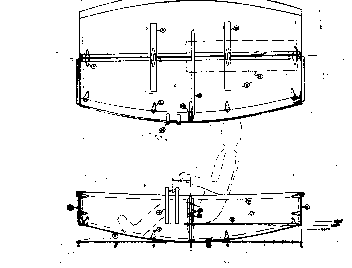
FOLDEROL2, FOLDING DINGHY, 6' X 43", 60 POUNDS EMPTY
I tried drawing a folding canoe a few years ago but thought twice about it, thinking little canoes are easy to stow even when they don't fold. But I mentioned it to Dave Carnell who has been boating for many years and never throws away a boating magazine. He sent me copies of two folding boats that appeared in "how to" magazines, especially Boatbuilder's Annuals that Science and Mechanics used to put out generations ago. One of those boats was "Handy Andy". How old is the Handy Andy design? This year someone gave me a 1948 copy of the Boatbuilder's Annual and Handy Andy is in there. I'm guessing many designs in the issue go back into the 30's since one might think that boat designers had other things to do in the early 40's. Handy Andy used modern plywood, probably better plywood than we can get today, and used canvas to seal the flexing joints.
Modern folding boats like the Portaboat look like they use flexible plastic sheets at the folding joints, something the home builder won't be able to use. So I went back to the Handy Andy technology which used common metal hinges to make structural joints between panels with waterproof fabric to seal the water out. Where Handy Andy used canvas I would suggest something like Aqualon which is very tough and totally waterproof by my experience.
The layout of a folding boat requires that the joining panels have exactly the same curve which is why most folding boats look pretty spooky. Folderol2 is done that way and to keep it simple I made it the same fore and aft. It is very short at 6', the absolute minimum for two adults. You can imagine a standard bathtub to get an idea of the size. When folded up it will be 6' long, 18" wide and maybe 6" deep. The usual talk will be that you could carry it on your "cruiser" to walk the dog or get the groceries. Maybe so, but I think the real use will be for apartment bound folks who will keep one folded up in the back of the vans, etc.. It could stay there all the time ready to go, quite out of the way.
Well, I think Folderol2 is a very experimental boat. The fact that the idea never caught on even though Handy Andy has been around for fifty years might mean something. The seals will be Ok given care in gluing to the panels. I'm not certain how well the folding system will work. I'm not certain how sturdy it will be since the panels have to be flexible enough to stow flat and still bend to shape on demand. But when used for minimum rowing the structural demands should not be great. Forget about using a motor or sail on it.
Folderol2 uses two sheets of 1/4" plywood and sixteen hinges by my count. The amount of frabric required is not a lot. I think the fabric will be glued with contact cement and the seam battens bolted over the glued joints just to be sure, as was done with Handy Andy. I suppose today's glues are a lot better than the old glues and the seam battens might be overkill. Then again, if I had one of these I would be sure to have a roll of duct tape with me just in case.
Plans for Folderol2 are $15 until one is built and tested.
Prototype News
Some of you may know that in addition to the one buck catalog which now contains 20 "done" boats, I offer another catalog of 20 unbuilt prototypes. The buck catalog has on its last page a list and brief description of the boats currently in the Catalog of Prototypes. That catalog also contains some articles that I wrote for Messing About In Boats and Boatbuilder magazines. The Catalog of Prototypes costs $3. The both together amount to 50 pages for $4, an offer you may have seen in Woodenboat ads. Payment must be in US funds. The banks here won't accept anything else. (I've got a little stash of foreign currency that I can admire but not spend.) I'm way too small for credit cards.
Here are the prototypes abuilding that I know of:
Electron: The California Electron is coming along. Right now a four cycle 2 hp outboard has been purchased so the original electric idea may wait a while.
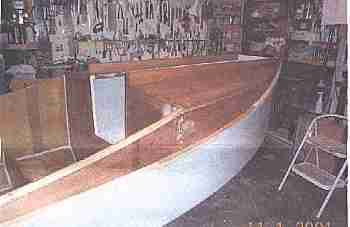
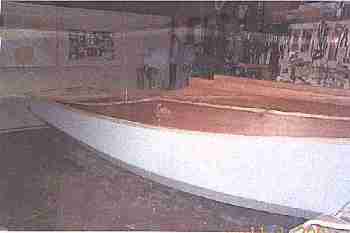
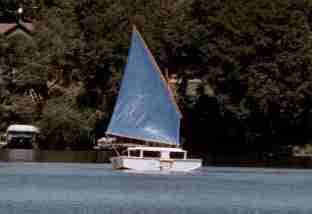
Mayfly: The prototype of the original 14' Mayfly is finished in New York state. Here it is on its first sail (Long Island Sound).

A Jewelbox Jr has been completed (with a lug rig) in Idaho. Waiting for good photo and some more testing but so far so good says the builder.
AN INDEX OF PAST ISSUES
Herb builds AF3 (archived copy)
Hullforms Download (archived copy)
Plyboats Demo Download (archived copy)
Brokeboats (archived copy)