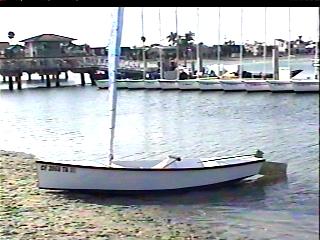
Todd Snyder's Mayfly12 in California.
Contents:
Contact info:
Jim Michalak
118 E Randall,
Lebanon, IL 62254Send $1 for info on 20 boats.
Jim Michalak's Boat Designs
118 E Randall, Lebanon, IL 62254
A page of boat designs and essays.
The 1aug02 issue will present an article about Piccup Pram accessories. The 15aug02 issue will rerun an article about making your own oars.
ON LINE CATALOG OF MY PLANS...
... can now be found at Duckworks Magazine. You order with a shopping cart set up and pay with credit cards or by Paypal. Then Duckworks sends me an email about the order and then I send the plans right from me to you. The prices there are $6 more than ordering directly from me by mail in order to pay Duckworks and credit charges. The on line catalog has more plans offered, about 65, than what I can put in my paper catalog and the descriptions can be more complete and can have color photos.

|
Left:
Todd Snyder's Mayfly12 in California.
|
|
|
Piccup Pram Accessories
BEFORE WE GET STARTED...Rob Rohde-Szudy wrote the article that follows. Last year we presented his article about building Piccup Pram and this one is about some accessories for it.
Rob and family brought their Piccup down from Wisconsin to the Rend Lake Messabout in June. (What a wonderful bunch!) I spotted a few tricks that don't appear in the following essay and wanted to pass them along.
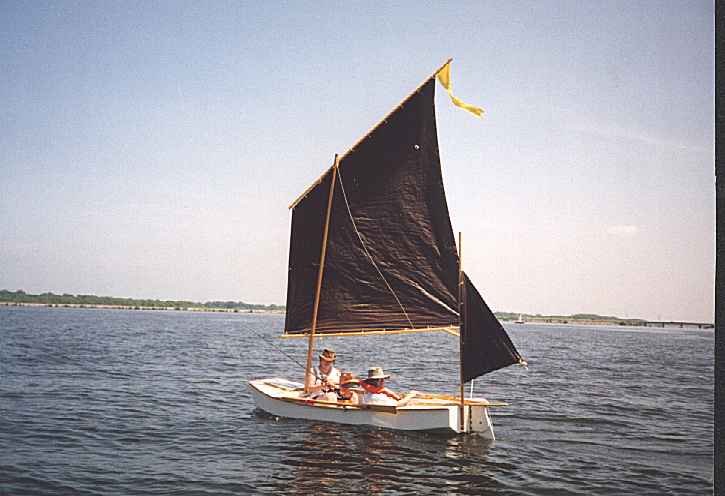
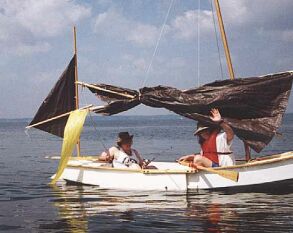
First you see he is using a small mizzen sail. It does what mizzens are very good at which is to allow you to trim the helm exactly as you want and also to keep the boat head to wind at anchor or when you just want to stop sailing for some reason, letting the boat drift backward under control. Without a mizzen almost any boat will turn sideways to the wind and waves when left to itself. Rob did what I advise to anyone wanting to add a mizzen which might not be used all the time - he mounted it outside the hull transom so there are no holes penetrating the hull. By the way, my own feeling about mizzens is that they are valuable to a boat which will be "cruised" but on a daysailer they are usually just unneeded complexity.
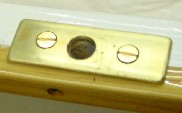
Second, I spotted on his boat this mast step:
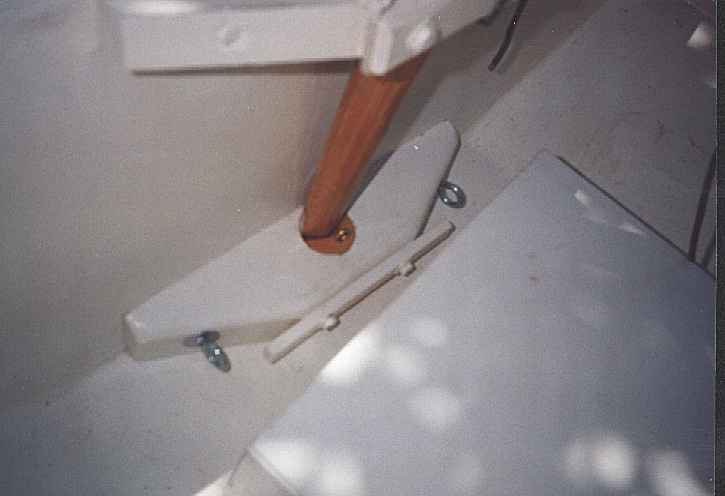
I've never seen this done before but it is so simple that surely it has. We'll call it the RZ step until someone else points out a previous inventor. What he has here is a tapered mast heel that is narrower than the hole in the step. Then he has a plug that fits in to take up the extra space. If the plug is behind the mast heel then the mast rakes aft a bit, and if the plug is moved to the foreward side of the mast heel then the mast rakes forward a bit. So he has an adjustment to help fine tune his boat. What I have seen before are mast steps that screw into position to allow shifting and tapered wedges at the partner to do the same thing. This looks simpler to me and can be adapted after the fact to most any boat with a similar mast step and partner.
Now to the main event....
ACCESSORIES FOR THE PICCUP PRAM....
Jim Michalak has designed the ultimate "first boat". It is light, convenient, easy to handle, stable, roomy, inexpensive and easy to build. What more can one ask?
How about a follow-up on some of the questions I raised in previous articles.
Thole Pins - Success!!!
Readers may remember that I had some difficulty implementing thole pins when I first built my piccup pram. I am pleased to report a success! If you look at Jim's article on rowing here, you will see at the bottom a cheap approach to oarlocks and sockets developed by Phil Bolger. To review, my problems with thole pins were grommets slipping off the pin, excessive play/wear, harder cartopping, and inability to feather. The last of these was partly because my oar looms were overly square. I even had to round them more to get them to fit in standard bronze oarlocks! Looking at Bolger's method, we see that the thole holes are reinforced with thin metal on the top and bottom faces of the gunwale. This, because they are thinner than my hardwood pads, makes cartopping easier AND helps prevent play and wear in the hole. Bolger's approach is ingenious in the way it uses a metal strap instead of a rope grommet, which reduces play of the oar, and a cotter pin to prevent the strap slipping off. Unfortunately, this method requires brazing!
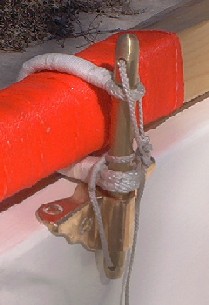
Well, I can't braze while watching my daughter, but I can do ropework. My approach is to make a short rope loop with an eye seized into each end. Then I stitch on another small rope loop as the spacer. The picture makes it much clearer.
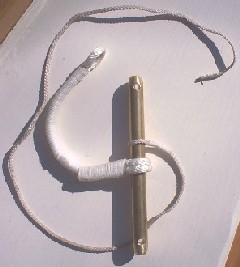
Using Bolger's cotter pin works, but I used the bitter end of the retaining cord in place of the cotter pin to avoid chafing the rope. I run these cords from the middle of the pin (enclosed by the grommet) through the hole in the bottom of the thole pin, through the hole in the top, and tie a rolling hitch around its own standing part. I tried a cotter pin in the bottom hole, but it runs into the paint on the side of the boat when the thole pin turns.
I use these thole pin oarlocks backwards from how Bolger does. That is, the oar in pulling against the ROPE, not the pin. This reduces wear on the oar loom, and allows you to simply let go of the oars and have them trail overboard. If this system seems radical, take note that it is the same as the oarlocks on racing sculls, and that fishermen in the age of oars often used this so they could let the oars trail and tend their lines, having them ready to use again in an instant - an undeniable benefit for the single-hander!
A word about metals. You will notice that I used brass for my pin and plates. This was for two reasons. First, brass is easy to work. Second, I already had one set of factory oarlock sockets installed, and I didn't want a harder steel thole pin to chew them up. If I were starting over, I'd probably do it all in steel, Bolger's way. Steel is certainly cheaper!
I bring this up because I needed to do a metal to metal joint after all. Don't ask me what I did wrong, but my oars tend to create some upward force on the oarlock (another reason Bolger's locks are better than factory locks!). If you look at the picture, you can see that the rope grommet is held on to the thole pin by running the light retaining cord through a hole above it. Well, when rowing really hard, the grommet can get past that cord and pop off. I needed something solid - like Bolger's cotter pin, but bigger so it doesn't chafe the grommet. I cut 2 2.5" sections of 1/4" brass rod and drilled through the top of the thole pin so they would not quite fit. Then I put the 1/4" rod in the freezer and heated up the thole pin with a cigarette lighter. After I hammered the cold (contracted) metal through the hot (expanded) metal, they locked together permanently at normal temperature! Almost as good as brazing! The crosspiece serves not only as a cotter pin to keep the "grommet" on, but also as a cleat for the retaining lanyard - much easier and faster than tying knots in little cords all the time!
Factory oarlocks do have a place, though - put a set in the sockets you are not using and rest the oar in them when you're not using them. They sit there, out of the way above the gunwale yet ready to use in an instant! This too works better when you use the thole pins "backwards", because the oar looms are not hanging inboard.
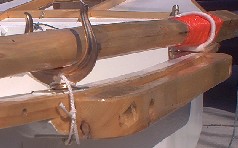
Only a few "issues" remain at this point. The main one is that the upward force on the oar tends to unwrap the whipping on the rope grommets. I didn't whip them perfectly, but a thin coat of varnish would probably help immeasurably. This will be my first approach once I find time to re-whip them. Of course, they may also be coming apart easier because I used cheap braided nylon. The stretch might be shucking off the whipping. If this turns out to be the case, I'll stop worrying about because I probably don't need it anyway - it looks more 'seamanlike', but it is far easier to re-sew the rope splices than re- whip the whole thing. I may also experiment with leather thongs in place of rope, perhaps a number of passes of bootlace, twisted. Or some harness scraps, since my wife is into horses. Failing both of these, I will give in to Bolger's genius and do it his way!
Rowing Seat
If you're going to row for any distance, you really need to have a good solid stretcher to brace your feet against. However I didn't want to spoil the wonderful open interior of the boat. The answer? A rowing seat with adjustable stretcher attached by lines! I made the seat as a box, using scrap 1/4" ply left over from the hull and 1x2 scraps as stringers, fastened with Weldwood and #8x3/4" screws. As for dimensions, I made mine the same size as a standard flotation cushion, the height set to put the top of the cushion about 9" below the oarlocks, which feels about right for my body. The top of the box seat is held down by a pair of webbing straps with buckles - they also pad the bottom. (Obviously there are other ways!) I have cargo eyes in the mast step and the aft bulkhead, so I ran a line through them and cleated it taut to the mast step cavil. This line holds down cargo, the rowing seat, the stretcher, and whatever else needs holding down. The stretcher is simply a 1x2 supported by some blocks made of 2x4. There are heavy screw-eyes in the blocks and a line runs through them. One end of the line is tied to an eyebolt on the seat, and the other belayed on a cleat on the opposite side of the seat. This provides quick and easy adjustment for the stretcher. When not in use, the lines can be wrapped around the whole works and cleated to keep it tidy. There is another line attached to the first cleat that loosely connects the box to the mast step so it doesn't get lost if capsized. A WATERTIGHT box seat is also a handy place to keep your "capsize survival kit" with warm clothes, rocket flares, waterproof matches, first aid kit, etc. (Meaning you REALLY don't want it lost if you capize!!!)
I must point out that any ready-made box of the right dimensions would save a lot of effort - I just couldn't find a watertight box the right size that I could sit on. I must also point out that this would probably be simpler with a removable thwart on risers mounted on the side panels. I may try this in the future.
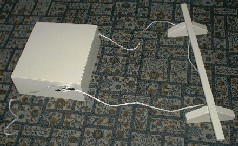
Boarding Ladder
I freely admit that I am no great sailor, and it is DAMNED reassuring to know I can get back in if (when) I fall out or capsize. I used a version of Reed Smith's reboarding ladder. I made it from 3/4" plywood, making it fit the space to the starboard side of the aft hatch. I added a plywood doubler on the inside of the aft bulkhead for the cleats to screw into - they have to be REALLY strong!!! As Jim says, a ladder that breaks is worse than none at all! I also felt the ropes could run through a ladder rung to provide a handhold in the right place when you need it and move out of the way when you don't. I thought of adding a rope ladder rung on the bottom to reduce body contortion in reboarding, but it's probably more trouble than it's worth. Another good idea would be a cleat on the transom (in my case on the "gudgeon" of my "Cary Hinge" rudder fastening) to keep the ladder in place in rough water. The same cleat could hold it down until it is needed. Right now I have to untie two taut line hitches every time I break out the ladder.
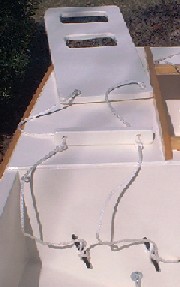
In use, you grab the top of the ladder with your right hand, mizzen with your left, get your right foot in the lowest ladder rung, get your right hand on the 'floating' rung on top of the deck, and swing yourself up until you can grab the coamings or bulkhead with your weight on top of the boat. It's not that graceful, but way more so than trying to be a gymnast without a ladder! An improvement to my design would be using a ROPE rung for the 'floating' rung, because it is hard to get your fingers under the wood rung against the deck. Another would be to wrap the lowest rung in soft rope to make it easier on bare feet. I will be incorporating these ideas!
Hiking Stick / Tiller Extension
OK, so I'm not racing this thing and hiking way out to windward. It's really a tiller extension, but it looks like a hiking stick. It's easy to rig too - the lanyard creates a loop on the underside. This loop goes around the end of the tiller, and the lanyard gets snugged up and cleated on top. It only really works, though, if you have a tiller made with a knob on the end.

Anchoring
Not everyone wants to anchor a day-sailer, but some of us do - to go swimming, picnic, camp, whatever. However, the hardware for belaying anchor rode tends to get in the way of cartopping. For now, I just tie a cheap nylon rope to the mast partner. In a light boat like this, the weather has to be pretty nasty to cause trouble with leading the rode over the foredeck. A bow cleat would alleviate this problem, but creates too many other problems with cartopping, and renders the anchor rode less accessible if problems do arise. Probably the best option is fitting cleats on each gunwale just forward of the mast and fastening a rope traveler to them for the rode to lead through. That way everything stays accessible! I will probably do this at some point. For the anchor itself, I like the look of the West Marine 8 lb. "River Anchor" for the muddy inland lakes where I live. However, those with rockier bottoms might consider the folding grapnel anchor, also from West Marine. Both are compact - pretty important on an 11' boat! In all honesty, I use a coffee can with some relatively wedge shaped stones hammered into it! Whatever is it made of, and wherever you stow it, it should be firmly fastened to the hull, or else it will help you flip over when it slams down to the lee side of the boat in 15 mph wind!
Knot Meter / Depth Sounder
The following is a very clever alternative to electronics. I wish I could remember where I copied it from to give proper credit! Let me know if you know! Read on...
If your boat doesn't sport a nifty electronic knotmeter, or the dang thing packed it in, you can use your GPS speed reading if you average the results over a few minutes for a reasonably accurate SOG (speed over ground). If you don't have a GPS, or the dang thing packed it in, or you need velocity through water (to account for current effects on SOG), here's a little trick I picked up from "The Complete Sailor".
1. Tie a 51 foot 1/4" nylon braid line to a tennis ball and cleat the loose end off at the stern.
2.Toss the ball overboard (ahead of the stern cleat).
3. Time how long it takes the 50 ft cord (1 foot for cleat tie off and angle compensation) to become taut.
30 sec = 1 knot/1.2 mph/1.8 kmph
15 sec = 2 knots/2.3 mph/3.7 kmph
10 sec = 3 knots/3.5 mph/5.5 kmph
7.5 sec = 4 knots/4.6 mph/7.4 kmph
6 sec = 5 knots/5.8 mph/9.2 kmph
5 sec = 6 knots/6.9 mph/11.0 kmph
4.25 sec = 7 knots/8.1 mph/12.9 kmph
3.75 sec = 8 knots/9.2 mph/ 14.7 kmph
Now here's where I can start taking some credit for this wonderfully simple yet highly accurate (especially at slower speeds where most other devices suffer) idea.
We printed the speed/time chart (above) and put it inside the clear tennis ball container (facing out) so it was always handy, and have tied a lead to the cord bitter end for a manual 50' sounder.
We always take two speed measurements, and use it if they're identical. (The first one being slower could be due to a kink in the line paying out). If the first reading is slower than the second we make a third, and if the latter two are identical we use it.
The lead, line and tennis ball all stow away in the container.
So there you have it, the most reliable (no batteries or vibration/corrosion sensitive electronics) anti-theft/vandal resistant (when stowed) depthsounder/knotmeter combo available, at the lowest possible cost.
Submitted by:
Rob Rohde-Szudy
Madison, WI
robrohdeszudy@hotmail.com
NEXT TIME...
...making oars.
Contents
ROGUE
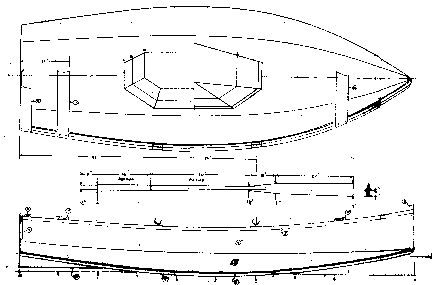
ROGUE, ROWBOAT, 10' X 3.5', 60 POUNDS EMPTY
I keep trying my hand at these little rowing boats. The idea is that they will cartop very easily, row quite well with one person and take two adults in a pinch. I also try to keep them somewhat seaworthy and easy to beach.
Rogue should be a very good cartop all around rowing boat. I kept her length down to just 10' which should mean that the boat will be short enough to cartop without bumper ties. That gets important because automobiles lost their metal bumpers back in 1990. It will also keep the weight to about 60 pounds for an easy lift to the roof. It should be easier to load than an 8 foot dink because those really short boats often can't be loaded one end at a time - they must be put up there all at once. Even ten footer might be too short for "one end at a time" loading although I know I can load an 11' Piccup Pram that way on a compact car, at least.
I kept the capacity up there at about 400 pounds with lines such that the stem and stern are still out of the water. With a light weight hull that should mean the boat might still row well with two adults. One might ask why longer boats are preferred. First, a longer boat can be faster at any loading because when operated at a low power mode, the speed of the boat is limited by waterline length, the longer the faster. That's because long boats make less waves that short boats and those waves are made by your arms in a rowboat. There are limits to the length, of course, but a really serious racing hull might be 20' long or more for a single seater. (I once saw on a college campus a racing boat for a four man crew, over 60' long as I recall. The rowing coach was trying to recruit men to row it, saying he preferred red shirted basketball players - the bigger and taller the better.) And one might remember that there are other elements that cause drag such as skin friction and windage, both factors get worse as boat length increases.
I went to multichines with Rogue and would expect her to be a good sea boat for the size, at least when rowed solo. (That is another argument for a longer boat. When loaded with a passenger the weight in the boat gets pushed to the ends and in rough water the boat will not lift itself over the waves but instead pushes through them and that usually slows you down. A longer boat is not affected as badly here.) I'm quite certain that a multichine hull has less drag all around than a flat bottomed boat, although I suspect the V is better yet. The multichine hull is a very good compromise in that it will beach flat and have draft somewhere between a flattie and a V bottom, everything else being equal. My first rowboat, Roar, had a hull like Rogue, but was 14' long. I found out from it that a multichine has little resistance to side loads, as in a cross wind. Thus to avoid needing to row in a "crab" in crosswinds, a multichine needs a lot of skeg area and a full length keelson.
Construction is taped seam. Three sheets of 1/4" plywood will do it and only two thirds of that ends up in the boat, the rest used as temporary forms that are removed. No jigs or lofting.
Plans for Rogue arel $15 until one is built and tested.
Prototype News
Some of you may know that in addition to the one buck catalog which now contains 20 "done" boats, I offer another catalog of 20 unbuilt prototypes. The buck catalog has on its last page a list and brief description of the boats currently in the Catalog of Prototypes. That catalog also contains some articles that I wrote for Messing About In Boats and Boatbuilder magazines. The Catalog of Prototypes costs $3. The both together amount to 50 pages for $4, an offer you may have seen in Woodenboat ads. Payment must be in US funds. The banks here won't accept anything else. (I've got a little stash of foreign currency that I can admire but not spend.) I'm way too small for credit cards.
Here are the prototypes abuilding that I know of:
Electron: The California Electron looks done to me. Right now a four cycle 2 hp outboard has been purchased so the original electric idea may wait a while.
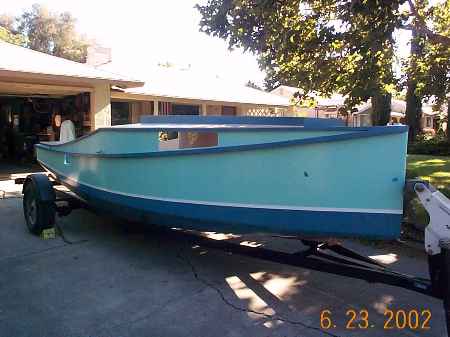
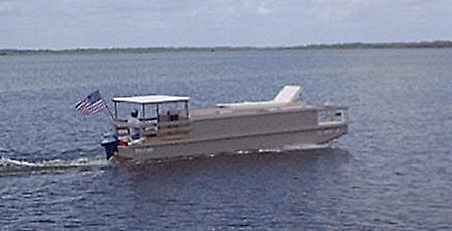
Shanteuse: The stretched (16' to 24') Shanteuse still awailts its windows. Here it is on trials for Florida river cruising.
Sowsear: Haven't heard anything lately of the Pennsylvania Sowsear.
AN INDEX OF PAST ISSUES
Hullforms Download (archived copy)
Plyboats Demo Download (archived copy)
Brokeboats (archived copy)
Brian builds Roar2 (archived copy)
Herb builds AF3 (archived copy)
Herb builds RB42 (archived copy)