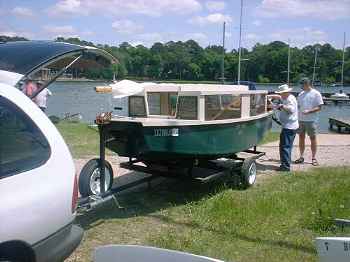
Bob Williams' IMB at the Houston Messabout.
Contents:
Contact info:
Jim Michalak
118 E Randall,
Lebanon, IL 62254Send $1 for info on 20 boats.
Jim Michalak's Boat Designs
118 E Randall, Lebanon, IL 62254
A page of boat designs and essays.
(1may02) This issue will discuss butt joints in plywood sheets. The 15may02 issue will present an essay about building the HC Skiff.
ON LINE CATALOG OF MY PLANS...
... can now be found at Duckworks Magazine. You order with a shopping cart set up and pay with credit cards or by Paypal. Then Duckworks sends me an email about the order and then I send the plans right from me to you. The prices there are $6 more than ordering directly from me by mail in order to pay Duckworks and credit charges. The on line catalog has more plans offered, about 65, than what I can put in my paper catalog and the descriptions can be more complete and can have color photos.
NOTE, 26APR02, THE DUCKWORKS MANAGER IS ON VACATION FOR A FEW WEEKS RIGHT NOW AND IT IS NOT CLEAR TO ME AT ALL HOW THE PAYPAL ORDERS ARE BEING HANDLED! SO UNTIL FURTHER NOTICE (WHEN CHUCK GETS BACK FROM VACATION) I'D GREATLY APPRECIATE IT IF YOU DID NOT ORDER THROUGH PAYPAL. YOU CAN USE THE ONLINE CATALOG TO MAKE A CHOICE, THEN SEND YOUR ORDER TO ME BY SNAILMAIL AND PAY WITH A CHECK, REDUCING THE DUCKWORKS CATALOG PLANS PRICES BY $6.
THE KEYSTONE MESSABOUT, at Keystone Lake, Oklahoma, will take place May 11-12. Click here for details.
THE 13th ANNUAL MIDWEST HOMEBUILT BOAT MESSABOUT will take place on June 8 and 9 at the Gun Creek Recreation Area at Rend Lake in Southern Illinois. Take exit 77W off I-57, head towards the golf course and you will see the signs. Lots of people arrive on Friday and leave early on Sunday. The camping fee is now $10 which includes the ramp fee at this Corps of Engineers facility. There is no schedule of events. We have a pitch in dinner on Saturday evening.
THE LAKE CONROE (HOUSTON, TEXAS) MESSABOUT of April 13 was a big success. Look at a report with lots of good photos at Shortypen's boat page

|
Left:
Bob Williams' IMB at the Houston Messabout.
|
|
|
JOINING PLYWOOD SHEETS
BACKGROUND...Almost any boat you build from plywood will require panels longer than the 8' lengths you will find at the lumberyard. For an "instant boat" the usual manner of joining the panels together to get one long panel is with a butt strap or butt plate. I've tried lots of different ways to make the joint in the 15 or so boats I've built over the years. All the methods worked. I have a feeling that the butt joints on the usual instant boat hull are not highly loaded and not too critical to overall boat strength. Since I've tried several ways and they all worked I've gotten to be pretty nebulous about the subject on my drawings. Lately I've been specifiying a butt plate as something like "Butt plate from 3/4" x 3-1/2" lumber, or equal" which doesn't tell you much. Most builders get by pretty well with just that but recently one builder asked what in the world I meant, and rightly so. So let's start the discussion with one joint I've never tried in plywood.
TRADITIONAL PLYWOOD SCARF JOINT...
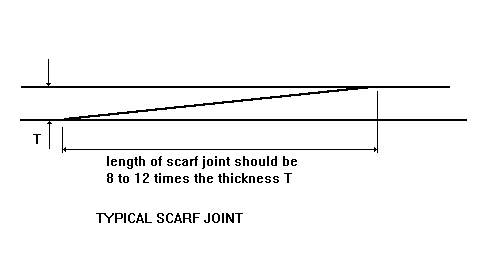
Figure 1 shows the traditional plywood scarf joint. I''ve never done this in plywood although I've made a lot of scarf joints in plain lumber. The two overlapping faces are tapered and glued together such that both joined faces remain smooth. If you are building a traditional lapstrake boat from plywood you have to make the joints this way.
What good about it? The faces are smooth both sides. Essentially you have a single piece of wood to work with after making the joint. It's quite strong, as strong as the base wood provided the taper is long enough. I've seen the taper range from 6:1 to 12:1. The shorter tapers are easier to make and probably just as good given modern glues.
What's bad about it? The tapers can be hard to make properly although thickened epoxy has made experts of most of us. Some experts have special saw rigs to cut the taper. Most use power hand planes or belt sanders, I think. When gluing the joint you must press it up against a firm surface while the glue cures, making sure nothing glues to that surface, and making sure the two pieces are secured lengthwise so the tapers don't push them apart as you apply clamping pressure.
There is one more warning for instant boat builders. Almost all instant boat designs have panels layouts which assume you will not be using a scarf joint. If you join two 8' panels with a scarf joint you will NOT end up with a 16' panel. It will be shorter by the overlap amount. That might be just enought to negate the ply panel layout.
THE PAYSON TEAL BUTT STRAP...
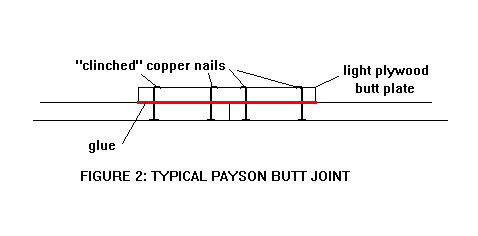
I think this type of joint was described in Payson's great book INSTANT BOATS. I used it on my Teal which was my first homemade boat. The side panels were 1/4" thick on my boat, the bottom 3/8". The butt straps were 3/8" plywood, 6" wide. So the effect of the joint was similar to a 12;1 scarf on the 1/4" ply sides and about 8:1 scarf on the bottom. The nails were supposed to be copper, but I think Harold might have also suggested copper rivets or short bolts for fasteners.
What's good about it? It's pretty simple to visualize and make. If the fastening is good you can make the joint and go right on building without waiting for the glue to set. You might do that with the sides, for example. Another neat thing about this plain butt strap joint is that, with a typical flat iron skiff type of assembly, the bottom panels need not be joined before assembly onto the hull. In that case you will have the hull inverted on sawhorses ready for the bottom. Then you put the first bottom piece on attaching it to the sides. Then you install the first butt strap at the end of that piece. Then you install the next bottom panel to that butt strap and the sides. And so forth until the entire bottom is planked, like laying bricks.
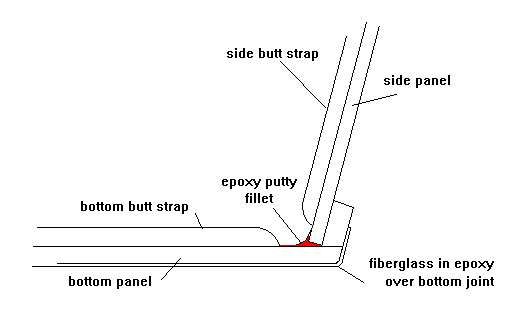
I might mention now that I think butt straps and plates should be well rounded at the ends to avoid trapping dirt and moisture. In boats that have taped seams I advise stopping the butt strap short of the edge of the panel so you will have room to run the tapes undisturbed. This is especially true of butt straps on the bottom. You must have a clear limber channel around the perimenter of the bottom. In that case I stop the strap about 1/2" short of the side, fill the little gap with epoxy to keep the water out, and tape over the bottom of the joint with glass tape and epoxy. Usually I don't put glass tape over the outside of the side panel joints. But butt joints in any deck should be well sealed with glass and epoxy. Here is an end view of the treatment:
What's bad about the plywood strap? I think in Maine you aren't a man until you've made a boat with clenched copper nails or rivets. Not so where I live, can't buy them any place I know of. I got by with bronze boat nails but they really aren't flexible enough for the job. They didn't look too cool. And the edges of the plywood butt straps don't look too cool either, wanting to have gaps and splinters showing. It takes a while to finish them. And, of course, you have a lump at each joint and folks will ask, "What's that?"
By the way, when I built my Toto I used the simple plywood strap method with no fasteners. Just carefully lay the ply panels over the straps which were well buttered with glue, weighed it all down with concrete blocks to provide pressure, and stayed away for a few days until I was sure the glue was totally set.
THE BIRDWATCHER BUTT STRAP...
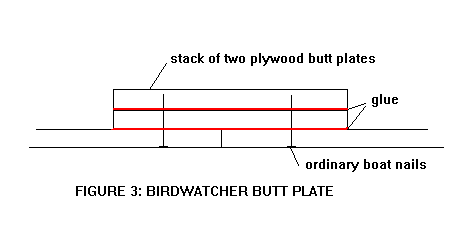
When I built my Birdwatcer in 1988 I think I piled on more layers of plywood straps such that I wouldn't have to bend over the nails. And by that time I was more expert at finishing the edges of plywood. It worked but it was very obvious that I could have done the same thing with regular lumber and saved a bit of work.
THE LUMBER BUTT PLATE...
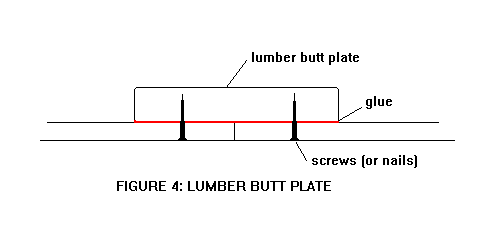
This is I like to advise now. Not much to it. Very quick and easy to make. Some say it looks too clunky for their tastes.
If there has been any structural problem with the above butt plate it is at the ends of a plate that joins bottom panels, ending short of the sides to allow a limber path. If the ends of the plate are not solidly glued and fastened to the bottom panels the butt plate will eventually loosen at the ends. I think that is due to the rapid change in flexibility in the system where the plate suddenly ends. A better solution might be to taper the end of the bottom butt plates starting maybe 3" in from the end of the plate and tapering down to maybe 3/8" thick at the ends. That will allow a gradual change in the flexibility and prevent a stress riser at the end of the butt plate. By the way, for any bulky butt joint care must be taken in design to see that the joints don't fall in places where the butt plate will be in the way.
LIGHT FIBERGLASS BUTT JOINTS..
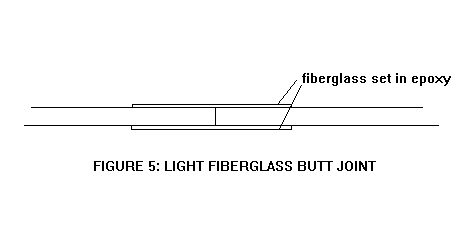
Both Harold Payson and Dave Carnell presented this one to U.S. readers in the '80's but I'll bet the English inventors of taped seam boats did it earlier. Simple as can be in theory. Just a layer of fiberglass on each side of the plywood.
Dave Carnell presents lots of details at his web site. He has done scientific load tests of these joints and says the joint will be as strong as the base wood if you use one layer of fiberglass cloth in epoxy on each side of 1/4" plywood, two layers on 3/8" plywood, three layers on 1/2" plywood, and four layers on 3/4" plywood.
I used the glass butt joint on my Roar rowboat but went back to wooden butt joints later. At first it would appear that the joint is easily made by laying the ply pieces on the floor, taping one side with fiberglass, waiting to cure, flipping the panel and repeating on the other side. But I found that plywood on its own often does not want to lay flat enough to get a smooth fit, so I had to place the joint over a board and screw the pieces down flat. Next the idea of flipping the panel with only one side taped doesn't work well because that one layer of glass has little strength by itself. But it can be done carefully. Better yet is what both Payson and Carnell advise: glass both sides at once. Lay the first side of fiberglass layers wet with epoxy on a protected flat surface, lay the plywood to be joined upon it, lay the second side of fiberglass over the top of the joint, cover with plastic sheet and weigh down with concrete blocks. The plastic sheeting not only protects everything from gooey epoxy, but it should provide a smooth final finish and if you are lucky no filling or sanding required afterward.
THE PAYSON HEAVY GLASS JOINT...
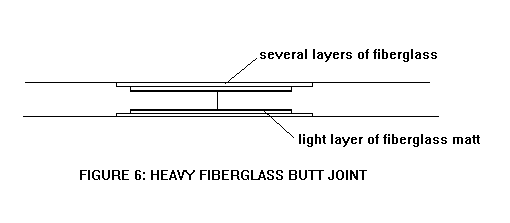
Harold Payson did a little more work on the glass butt joint. I'm doing this from memory and hope I'm getting it right. To hide the build up of glass on a thicker sheet of plywood he recessed the surfaces roughly with a sanding disk in a drill. Then he added a layer of light fiberglass matt to the wood before pasting in the glass. Fiberglass matt is generally thought to provide better adhesion to wood than glass cloth although by itself it has little strength. Harold is big on using polyester resin on his boats instead of epoxy so perhaps the matt is more important for the polyester users. But you can see the advantage of the system: the final joint can be more or less invisible as the multiple layers of glass are recessed.
NEXT TIME...
I'll present a builder's essay about making the HC SKiff.
Contents
IMB
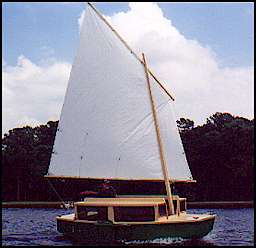
IMB, SAIL BEACHBOAT, 13-1/2' X 5-1/2', 350 POUNDS EMPTY
The prototype IMB was built by Jerry Scott of Cleveland, Texas. (This boat was originally drawn for a design competition sponsored by International Marine Publishing a while back and was called the International Marine Beacher, or IMB. I didn't win anything (again).) A second IMB was completed recently by Bob Williams, also in Texas.
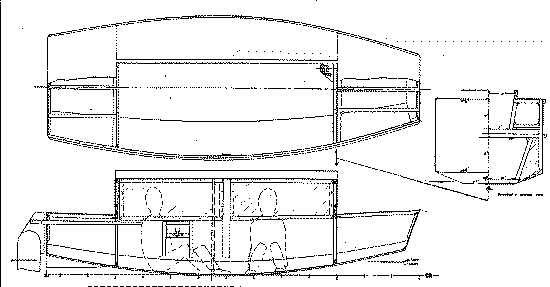
IMB features a "Birdwatcher" cabin. Birdwatcher cabins are full length with panoramic watertight windows and a center walkway slot in the roof. Everyone rides inside including the skipper.
Around 1984 Phil Bolger showed me a cartoon of his 24' Birdwatcher and I didn't know what to think of it. He presented it in a 1986 issue of the old Small Boat Journal. Ron Mueller built the prototype and convinced me that this cabin really works. I built the second Birdwatcher and here is what I found:
These boats can be self righting without ballast because the crew weight works as ballast. They sit down low on the floor looking out through the windows (although I found standing in normal winds was quite acceptable). In addition, the high cabin sides provide lots of buoyancy up high to ensure a good range of stability. IMB, which is small and has no ballast, will probably self right from 60 or 70 degrees of heel, but the larger ones such as the water ballasted Scram will self right from a full 90 degrees knockdown. Others like the original Birdwatcher and my Jewelbox have 1" thick bottoms which give enough weight down low that they self right from a "windows in the water" knockdown. Here is a photo of the inside of Bob's IMB:
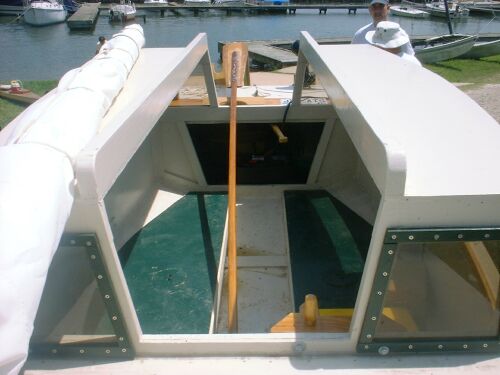
These boats can be operated totally from within the cabin, like an automobile. No one need ever go on deck. For boating with children I can see no equal.
These are cool boats. The tinted Plexiglass windows cut the sun's power. The crew can always sit in the shade of the deck. Downdraft from the sail cascades through the walkway slot.
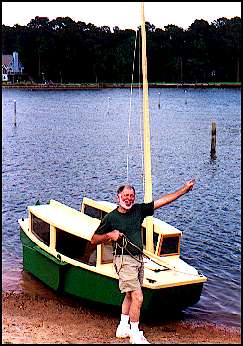
IMB has an 8' long cabin on a wide multichine hull, sort of an enlarged Piccup Pram hull.
I haven't really gotten a test report of this boat yet but the photo above taken on its first sail shows to me that it must be pretty close to "right". I did get a report from Bill Paxton who attended the Houston meet and filed this report:
"All right, I admit it. When it comes to sailboats, I'm a size bigot. Or at least I was until I took a ride in Bob Williams' IMB.
"I truly like the idea of Jim Michalak's "birdwatcher" designs. These clever craft provide comfort and safety in boats that are easily built by any novice. I've spent a lot of time studying JM's Jewelbox. At 19' it's the largest of its type in Jim's repertoire. With a 12' cabin, it could host a whole Cub Scout Pack. It's a little large for my needs so I found myself pouring over Jim's Jewelbox Jr., a 16' version with an 8' cabin. Nice. Scram Pram and even Eisbox were considerations. But at no time did I seriously consider the IMB. Why? It's too short! How can a cabin sailboat with a length of 13.5' be taken seriously?
"Man, was I ever wrong!
"I met Bob Williams at the Lake Conroe Messabout, and I was immediately fixated on his new IMB. He patiently answered all my questions, and then, generous soul that he is, agreed to take me along with him and Bob Shipman for a ride. (You'd be hard pressed to find two finer sailing companions than the Bobs.)
"The first thing that impressed me was the volume of space in the cabin. It' s 8' long. The three of us had plenty of space to sprawl out, and at no time did I feel like we were getting in each other's way. Skipper Bob mentioned that he had slept in the cabin Friday night, and said it was downright spacious.
"A real surprise was the ease with which we could carry on a conversation inside the cabin. The sound bounced around nicely making it effortless to hear one another.
"The breeze was gusty and unreliable. At times we were really flying along, and at other times we drifted from puff to puff. This gave me a chance to see if the cabin would heat up. It got a degree or two warmer than the 80 degree outside temperature, but that was about all. When making any decent speed at all there was a fair amount of breeze through the cabin.
"I enjoyed sitting in the shade as we sailed along. With the large slot top down the middle it's impossible to stay in the shade all day on all tacks, but it's way more solar protection than I get in the open cockpit of my boat. I also like the idea of being able to stand up and stretch while under sail.
"One of the things I was curious about was visibility. Would we really be able to see well enough looking out the windows? The answer is yes. I never felt we were in danger of other boats we failed to see. But there's always the option to sit on the aft deck, steer with your knees and swivel your head to your heart's content.
"Under the aft and fore decks are storage areas large enough to hold camping supplies for one man for many days.
"Did I mention how easily the boat handled choppy water? Oh sure, the wake from large powerboats tended to kill our speed when we hit them head on. But the multi-chine hull gives the boat "soft shoulders," and it never felt like we were in any danger of being pushed over.
"Jim Michalak did a great job designing a boat that seems bigger on the inside than on the outside. Bob Williams did a fine job of building his IMB, Happy Camper, and I'm glad he brought it to Conroe. It sure taught me a thing or two."
IMB takes two sheets of 1/2" plywood, 8 sheets of 1/4" plywood and one sheet of 3/16" dark tinted Plexiglass. Taped seam construction using no jigs or lofting. Sail is 104 square foot balanced lug with pivoting leeboard.
Plans for IMB are $30.
Prototype News
Some of you may know that in addition to the one buck catalog which now contains 20 "done" boats, I offer another catalog of 20 unbuilt prototypes. The buck catalog has on its last page a list and brief description of the boats currently in the Catalog of Prototypes. That catalog also contains some articles that I wrote for Messing About In Boats and Boatbuilder magazines. The Catalog of Prototypes costs $3. The both together amount to 50 pages for $4, an offer you may have seen in Woodenboat ads. Payment must be in US funds. The banks here won't accept anything else. (I've got a little stash of foreign currency that I can admire but not spend.) I'm way too small for credit cards.
Here are the prototypes abuilding that I know of:
Electron: The California Electron is coming along. Right now a four cycle 2 hp outboard has been purchased so the original electric idea may wait a while.
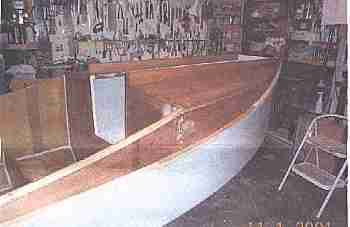
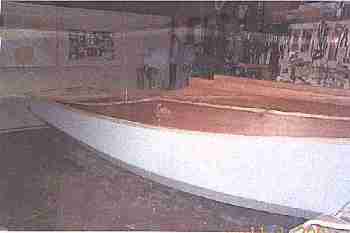
Mayfly: The prototype of the original 14' Mayfly is finished in New York state. Here it is on its first sail (Long Island Sound).

The Queensland Campjon is about done. Waiting for a trailer.
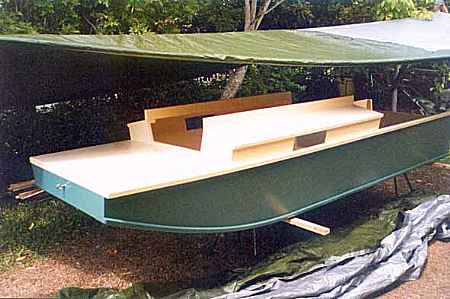
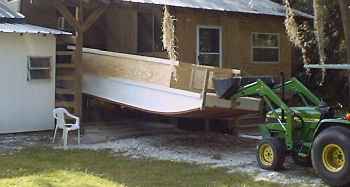
A barn in rural Florida giving birth to the first Shanteuse, this one stretched from 16' to 24'. The builder said it was easy to turn the hull but it looks like his name is John Deere.
AN INDEX OF PAST ISSUES
Hullforms Download (archived copy)
Plyboats Demo Download (archived copy)
Brokeboats (archived copy)