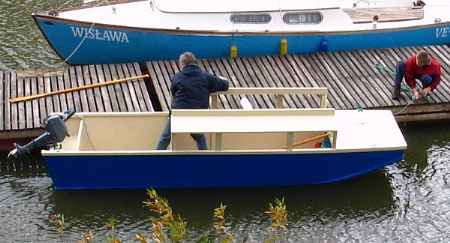
Wojtek Baginski's Campjon is modified with an enlarged cabin and small cockpit for canal cruising in Poland.
Contents:
Contact info:
Jim Michalak
118 E Randall,
Lebanon, IL 62254Send $1 for info on 20 boats.
Jim Michalak's Boat Designs
118 E Randall, Lebanon, IL 62254
A page of boat designs and essays.
(15Nov03) This issue will talk about glassing plywood. The 1dec03 will repeat the essay about the IMB self righting test.
THE BOOK IS OUT!
BOATBUILDING FOR BEGINNERS (AND BEYOND)
is out now, written by me and edited by Garth Battista of Breakaway Books. You might find it at your bookstore. If not check it out at the....ON LINE CATALOG OF MY PLANS...
...which can now be found at Duckworks Magazine. You order with a shopping cart set up and pay with credit cards or by Paypal. Then Duckworks sends me an email about the order and then I send the plans right from me to you.
Glassing Plywood
TO GLASS OR NOT TO GLASS, THAT IS THE QUESTION....
I'm sure you will have to answer that one for yourself but maybe I can provide some guidance.
I'm only going to talk about glassing with epoxy here. We used to use polyester types of resin that are still used for fiberglass boat construction. I glassed the bottom of my Birdwatcher that way in 1988 and it is still stuck there but the boat has been stored inside all of the time. I guess you could say that proves a boat stored inside all of the time can successfully be covered with glass set in polyester resin but it says nothing about outside storage. Epoxy is cheaper than it was back than and polyester more expensive. Even real cheap people like myself have switched to epoxy.
You really have to glass the chines and exterior edges of a plywood hull if you expect it to last more than a few days in the water without damage. I think Payson mentioned in one of his books that plywood boat construction wasn't really advantageous until glass taping became common in the 1950's or 60's. Before then plywood boats were given strips of wood over each joint that showed end grain, sometimes the strips were quite elaborate.
So this discussion involves glassing the overall hull, sort of armor painting the entire surface of the boat.
THE BAD OF GLASSING....
Extra Expense. Epoxy costs maybe $50 a gallon. I suppose if you are making a 12' skiff glassing the total outside as opposed to just the chines you might raise it from a $100 boat to a $200 boat. Some folks would comment "Anything worth doing is worth doing right! You've got all that labor in it anyway!" Well, that argument doesn't hold for everyone (and I suspect anyone who really felt that way would have stopped reading this web site long ago). The labor in the building the boat is its own reward to most of us. There are VERY few people who can make plywood boats and sell them at a profit.
Extra Labor. Just as glassing might double the cost of the materials, it could easily double the labor involved. And that is not warm and fuzzy woodworking you will be doing. The epoxy work is usually messy and toxic. Here is the real hitch: plywood is for all practical purposes prefinished - it is usually ready to paint with sanded surfaces. So the guy who is building without glassing his plywood can think of painting right away with no sanding except at the assembly joints. But the fellow who epoxies the entire surface now has to sand it all smooth again. It can be a miserable job.
Extra Weight. Epoxy weighs about 10 pounds per gallon I think. The glass cloth and tape always struck me as being weightless. So the fellow building the 40 pound Toto who decides to glass the whole thing can expect a 50 or 60 pound Toto. For a trailer boat that is usually not a problem but for cartoppers it can tip the scale literally to make the boat unpleasant to use.
Shorter boat life?? Tom Jones wrote that glassing both sides of a piece of plywood is an invitation to disaster. The wood needs to breath and expand and shrink. I'm not so sure about that. I am quite certain that coating the surface of a traditionally planked boat is a bad deal - the seams will eventually break the glass and then you have a huge mess. Now that I think of it I saw up close and personal a 36' Chris Craft sea skiff probably from the 1960's made of lapstrake plywood. It was glassed on the outside, probably at the factory and probably with polyester resin. So it was 40 years old covered in a way that no one would advise, lots of rainwater pooled in it for months at a time, and, guess what? It was all original and solid as a rock! Confused by all of this? So am I.
THE GOOD OF GLASSING...
Slick Finish. Painting bare plywood leaves you with something that looks like painted wood. You can prime heavily but usually there are knots and grain that are always visible. It is not unpleasant to me - it is after all a wooden boat. But if you want a super slick boat applying a layer of fiberglass set in epoxy gives a uniform surface that can be sanded as smoothly as you can stand. I'm told it also provides a base that often does not need primer, at least for latex paints. (For other paints always test first since chemicals in epoxy and paint can interact to prevent the paint from curing properly. They say formulations change some regularly that testing of the materials at hand is always required.) Slick finishes make a boat more than pretty. It might be faster and will surely be a lot easier to keep clean.
They say epoxy coating is the only way to prevent "checking" of wood, and not just coating with epoxy but using at least one layer of glass too set in the epoxy.
Weather Resistance. Epoxy is not totally waterproof. No it isn't. About 15 years ago I helped repair a production boat with epoxy and the yard owner had a set of manuals that came with the epoxy. The manuals stressed how epoxy was such an improvement for repairs over polyester resins and presented charts of how water permeates the two resins with time. Epoxy was a lot better - maybe tens times as waterproof as polyester. But still some water gets through.
Dave Carnell told me he had built a few skiffs and was and still is a real believer in epoxy coating a boat, not really glassing the boat but giving it say three painted on coats. This used to be called "epoxy saturation" until someone noted that epoxy never penetrates into the wood more than a cell or two deep. I recall Dave's comments about two of the skiffs. He lives near the water and his boats stay outside all the time and often fill with rainwater. One skiff used cheap lauan plywood which was supposed to be "waterproofed" by the three epoxy coats. Once outside it delaminated and fell apart in a few weeks. The second skiff used three coats of epoxy on top of exterior plywood so it soldiered on more or less forever, might still be around. But Dave said it weighed 100 pounds when new and 130 pounds after being outside for a few months. Brought back under cover for the winter it once again weighed 100 pounds in the spring! And so forth as it breathed water in and out through its epoxy skin.
I think epoxy coating has really excelled in plywood boats because almost none are stored in the water. They are out trailers behind your house. So the epoxy coating sheds rainwater instantly and the boat never soaks up water like a painted boat might. And seedlings and such have far fewer chances of taking root (back at the marina we had a very neglected fiberglass daysailer that had filled over the years with rotting leaves so that it came to pass that it had enough topsoil in it to support the growth of two small trees in its cockpit - I think it wanted to be a yawl). If you can keep rainwater from pooling inside the epoxy coated boat will go on and on and on forever with a slick surface to wipe clean quickly before you go boating.
There has been the idea that epoxy coating prevents the growth of rot. The spoors they say are everywhere, impossible to eliminate totally. But epoxy might block out the goodies they need to live. Don't know one way or another about that theory.
THOUGHTS ABOUT APPLYING EPOXY/GLASS...
First of all I'll admit that I am no expert at this.
Second to remember is that epoxy loves to run downhill. You might think that somethink that is supposed to be really sticky would not do that but if I were building a soapbox derby racer I would use epoxy for everything - it runs downhill out of joints or cloth or when just painted on faster than anything once it get started. It will trick you too. You might paint it all smooth and think it is setting up and leave for the night but as soon as you turn your back on it for the last time downhill it goes. Sags, drips, runs, etc. etc.
So you need to put the working surface horizontal if at all possible. I recall a long time ago when epoxy boats were getting started that some builders would give the new plywood sheets a couple of epoxy coats applied with a roller as the sheet lay flat on the floor. Then come back after cure to draw and cut out the parts. The roller and flat surface made for fast smooth going although you would think that a lot of epoxy would be wasted. Maybe not in the long run. There would be no sags, drip, runs, etc, etc. to fix up later. In a way it makes sense.
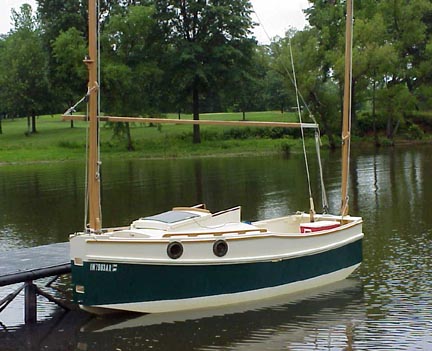
John McDaniel built this beautiful Banty Micro a while back. Totally epoxy glassed on the outside and coated on the inside. I don't think anyone who looked at it expected that it is a wooden boat inside. Very very slick and I think he said it was usually stored outside uncovered for most of its like, needing just a dusting at the beginning of each season. But he also told me the key to the slick finish. He built a set of large rollers that encased the entire boat when it came to finishing. So he could roll the completed boat to any orientation needed to keep the surface to be coated on the horizontal!
Third is that for any epoxy work large or small, be very well prepared. Have all your glass cloth or tape cut to fit before hand because once you start mixing and spreading everything will get sticky and ten times harder to work with. Everything required to do the job must be right at hand. I think when you do this work you should try to do as much as possible at a shot, one of the disadvantages to working with the stuff. The idea of putting down a coat and sanding and putting over it another coat doesn't work well for epoxy (or polyester). If you have several laminations you want to apply put them all down at one time so they will all set at once and you will have but one surface to sand. Also then there will be no question of adhesion between laminations since it will all set as one chunk.
ONE MORE APPROACH...
I've never heard of this being done before but Garth Battista of Breakawaybooks.com (publisher of my book and a great boat nut too) tried a new (to me) way of glassing the surfaces of plywood. He is building an enlarged version of Caprice. Don't ask for plans yet since I don't have them done - he is working from preliminary stuff to get a bit done before winter stops all. So he has hull panels roughly 32' long to work with. Not only is he epoxy coating them beforehand, he is glassing them too, all at once.
I asked him to for a short writeup:
"Hi Jim --
(I started a quick reply and wound up writing a whole article. Sorry to carry on at such length. Use as much of this as you wish. I'll also attach a photo my wife took of me rolling out the film. Also, I forget if I mentioned before, but what inspired me to try this was an article by John Blazy on Duckworks. I'm not the inventor, just an early enthusiast.)
I thought I'd try this preglassing technique, smoothing out the epoxy by rolling on Lexan film, in hopes of saving a lot of sanding time and effort. My usual fiberglass jobs, draped over an inverted hull, almost always result in many drips, waves, knobs, etc., that then require long hours of sanding while holding the sander up to the side, or, as I envisioned it on this big boat, sanding while standing on a ladder. It just gets heavy and dreary after a while. Also, I usually wind up sanding away glass here and there, decreasing the strength.
I'm not sure what the time savings will be in the end, but so far the preglassed panels look beautiful. Smooth as glass, and only requiring a light fine-grained sanding to prepare them for paint. No danger of cutting into the glass. Also, I'm glassing this boat inside and out, and the idea of sanding all the interior surfaces while inside the hull is a pretty awful one. With this technique I can preglass all the panels flat, both sides, and sand them flat with a floor sander in one day, then assemble. I'll only have to sand and fair the joint areas -- still a big job, but much less.
First I do fiberglass butt joints joining the four full ply sheets. Then I cut them to shape. I mark all the bulkhead positions and deck positions, etc. in heavy permanent marker, so I'd still be able to see them after glassing and sanding the panels. Then I place cheap 2 mil plastic sheeting under the panel, and mask off all the panel edges -- either to leave 2" bare wood on the lower edge, where the side will join with the bilge panel -- or masking only 1/4" of the upper edge, where it will be covered by the cabintop strake. Basically, I made sure the tape sealed from the panel edges directly onto the plastic sheeting below, so no epoxy would slip under the panel and form messy pools. (OK, I admit it took glassing two panels to fully realize the necessity of this procedure.)
Then I lay out my 6 oz. fiberglass cloth dry, and cut that to shape roughly. Then I mix up a gallon of epoxy (or 0.8 gal.) all at once in a big tub, and pour it out in a long line right down the center of my panel. I find that even working with "Fast" hardener in 60+ degree temps, there's no rush. Spreading out the epoxy quickly slows its cure time markedly. I squeegee it quickly out from the center, which helps get rid of wrinkles. Then I work it around with my long-handled window-washer squeegee. I make sure everything is wet out and evenly coated. It would look under-covered by normal glassing standards -- the weave still shows everywhere, but the glass and the underlying wood are wetted thoroughly. With this film technique basically you get away with using less epoxy and still get a smooth surface.
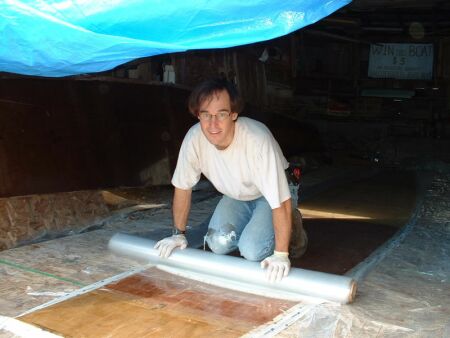
Then I roll out my 20 mil Lexan film, KNEELING on the roll, bearing down as much of my 165 lbs. as possible everywhere. Having two people kneeling on it would be even better. Unroll it very slowly, maybe 3 feet per minute, working out all the bubbles as you go. They get chased out before you in a little rolling wave, looking like shaving cream or spray-in insulation.
It takes maybe ten minutes to do the masking, five or ten minutes to lay out the cloth and trim it, thirty minutes to do the squeegeeing, and ten minutes to roll out the film. Say an hour, start-to-finish on a 32'-long panel.
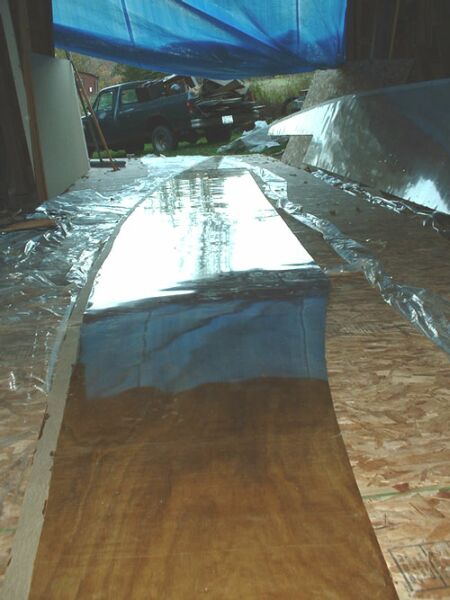
After the epoxy has cured to almost-hard, I roll back the film, and trim off the masked areas with a razor knife. The excess glass and epoxy and tape all usually peels up easily in one big long strip. Sometimes you need to go back and pick at a torn bit of masking tape to get it going again. Then I let the (smooth as a mirror) epoxy cure some more, usually overnight, before moving it.
Flipping the full 32' panels singlehanded is awkward, but not impossible. For most moving around, I just pick up one edge in the middle and drag it to where I need it. Then a big flip and a flop -- the bowed tails of the panel come over. They gain a lot of stiffness from the double-sided glassing -- but they're still bendy enough that they'll wrap on the bulkheads without protest. I'm not sure if this will be true of the bilge panels. Haven't glassed those yet, and the 1/2" MDO I'm using is already plenty stiff to begin with. I'll let you know when I get to that part.
I bought my 4'-wide X 40'-long roll of 20 mil Lexan from GE Polymershapes. It cost $1 per square foot, a wild extravagance, but I hope it's justified in time and labor savings. I cut off six 16" sections to use smoothing out glass butt joints, and saved 32' on the roll. John Blazy says to use 30 mil "polyester film," but I couldn't find that. Others (John Cupp, I think?) have suggested using the 30 mil vinyl rolls available in the Walmart sewing section. Probably not as stiff, but with a good heavy 2-person roll-out, that might not matter. That stuff is much cheaper. I've also thought about filling a length of 4" or 6" PVC pipe with cement, to serve as a roll-out aid.
Today -- cold rain. Damn weather. I'm ready to move to Texas, next door to Chuck Leinweber.
All best, Garth
NEXT TIME...
...we give IMB another flip.
Caprice
CABIN SAILBOAT, 17' X 3.5', 100 POUNDS EMPTY
About 15 years ago I built a Payson Canoe and used it for several years before selling it. I replaced it about 10 years ago with my Toto double paddle canoe. Toto has the same multichine cross section as the Payson Canoe but I tried for a long lean bow which would be better in rough water and more foregiving of bow down trim. I still have that Toto, unchanged in any way since new, and still use it all summer. Amanda Johnson demonstrates:

The Toto shape worked so well that I used it in other designs like Roar2 and RB42. I tried it also in a sailing boat, the 20' Frolic2 (the original Frolic was narrower, more of a rowboat than a sailboat). Frolic2 was unballasted with a small cuddy and I hoped it would be a good daysailer and one man camping boat.
Bill Moffitt had built my Woobo design and funded a 20% enlargement of Frolic2 that would have a cabin, water ballast, and a yawl rig for cruising near the Gulf Coast.
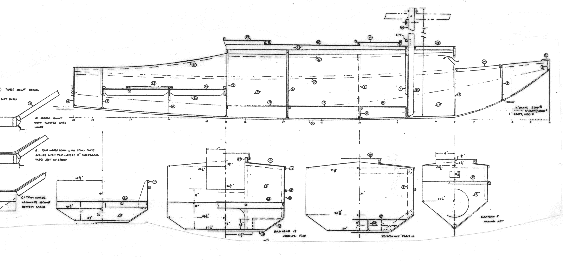
The 20% enlargement idea went very well except that I had to deepen the hull more than that to give some serious headroom in the cabin, but it doesn't have standing headroom. Great empasis was placed on ease of use and rigging. The main mast is short and stepped in a tabernacle. There is a draining anchor well in the bow, a small storage segment under the front deck. The mast tabernacle is bolted to the bulkhead that forms the front of the sleeping cabin. There is a utility room aft of the sleeping room. Water ballast tanks are under the bunks and in the sides of the utility room floor, about 600 pounds of ballast as I recall. Aft of the cabin is the self draining raised cockpit with storage volume under the deck. Finally there is a self draining motor well across the stern. Construction is taped seam plywood.
Bill couldn't start his Caprice right away but Chuck Leinweber of Duckworksmagazine gave it a try. He has the room and tools and smarts to tackle a project like this with no hesitation. There weren't many changes from the plans that I know of, the main one being adding a conventional footwell to the aft deck which is designed to have a hatch type of foot well as with the Bolger Micro.

Chuck trailered his Caprice up from Texas to our Midwest Messabout this June and I had a chance to go over it, sail it for a couple of hours, and watch it sail from other boats. Wonderful!
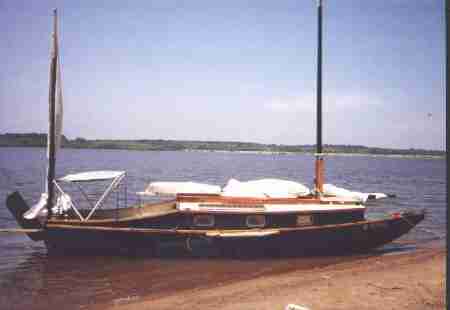
Chuck tells me it takes less than 15 minutes to rig the boat to as you see here. As shown the boat has its ballast so you see it beaches very well indeed. I asked about the ballast. He can flood the tanks without power, just open the access plate, reach in and pull the fill plug and let the water rush in. Since the tops of the tanks are about even with the normal waterline he has to move his weight around to keep the tank depressed long enough to completely fill. Then you reach into the filled tank, replace the plug in the bottom, and then replace the access plate in the top. There are two tanks to fill.
Are the ballast tanks worth the building effort? On a multichine hull like this the tops of the tanks form flats that give places for bunks and storage so that is good. When full the boat should have a very good range of stabiltiy. Chuck's boat has never been in rough going as I'm writing this so the effect of the ballast remains to be proven. It has been capsized in a practice but the ballast tanks were empty and the boat was empty with no crew, etc.. But the ballast is a success from the standpoint that Chuck is able to tow his Caprice behind a four cylinder pickup truck. My idea was to pull the boat up the ramp and drain the tanks afterward by simply pulling the drains plugs. But Chuck has found it best by far to empty the tanks before recovering the boat at the ramp. So he uses a bilge pump in each tank to pump them empty. I'd be worried about water ballast tanks on a wooden boat from a rot standpoint and would be careful to open all the plugs and access panels when the boat is stored.
(I should add that I think an empty Caprice will weigh about 900 pounds based on the plywood sheet count (eight sheets of 1/4", nine sheets of 3/8" , five sheets of 1/2" and one sheet of 3/4"). But any boat like this can hold an awful lot of gear and junk.)
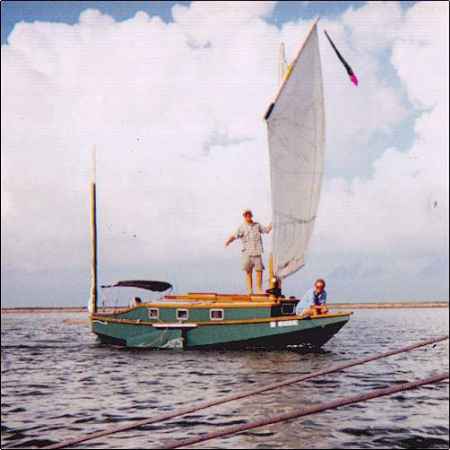
Caprice has the tabernacle setup that I first saw on Karl James' sharpie. The mainsail is 190 square feet, balanced lug. The mast is fairly short, stowing within the length of the boat when lowered. Chuck demonstrated putting up the mast, maybe a 15 second operation. I've been drawing these for a while on different boats but this is the first one I know of to get built and used. I'm greatly relieved that is all works so well. Before you decide to tack a tabernacle like this onto your boat, be advised that the tabernacle posts go clear to the hull bottom with big bolts all around a beefy bulkhead.

I thought Caprice sailed very well in the light winds we had that weekend. Tacked very smoothly through 90 to 100 degrees which is all you can ever get with a low tech rig. Very smooth and quiet compared to the sharpies I'm used to. It didn't seem at all sensitive to fore-aft trim. In the light winds it went 5 knots on the GPS which is certainly fast for the conditions.
Well, all in all I thought Caprice was everything I was hoping for.. Plans are $45.
Prototype News
Some of you may know that in addition to the one buck catalog which now contains 20 "done" boats, I offer another catalog of 20 unbuilt prototypes. The buck catalog has on its last page a list and brief description of the boats currently in the Catalog of Prototypes. That catalog also contains some articles that I wrote for Messing About In Boats and Boatbuilder magazines. The Catalog of Prototypes costs $3. The both together amount to 50 pages for $4, an offer you may have seen in Woodenboat ads. Payment must be in US funds. The banks here won't accept anything else. (I've got a little stash of foreign currency that I can admire but not spend.) I'm way too small for credit cards.
Here are the prototypes abuilding that I know of:
The Texas Ladybug gets painted:

The Tennessee Shanteuse is rightside up now on a trailer:
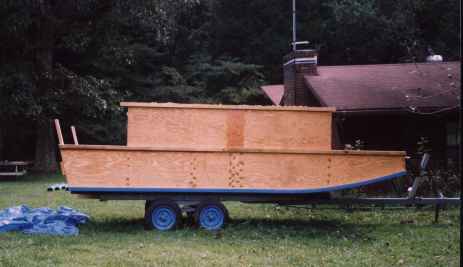
Out West the Picara project gets its bottom. Winter approaches:

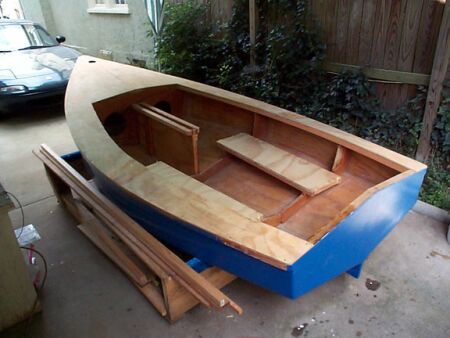
The Deep South Skat is getting done:
AN INDEX OF PAST ISSUES
Hullforms Download (archived copy)
Plyboats Demo Download (archived copy)
Brokeboats (archived copy)
Brian builds Roar2 (archived copy)
Herb builds AF3 (archived copy)
Herb builds RB42 (archived copy)