
Richard Cunningham's new Vamp.
Contents:
Contact info:
Jim Michalak
118 E Randall,
Lebanon, IL 62254Send $1 for info on 20 boats.
Jim Michalak's Boat Designs
118 E Randall, Lebanon, IL 62254
A page of boat designs and essays.
(15Oct03) This issue will present results of my Birdwatcher/lugsail rig. The 1Nov issue will rerun the oarmaking essay.
THE BOOK IS OUT!
BOATBUILDING FOR BEGINNERS (AND BEYOND)
is out now, written by me and edited by Garth Battista of Breakaway Books. You might find it at your bookstore. If not check it out at the....ON LINE CATALOG OF MY PLANS...
...which can now be found at Duckworks Magazine. You order with a shopping cart set up and pay with credit cards or by Paypal. Then Duckworks sends me an email about the order and then I send the plans right from me to you.

|
Left:
Richard Cunningham's new Vamp.
|
|
|
Birdwatcher Lugsail
RECAP....
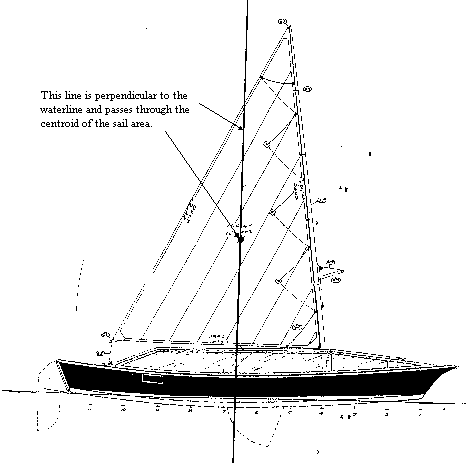
You might recall that a few months back I showed how to do "real life sail area math" to take my Birdwatcher, designed by Phil Bolger to have a sail like this:
And was tweaked to take an old lug sail I had something like this:
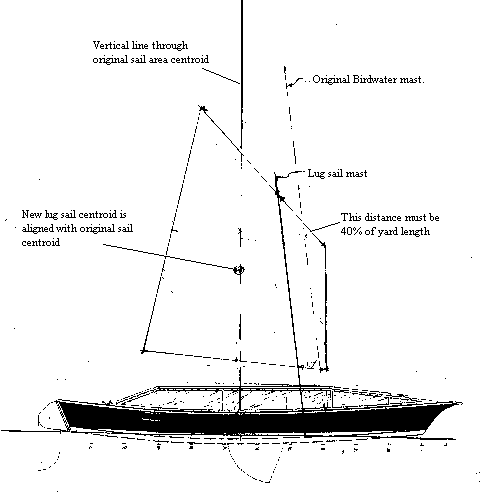
The idea behind the article was to show how to adapt a different rig to a boat. In this case the new sail was smaller, about 115 sq ft vs 125 sq ft of the original, and of a very different type. The new sail used a mast from an older boat that was about 10' shorter than the original sharpie mast, much easier to step and stow. The completed conversion looked like this:
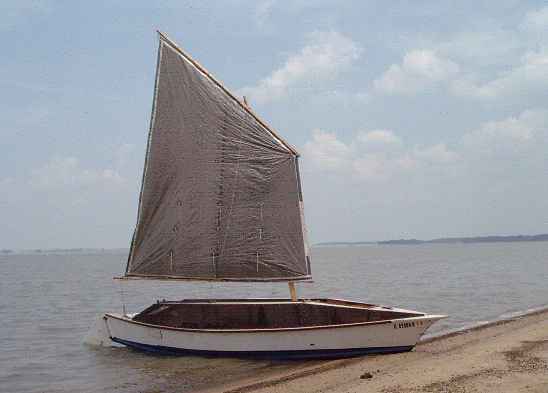
DID IT WORK?? YES
A long time ago I took a class in technical writing where the instructor said to forget everything we learned in college English. The best tech writers, he said, were the guys out in the shop. The worst were English majors. I suppose if Agatha Christie were a good tech writer she would start her mystery with, "THE BUTLER DID IT" and the following pages would say the details. Start with the conclusion.
The lugsail conversion worked very well. At least in the ten or so times I got to use it, not really enough to test a boat. It balanced well so the relocated mast calculations were about right on. The sail area seems small but did fine for the boat. I sailed in winds too light and too heavy. I guess the thing to remember about Birdwatcher is that it is only 5' wide on the bottom and even if it is 24' long it doesn't need a lot of sail area to go. I'm going to keep using it although I have the sharpie sprit sail stored away in case I change my mind.
FIRST, ANOTHER MOD...
First I want to mention another change I made to Birdwatcher that I think is all around positive. If you look at the BW drawings you might notice that the centerboard is sort of a solid quarter circle. When the board is raised the centerboard quite fills the bay above the cb case all the way to the roof of the boat. It blocks access to the storage on the other side of the case, plus your view sometimes. Over the years I have trimmed my centerboard down above the case so that it is more or less rectangular now with an arm left on the front to give some leverage for raising and lowering. Now it looks like this:
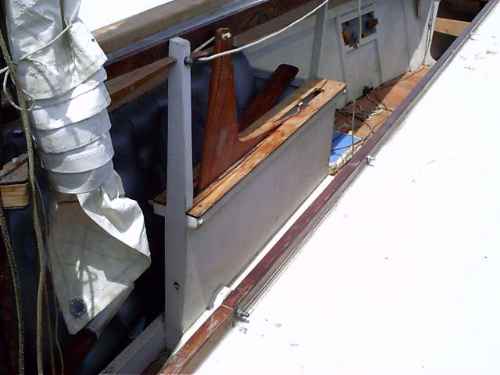
You can see that access to the storage and visibility are a lot better. There is no difference in sailing ability because the actual board in the water is changed very little and what change there is is on the trailing edge and not on the all important leading edge. I think there is less chance of the board jamming in the case too since when the board is lowered there is a lot less board/case contact. In use the past few years it has been all positive.
CHANGED MAST PARTNER
According to the lug sail layout the mast would need to be moved well aft of the sharpie mast location in order for the lugsail to sail well. Here is a photo of the new partner:
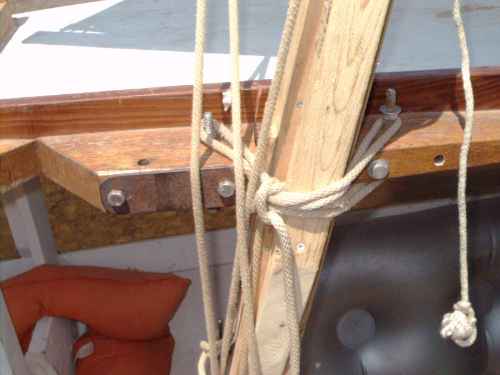
Actually this is not a new partner but the original with another notch cut into it aft of the sharpie mast notch. If you look forward (left in the photo) of the mast you will see a "V" where the original mast mounted and can still be mounted. Luckily the original mast partner fitting was quite long. The original mast has a weldment that clamps around the mast and secures it. A long time ago Marc Smith made a BW without the clamp, instead using a simple roping system to secure the mast. I've copied that method on the lug mast. There are half inch bolts either side of the mast and a 1/4" line that belays around the bolts and mast many times. Works fine. Low tech. No more weldments to bump into. The "bury" of the BW mast mounts is over 3' so the rope system works very well but if you have a low sided boat with a very short bury it may not work so well.
MAST STEP
Luckily also the mast step is a plywood plate about 12" square, a lot larger than needed to accept the mast heel which is about 3" in diameter. So I was able to cut another hole for the lug mast heel several inches behind the original sharpie step hole. The resulting mast alignment has more rake that I really care to see but has the great advantages of not requiring any new fittings and still allows the original rig to be used.
FIRST SAIL
The first trip out with the new rig had the usual rough spots. When first hoisted the lug sail barely cleared the deck (the sharpie sail was also very low to the deck and I wanted to avoid that). The boom drooped downward in an ugly way. The rig, mast especially, was pretty limber. Remember that it was designed originally for a 15' boat that would weight less than half of the BW's weight and whose cabin was a lot lower.
Winds were light, always a good thing when testing a new rig. But the balance and speed seemed fine. Good steering.
Oh yes, one last thing. As I sailed along I noticed that not only was the mast bending a lot but there was a series of large knots shortly above the partner. Great fun sailing along keeping an eye on them and wondering when they were going to snap.
Back home I took a good long look at the hoisting system for this particular lug sail and mast.
The hoist point on the yard was not where it was drawn on my sketch, it was forward of that point. So I retied it a bit aft to match the drawing. That would lower the boom which is not what I wanted. To raise it up again I removed the dangling block on the mast head that I was using for the halyard. Instead I drilled an appropriate hole to run the halyard through directly with no block. I radiused that hole as well as possible, sort of polished it, and grease it on each trip to keep it as slippery as possible. Thus there is little slack at the top of the mast as with the dangling block. So now the yard hoists hard to the mast head. Then the tack is set hard around the boom to pull down on it and tension the sail. That stretches the halyard a bit and drops the yard down a few inches, enough to give it the play it needs to allow the yard to swing around the mast a bit on different tacks.
I decided to splint the old mast to stiffen it and get some good material over those interesting knots. I got a good 2x4 and stripped off two good lengths about 1-1/2" square. They are 10' long and the mast is about 16' long so the splints don't go from heel to tip. I suppose they start 2' up and are about 4' short of the top, but they cover the main meat of the mast and bridge over the knots. You can see them in the photo of the partner. One is on the forward face of the mast and the other on the inner face. So I had to enlarge the new notch in the partner fitting. The rope latching system took the added splint in stride, something the weldment would not have done. Ugly but effective.
SECOND SAIL
That about fixed it all. The new rigging hoisted just right.

A few nice surprises were that the smaller sail has sufficient area. No need to change it although if I were building something new I suppose I would add 20 sq feet or so probably by making the sail mostly taller. The yard and boom which are just 1-1/2" x 1-3/4" in cross section turned out to be sufficiently stiff. I did not expect that. Again if I were building anew I would try something like 2-1/4" round. If I were building anew I think I would go with a mast about 3" square at the partner and maybe 2" square at tip and heel, a lot stiffer and stronger than what I have now. Maybe add a foot or two. As it is now the mast is a one handed operation, very easy to step even in rough water afloat. That could never be done with the original mast which you can step solo but with great care.
So am I going to change anything? Probably not. The boat is a lot easier to use than before if less elegant.
NEXT TIME...
...I'll present the oar making essay.
Batto
FAST ROWBOAT, 18' X 3', 70 POUNDS EMPTY
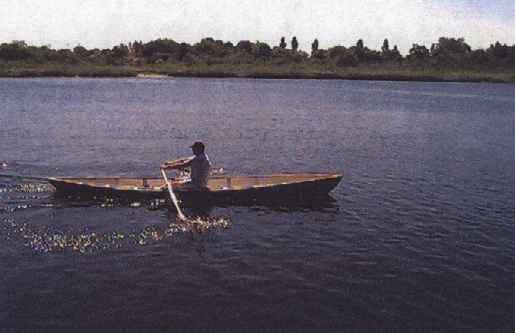
Batto is sort of a "retro" boat. Every now and then I go over another designer's older design and try to update it to the way I do boats. I always learn a bit. Batto is a close copy of the Pete Culler clipper bateau Otter which appears in John Burke's book PETE CULLER'S BOATS. Batto is only very slightly different in shape and size from the original Otter and is in no way intended to be a parody of it, only a reworking to the type of construction I prefer. Burke points out that the boat is about as close as you can get to a racing shell with traditional hull, and that it was unforgiving and cranky if improperly used and very elegant and fast if properly used. I would prefer it to be thought of an exercise boat meant for one. Supposedly Culler judged the boat to be safe to handle one third of a person by proposed Coast Guard regulations. I found Burke's book to be very good reading.

The big departure I've made from Culler's work is that I've used "instant" plywood construction, something that Culler didn't like at all. He had a long lifetime of experience with traditional methods and tools and materials by the time he built Otter and Burke says he built her in a one week vacation, with lapstrake sides, cross planked bottom, and all the gingerbread. In the photos it is a true work of functional folk art. Batto won't be in the same league as a work of art, but it should actually be a better boat by almost all other criteria. Built taped seam style with no jigs from 3 sheets of 1/4" plywood, Batto will be a 40 hour project for most any man and will be lighter and faster than the original.
Culler used very long special rowlocks to get the proper oar location in the very low and narrow hull. (You won't be able to stand up in it.) That replaced the need for outriggers which, I can attest to, are a pain for a cartop boat. I think the Culler locks are worth a try, if only because they can be easily removed and replaced. For that matter the boat would take a sliding seat very easily. I'm certain Phil Bolger would quickly point out that locks tilted 45 degrees like these aren't worth a hoot. And he'd say that the hull needs more rocker. But I guess that shows how two very experienced designers can have very different experiences. I know for a fact that the narrow Culler oars work very well although Phil never liked them.

The prototype Batto was built by Ray Schaefer of Brooklyn, NY. He is a very experienced builder and oarsman. He writes, "Here is Batto in action, Harry Rasmussen test pilot. Slick as snot. Fastest fixed seat I ever rowed. It's a pleasure to row into a good wind and make good progress."
"Oars are Culler style 8'8" cedar and redwood with inboard looms not square anymore. Fitted 2" PVC in place of leathers and PVC collars, 2 more layers, additional pieces glued and faired for D shape. So far so good, not too many miles on them. Last 3 pair of oars fitted with lead counter weights as per Bolger/Montgomery, this pair 8 oz sinkers hammered to cylinders, epoxied in ends of handles last year. Works good. Anything helps as you get older."
"Outriggers are 3/4" SS tube from cast off bow rail, tough stuff to bend cold with a hickey Slug of 3/4" x 1-1/2" welded in outboard ends, 1/2" thole pins welded to them for Bolger style locks. Lug of 1" x 1/8" SS welded under for 16 x 1 x 1/8 strut leading forward. One 1/4" bolt, loosen screws on 3/4" tubing clamps and lift out."
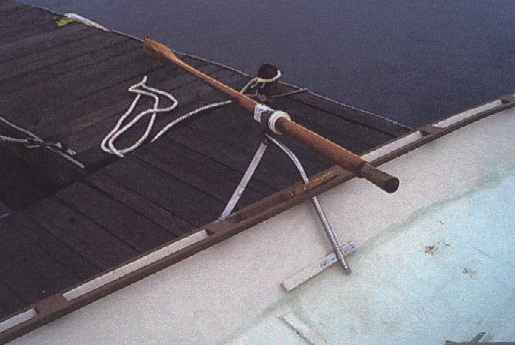
He did elaborate on the construction a bit. Looks very nice!
Batto plans are $25.
Prototype News
Some of you may know that in addition to the one buck catalog which now contains 20 "done" boats, I offer another catalog of 20 unbuilt prototypes. The buck catalog has on its last page a list and brief description of the boats currently in the Catalog of Prototypes. That catalog also contains some articles that I wrote for Messing About In Boats and Boatbuilder magazines. The Catalog of Prototypes costs $3. The both together amount to 50 pages for $4, an offer you may have seen in Woodenboat ads. Payment must be in US funds. The banks here won't accept anything else. (I've got a little stash of foreign currency that I can admire but not spend.) I'm way too small for credit cards.
Here are the prototypes abuilding that I know of:
The Texas Ladybug uses up all the man's clamps:

The Colorado Trilars has been sailed but needs more testing and the water is getting mighty cold:
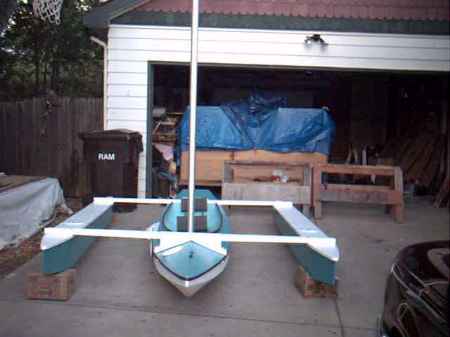
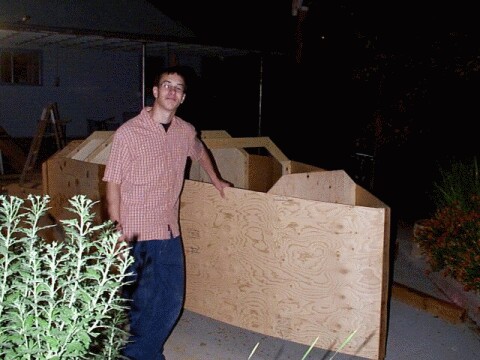
Out West a young fellow poses with his Picara project:
AN INDEX OF PAST ISSUES
Hullforms Download (archived copy)
Plyboats Demo Download (archived copy)
Brokeboats (archived copy)
Brian builds Roar2 (archived copy)
Herb builds AF3 (archived copy)
Herb builds RB42 (archived copy)