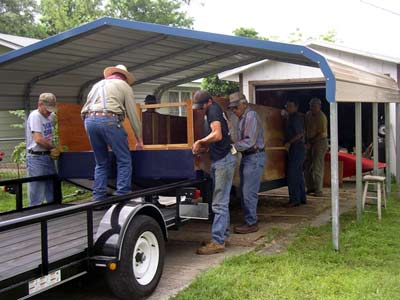
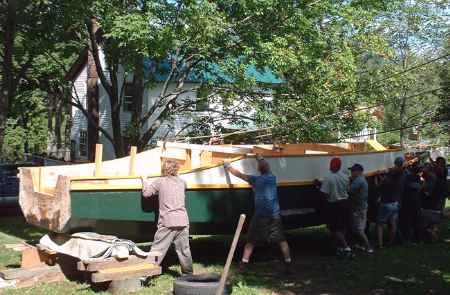
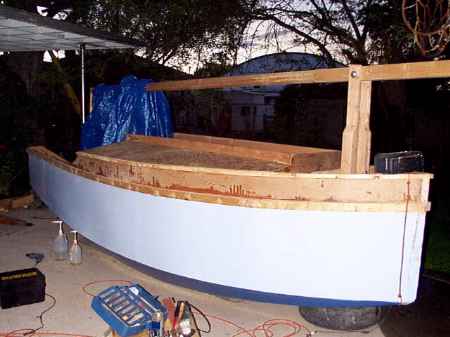
The Texas gang moves Bob Williams Shanteuse from its shed to a trailer.
Ā
Contents:
Ā
Contact info:
Jim Michalak
118 E Randall,
Lebanon, IL 62254Send $1 for info on 20 boats.
Ā
Jim Michalak's Boat Designs
118 E Randall, Lebanon, IL 62254
A page of boat designs and essays.
(15Nov04) This issue will start some essays about drawing your own boats. The 1Dec issue will be a guest essay about scarf joints.
THE BOOK IS OUT!
BOATBUILDING FOR BEGINNERS (AND BEYOND)
is out now, written by me and edited by Garth Battista of Breakaway Books. You might find it at your bookstore. If not check it out at the....ON LINE CATALOG OF MY PLANS...
...which can now be found at Duckworks Magazine. You order with a shopping cart set up and pay with credit cards or by Paypal. Then Duckworks sends me an email about the order and then I send the plans right from me to you.
|
|
Left:
The Texas gang moves Bob Williams Shanteuse from its shed to a trailer. Ā |
Ā
|
Ā
|
Ā
Drawing Tools
THE DESIGN SPIRAL....
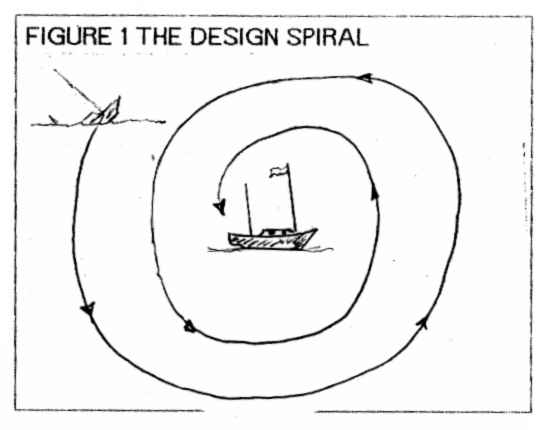
Designing boats can be an adventure. You never really know exactly where you are headed or what you will learn on the way. I like to think of the design process (of anything, not just boats) as a line that spirals to a bullseye as in Figure 1. An old timer or a lucky stiff might start out right at the bullseye and get it correct at the start. But most of us won't. We'll start in the middle of the line somewhere and with each stroke of the eraser and pencil progress a little closer to the target. With enough trial and error we'll get there eventually. The unlucky ones might regress the other way and spiral away from the desired results. In some cases an experienced designer will spiral outward and conclude that the desired boat is impossible.
(And I'm reminded of the time a long time ago when at the missile factory about a hundred of us burned the midnight out for maybe six months working to cram enough fuel into a ramjet missile to meet the range needs and then the lowly weights guy pointed out the the result was so heavy that the booster could not get the heavy result up to flight speed. And the whole project spiraled to a crash.)
Design is almost always an iterative process. At the spiral's bullseye all the boat's elements are in harmony and the pieces of the puzzle all fit. But just as in solving a jigsaw puzzle, in design there is a lot of trial and error fitting involved. I think the best example of that is in sizing sail rigs. The amount of sail you can carry is dependent upon the stability of the hull so you might think that you could pick a proper sail area knowing the hull's stabiltiy. But the stability itself is greatly affected by the size of the sail rig and you must assume a rig size before calculating stability! So which came first, the chicken or the egg? It doesn't matter, but you've got to assume one comes first to get started. Then you proceed through the design process, checking calculated values of stability or sail rigs against assumed values, make adjustments, and move another step closer to the bullseye.
DESIGN EQUIPMENT...
Drawing boats is an inexpensive adventure. With one avoidable exception (determining the shapes of twisted and bent panels) I think no computer gear is required. In fact that gear might get in the way and slow you down. And you might find yourself designing projects that are limited by the capabilities of your gear. An inexpensive hand calculator is almost always sufficient. Drafting tools can be minimal. A three foot by four foot sheet of 1/2" plywood is a good drawing board although you will have to surface it with a layer of heavy paper to negate its grain. I met Phil Bolger about 20 years ago when he was still working in his ancestral house. He was quite famous and seeing his drawing room was quite a treat. At that time he had a full sized sheet of plywood atop a stack of concrete blocks and could make very large drawings on it for some of the very large boats he was drawing. There was no computer gear and he had no intention of getting any although he said the salesmen were hounding him a bit. Ten years later he had moved into his boat home and his drawing board was quite small, maybe 2 foot square at the most. Perhaps he had a larger board on shore somewhere. At any rate I'm sure he is back on shore now in a real office complete with big drawing boards and electronics. He still does his drawings by hand and I'm sure most of you know that he has a true artist's hand and for him to use a cad program to put out final drawings would be a crime.
No T square or drafting machine is needed, another thing I learned from Bolger who told me T squares are just for quickie diagrams. Don't believe Howard Chapelle used one either. We'll get into the subject of avoiding the T square later.
About three drafting triangles would be nice in different sizes. Get at least one that is quite large.
I use an ordinary three sided architect's scale for measuring. It has fine graduations and when working in 1/8 or 1/12 scales will give accuracy sufficient for boatbuilding from the scale drawings.
I use an aluminum yardstick meant for drywall workers as a long straightedge.
I use ordinary .5mm mechanical pencils that I get at the discount store. Last I saw him work Bolger was using very fine and hard drafting pencils that he kept to the sharpest edge. His preliminary lines were so fine that they were to me hardly visible. He has great eyes and hands and can work with accuracy in much smaller scales than I can.
For a compass I modified a discount store bow compass to hold a .5mm mechanical pencil on one arm by strapping the pencil to the metal compass arm with wire and then potting it into place with a blob of epoxy putty.
And I have a simple plastic protractor. This and the triangles are two of three things I bought at the drafting supply.
As for "Ships Curves", none are required or needed or even suggested because with them you can easily draw curves that can't be easily made full size on the real boat. So I have no drafting curves and think their use can be detrimental. Using "splines", which are long flexible battens, to draw those curves will solve that problem. I now use a plastic spline purchased at the drafting supply and that was over ten years ago and even then they were special order. I dread to think that some day they will be unobtainable. It is about 3' long and about 1/8" x 1/4" in cross section with a groove on the top for the lead weights (usually called ducks or whales) that hold it in place. If splines become extinct I will have to go back to making my own from wood. In one of Howard Chapelle's books he describes drafting gear then current and the making of one's own splines. As with almost all homemade things, once you get the hang of it the homemade spline can be better than the factory spline. Chapelle shows how one can taper and thin the splines to make them throw tricky curves into the right places. But like the ships curves, remember that anything that is tricky to draw will be even trickier to make full size and one of the great advantages of drawing with splines is that they bend in the same way as real lumber. If your drawing goes quickly because the bends are easy, so it will be with the real boat. If you torture your splines with kinky curves, so it will be with the real boat.
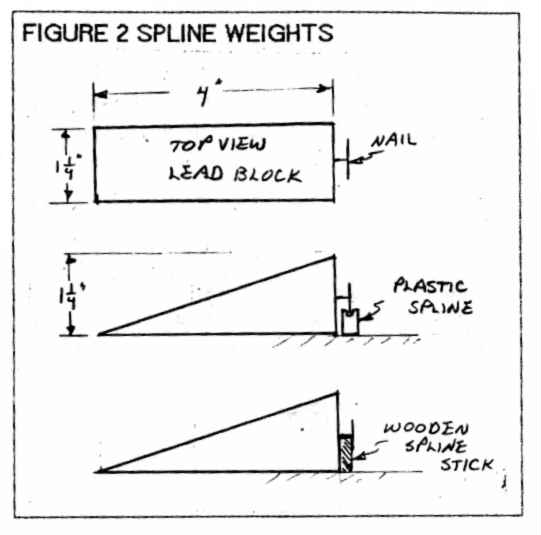
I made my own spline weights, being shocked at the price of the store bought weights (the plastic splines were shockingly cheap at the time at least). First I cast lead (old wheel weights work great) into blocks 4" x 1-1/4" x 1-1/4". Then I sawed the blocks across diagonally to give two triangular blocks. Then I drove a roofing nail into the fat end of each block so that it fell just right into the slot of the drafting spline as shown in figure 2. I wrapped the lead with paper tape to keep it from making everything up and glued a rubber layer to its bottom for friction. Figure 2 also shows the set up used with the simple stick spline.
For drafting paper I prefer to use the backs of old blueprints which are 24" x 36". My second choice is the matte side of drug store poster cardboard which is about 22" x 28" and almost all my older designs like Piccup Pram were done on the poster cardboard. Someone once told me that William Jackson who designed many of the boats you'd see in popular magazines in the 50's and 60's liked to draw on ordinary brown wrapping paper. I tried it and couldn't see the lines. But I did end up using the heavy wrapping paper to give a nice surface to the plywood drawing board. If a design turns out to be a keeper I trace the lines on drafting mylar using ordinary .5mm lead pencil. It must be handled somewhat with care to avoid smearing. Bolger does his tracings with very fine ink pens but I make way too many mistakes for that.
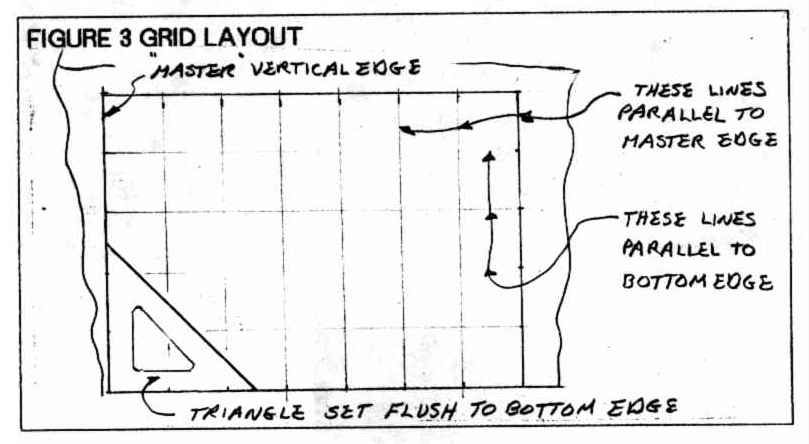
To set up shop you place your board in a comfortable place with good light and surface it with the heavy wrapping paper. Tape your drafting paper to it with any sort of regular tape using no pins. Check the corners of your paper for squareness with that large triangle you bought. It is almost always perfectly square but you must check it. (The post cardboard is seldom square.) If it isn't perfectly square, draw a vertical line up the left or right side using the large triangle set flush with the bottom edge of the sheet. Now lay out a grid of lines all over the paper with all vertical lines parallel to that first vertical and with all horizontal lines parallel to the bottom edge as shown in Figure 3. The spacing of the lines should be between 1" and 3" apart. I like to space the lines a scale 12" apart, so in 1/8 scale they are 1-1/2" apart, and in 1/12 scale they are 1" apart. Don't worry about getting the grid size that will fit exactly on your paper. If the last sectors along one edge aren't the proper size it is of no consequence. All measurements will be taken from this grid so use care in getting it right. And that is how we avoid using the T square. They say the grid method is more accurate than using the T square.
That's about it for buying stuff, maybe $50 worth.
NEXT TIME...
Rob Rhode-Szudy shows us his scarf joints.
Caprice
CABIN SAILBOAT, 25' X 6', 900 POUNDS EMPTY
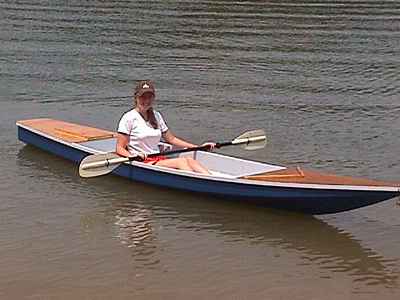
About 15 years ago I built a Payson Canoe and used it for several years before selling it. I replaced it about 10 years ago with my Toto double paddle canoe. Toto has the same multichine cross section as the Payson Canoe but I tried for a long lean bow which would be better in rough water and more foregiving of bow down trim. I still have that Toto, unchanged in any way since new, and still use it all summer. Amanda Johnson demonstrates:
The Toto shape worked so well that I used it in other designs like Roar2 and RB42. I tried it also in a sailing boat, the 20' Frolic2 (the original Frolic was narrower, more of a rowboat than a sailboat). Frolic2 was unballasted with a small cuddy and I hoped it would be a good daysailer and one man camping boat.
Bill Moffitt had built my Woobo design and funded a 20% enlargement of Frolic2 that would have a cabin, water ballast, and a yawl rig for cruising near the Gulf Coast.
The 20% enlargement idea went very well except that I had to deepen the hull more than that to give some serious headroom in the cabin, but it doesn't have standing headroom. Great empasis was placed on ease of use and rigging. The main mast is short and stepped in a tabernacle. There is a draining anchor well in the bow, a small storage segment under the front deck. The mast tabernacle is bolted to the bulkhead that forms the front of the sleeping cabin. There is a utility room aft of the sleeping room. Water ballast tanks are under the bunks and in the sides of the utility room floor, about 600 pounds of ballast as I recall. Aft of the cabin is the self draining raised cockpit with storage volume under the deck. Finally there is a self draining motor well across the stern. Construction is taped seam plywood.
Bill couldn't start his Caprice right away but Chuck Leinweber of Duckworksmagazine gave it a try. He has the room and tools and smarts to tackle a project like this with no hesitation. There weren't many changes from the plans that I know of, the main one being adding a conventional footwell to the aft deck which is designed to have a hatch type of foot well as with the Bolger Micro.
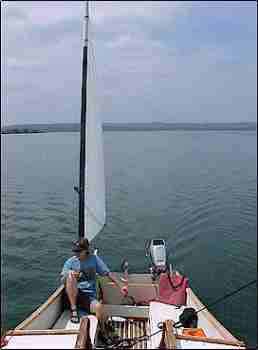
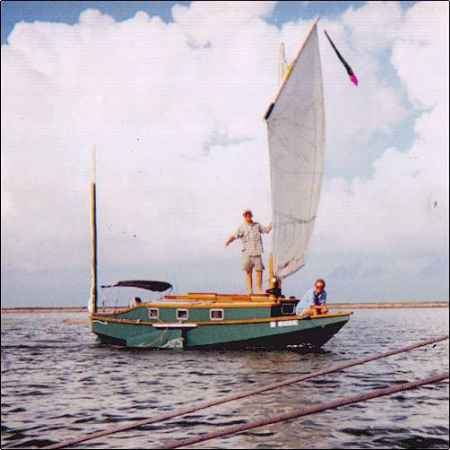
Chuck trailered his Caprice up from Texas to our Midwest Messabout this June and I had a chance to go over it, sail it for a couple of hours, and watch it sail from other boats. Wonderful!
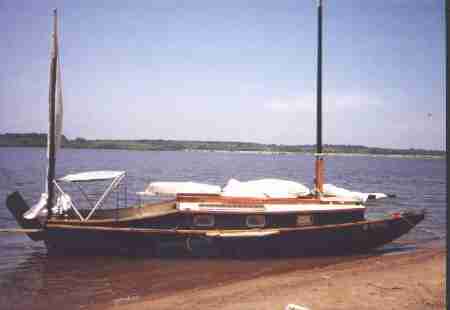
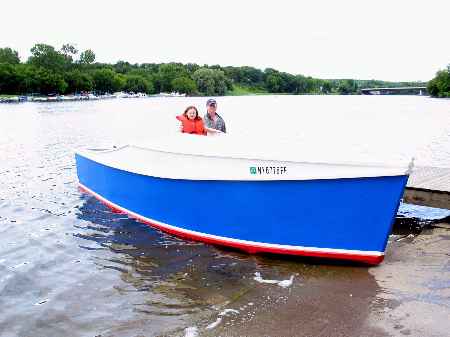
Chuck tells me it takes less than 15 minutes to rig the boat to as you see here. As shown the boat has its ballast so you see it beaches very well indeed. I asked about the ballast. He can flood the tanks without power, just open the access plate, reach in and pull the fill plug and let the water rush in. Since the tops of the tanks are about even with the normal waterline he has to move his weight around to keep the tank depressed long enough to completely fill. Then you reach into the filled tank, replace the plug in the bottom, and then replace the access plate in the top. There are two tanks to fill.
Are the ballast tanks worth the building effort? On a multichine hull like this the tops of the tanks form flats that give places for bunks and storage so that is good. When full the boat should have a very good range of stabiltiy. Chuck's boat has never been in rough going as I'm writing this so the effect of the ballast remains to be proven. It has been capsized in a practice but the ballast tanks were empty and the boat was empty with no crew, etc.. But the ballast is a success from the standpoint that Chuck is able to tow his Caprice behind a four cylinder pickup truck. My idea was to pull the boat up the ramp and drain the tanks afterward by simply pulling the drains plugs. But Chuck has found it best by far to empty the tanks before recovering the boat at the ramp. So he uses a bilge pump in each tank to pump them empty. I'd be worried about water ballast tanks on a wooden boat from a rot standpoint and would be careful to open all the plugs and access panels when the boat is stored.
(I should add that I think an empty Caprice will weigh about 900 pounds based on the plywood sheet count (eight sheets of 1/4", nine sheets of 3/8" , five sheets of 1/2" and one sheet of 3/4"). But any boat like this can hold an awful lot of gear and junk.)
Caprice has the tabernacle setup that I first saw on Karl James' sharpie. The mainsail is 190 square feet, balanced lug. The mast is fairly short, stowing within the length of the boat when lowered. Chuck demonstrated putting up the mast, maybe a 15 second operation. I've been drawing these for a while on different boats but this is the first one I know of to get built and used. I'm greatly relieved that is all works so well. Before you decide to tack a tabernacle like this onto your boat, be advised that the tabernacle posts go clear to the hull bottom with big bolts all around a beefy bulkhead.
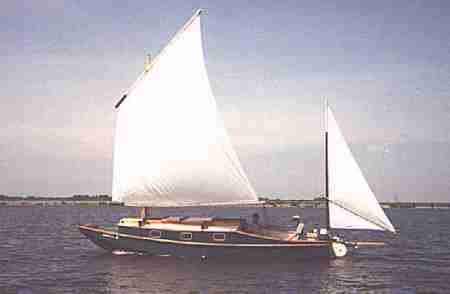
I thought Caprice sailed very well in the light winds we had that weekend. Tacked very smoothly through 90 to 100 degrees which is all you can ever get with a low tech rig. Very smooth and quiet compared to the sharpies I'm used to. It didn't seem at all sensitive to fore-aft trim. In the light winds it went 5 knots on the GPS which is certainly fast for the conditions.
Well, all in all I thought Caprice was everything I was hoping for.. Plans are $45.
Prototype News
Some of you may know that in addition to the one buck catalog which now contains 20 "done" boats, I offer another catalog of 20 unbuilt prototypes. The buck catalog has on its last page a list and brief description of the boats currently in the Catalog of Prototypes. That catalog also contains some articles that I wrote for Messing About In Boats and Boatbuilder magazines. The Catalog of Prototypes costs $3. The both together amount to 50 pages for $4, an offer you may have seen in Woodenboat ads. Payment must be in US funds. The banks here won't accept anything else. (I've got a little stash of foreign currency that I can admire but not spend.) I'm way too small for credit cards.
The AF4G is done and launched. Writeup after testing:
The 30' Cormorant has been flipped! Bottom totally painted so there should be no upside down work to do. Read about the flipping at www.breakawaybooks.com/Flipping_Cormorant.htm
The out West Picara has its roof and some major sail rig bits done, but the Utah winter is closing in:
The down South Picara is getting its innards done.
AN INDEX OF PAST ISSUES
Hullforms Download (archived copy)
Plyboats Demo Download (archived copy)
Brokeboats (archived copy)
Brian builds Roar2 (archived copy)
Herb builds AF3 (archived copy)
Herb builds RB42 (archived copy)