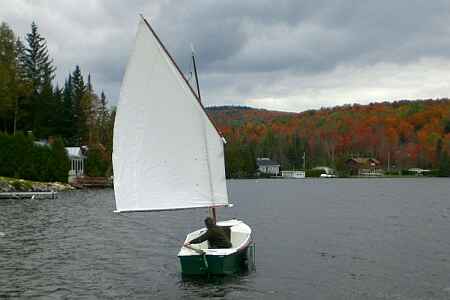
Dave McGuire launches his new AF3 in Vermont foliage and remembered to lower that leeboard after the photo was taken.
Contents:
Contact info:
Jim Michalak
118 E Randall,
Lebanon, IL 62254Send $1 for info on 20 boats.
Jim Michalak's Boat Designs
118 E Randall, Lebanon, IL 62254
A page of boat designs and essays.
(15Nov08)This issue will take another look at polytarp sails. The 1December issue will take a look at what happens when the weight goes up.
THE BOOK IS OUT!
BOATBUILDING FOR BEGINNERS (AND BEYOND)
is out now, written by me and edited by Garth Battista of Breakaway Books. You might find it at your bookstore. If not check it out at the....ON LINE CATALOG OF MY PLANS...
...which can now be found at Duckworks Magazine. You order with a shopping cart set up and pay with credit cards or by Paypal. Then Duckworks sends me an email about the order and then I send the plans right from me to you.
LUGSAILS FROM POLYTARP 2
SPEAKING OF SAILS OF POLYTARP....
Craig O'Donnell, whose web site you will find down in my links, read the last polytarp essay and wrote me:
"I've attached a tarp-sailed boat photo. This was taken by my friend Nick Burningham in Australia, who's an expert on Indonesian working craft. He says tarp sails are the standard on Indonesian sailboats now. He explains they are sewn in double thickness "like bricks" so the seams overlap. No shape. Just sewn up and hoisted."
Well, you can see there are lots of ways to make a sail and some folks have figured out how to use the cheap material on a large boat. 
NOW, BACK TO OUR STORY......
You recall the pattern we developed for a small lugsail to be made from a single sheet of polytarp. The pattern was predetermined to give a certain draft. The pattern below is for a Piccup Pram sail, about 70 square feet of area and 10% draft. We're going to cut and sew this sail.
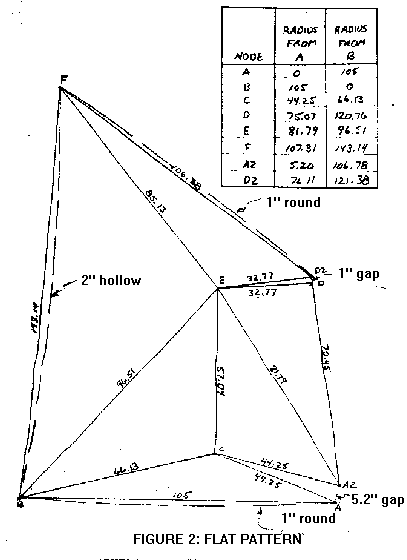
As we discussed last episode, we have this pattern drawn in felt tip pen on polytarp such that no edge comes within about 2" of the edge of the tarp. We will not use any of the preformed edging on the tarp. Don't be tempted to do so. As for tarp material, I prefer the "Coleman" brand sold at Wal-mart stores although I doubt if the other ordinary tarps are much different. I haven't tried any of the "heavy duty" tarps although they might be worth a try. A few issues ago I suggested looking at the polysail page for gourmet tarps. Since I wrote that I saw some examples of those tarps at the messabout at Bloomington, Indiana in September. They are indeed superior to the common tarps, not only slightly heavier, but they can be bought in pure white, something I've never seen in a polytarp.
CUTTING THE TARP....
The tarp will be hemmed along the foot, head, and leech. So those lengths should be cut about 2" outside the line. The luff can be cut right to the line. DON'T CUT THE LONG V'S FROM A-C-A2 AND FROM D-E-D2! Instead cut straight across from A to A2 and from D to D2.
SEWING THE DARTS...
The darts at the two major shaping seams will be sewn as shown in Figure 3. In Figure 2 the two shaping seams appear as the deep V's of A-C-A2 and D-E-D2.
Break out the sewing machine. Any sewing machine will sew polytarp although you should use one that will sew a zigzag stitch. Use a rot proof thread like V69 polyester the SailRite sells. Practice a bit if you aren't used to sewing. Read the manual if you've got one.
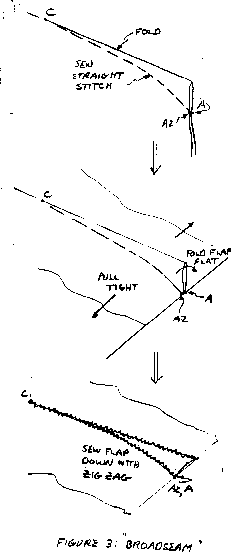
I'd suggest you try the widest seam first, the wide ones seem the easiest. Practice sewing one or two with some scrap. First fold the cloth on the centerline of the seam. You might secure the fold temporarily with clothespins or paperclips. Then sew, using a straight stitch, from the inner part of the seam to the outer edge along the smoothly curved line shown in the figure. If you were to sew a straight line from point C to A you would end up with the double wedge shape of the original pattern (or something like it - the flexible cloth probably wouldn't take the exact shape.) But if you sew the ever-broadening curved line shown you will get a sail with smooth curves and the original double wedge will be converted to a smooth airfoil with the desired draft.
Next open the fold and pull the cloth tight across the seam. It won't be flat anymore but that's the whole point of the special seams. There will be a little flap of material stcking out. Fold it flat and sew down the loose edge with a zigzag stitch. Then sew over the other edge of the flap, that is the edge with the straight stitch, with the zigzag stitch to further secure it.
Repeat with the other seam.
Let's take stock of what we've done. The sail has already been cut to its final dimensions and seamed to its final shape. All that remains to complete the sail is to sew in the corner reinforcements, sew the perimeter hems and reinforcements, and set the grommets. It took me an hour to get to this point on the Piccup sail. It took me two more hours to complete the finish details.
CORNER REINFORCEMENTS.....
The corners and reefing areas need to be reinforced with four layers of polytarp. Two layers of regular Dacron sailcloth would also do the job.) That provides strength against tear out of the grommets and stiffens the material to prevent folding under stress. I usually make the reinforcements about 8" long on a side. There are lots of ways to shape these patches. Sew the patches down well with a zigzag stitch.
BORDER HEMS...
On a smaller sail like this 70 square footer I usually make all the hems, except the luff hem, with a simple folded over hem about 2" wide. I've had no trouble. Some might prefer to reinforce all the edges, especially the head edge, with something like 4 ounce sailmaker's tape, 3" wide, folded in half and sewn over the edge. Sew it all down with a zigzag stitch. Reed Smith, who sometimes sails his Piccup in the open ocean (Gulp!) said he had a problem with the leech stretching so perhaps that edge might get a treatment similar to that of the luff.
The luff hem needs a stiffer and stronger treatment. I've been using 3" wide fiberglass tape, the same stuff used to make taped seam plywood hulls. It's fairly inexpensive and very easy to sew. It's edges are treated to prevent unraveling. Dacron sailmaker's tape would also be ideal. Here is how I do the job with fiberglass. I ust sew a 3" wide tape down each side of the luff. The ends, which will unravel badly if left raw, are doubled under the last 6" or sew before being sewn down. That prevents unraveling and also provides a second layer of material in the region of the end grommets, the most highly loaded grommets in the system. It might be advised to sew a final protective layer of tarp over the top of the glass tapes as the tapes seem to abrade easily with handling. All the luff sewing is with zigzag.
At this point all the sewing is done.
GROMMETS....
A smaller sail like this one can use ordinary brass #3 grommets all around. A good hardware store might have them plus the simple tools needed to install them. A bit of warning - I've heard that some of the grommets are brass plated steel. That type looks exactly like real brass when new in the box but they will rust shortly. Try to get real brass.
Practice setting a few grommets in scrap. They need to clamp tightly on the cloth but not so tight as to cut the cloth.
Place grommets at each corner with about 1" edge distance. Then along the hems in the head and foot spaced about every 15".
Large sails aand heavy boats need better grommets in the corners. I've had very good luck with SailRite's riveted "Jiffy " grommets. (SailRite also has all the types and sizes of brass grommets.)
The sail is done! It took me three hours of work to get to this point. No doubt it could be done quicker. If you're not used to sewing you should expect to take longer.
Caprice
CABIN SAILBOAT, 25' X 6', 900 POUNDS EMPTY
About 15 years ago I built a Payson Canoe and used it for several years before selling it. I replaced it about 10 years ago with my Toto double paddle canoe. Toto has the same multichine cross section as the Payson Canoe but I tried for a long lean bow which would be better in rough water and more foregiving of bow down trim. I still have that Toto, unchanged in any way since new, and still use it all summer. Amanda Johnson demonstrates:

The Toto shape worked so well that I used it in other designs like Roar2 and RB42. I tried it also in a sailing boat, the 20' Frolic2 (the original Frolic was narrower, more of a rowboat than a sailboat). Frolic2 was unballasted with a small cuddy and I hoped it would be a good daysailer and one man camping boat.
Bill Moffitt had built my Woobo design and funded a 20% enlargement of Frolic2 that would have a cabin, water ballast, and a yawl rig for cruising near the Gulf Coast.
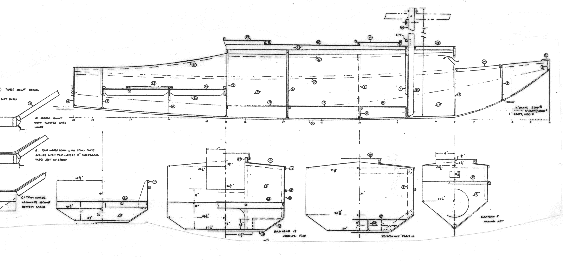
The 20% enlargement idea went very well except that I had to deepen the hull more than that to give some serious headroom in the cabin, but it doesn't have standing headroom. Great empasis was placed on ease of use and rigging. The main mast is short and stepped in a tabernacle. There is a draining anchor well in the bow, a small storage segment under the front deck. The mast tabernacle is bolted to the bulkhead that forms the front of the sleeping cabin. There is a utility room aft of the sleeping room. Water ballast tanks are under the bunks and in the sides of the utility room floor, about 600 pounds of ballast as I recall. Aft of the cabin is the self draining raised cockpit with storage volume under the deck. Finally there is a self draining motor well across the stern. Construction is taped seam plywood.
Bill couldn't start his Caprice right away but Chuck Leinweber of Duckworksmagazine gave it a try. He has the room and tools and smarts to tackle a project like this with no hesitation. There weren't many changes from the plans that I know of, the main one being adding a conventional footwell to the aft deck which is designed to have a hatch type of foot well as with the Bolger Micro.

Chuck trailered his Caprice up from Texas to our Midwest Messabout this June and I had a chance to go over it, sail it for a couple of hours, and watch it sail from other boats. Wonderful!
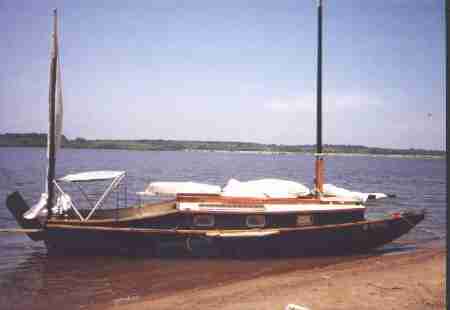
Chuck tells me it takes less than 15 minutes to rig the boat to as you see here. As shown the boat has its ballast so you see it beaches very well indeed. I asked about the ballast. He can flood the tanks without power, just open the access plate, reach in and pull the fill plug and let the water rush in. Since the tops of the tanks are about even with the normal waterline he has to move his weight around to keep the tank depressed long enough to completely fill. Then you reach into the filled tank, replace the plug in the bottom, and then replace the access plate in the top. There are two tanks to fill.
Are the ballast tanks worth the building effort? On a multichine hull like this the tops of the tanks form flats that give places for bunks and storage so that is good. When full the boat should have a very good range of stabiltiy. Chuck's boat has never been in rough going as I'm writing this so the effect of the ballast remains to be proven. It has been capsized in a practice but the ballast tanks were empty and the boat was empty with no crew, etc.. But the ballast is a success from the standpoint that Chuck is able to tow his Caprice behind a four cylinder pickup truck. My idea was to pull the boat up the ramp and drain the tanks afterward by simply pulling the drains plugs. But Chuck has found it best by far to empty the tanks before recovering the boat at the ramp. So he uses a bilge pump in each tank to pump them empty. I'd be worried about water ballast tanks on a wooden boat from a rot standpoint and would be careful to open all the plugs and access panels when the boat is stored.
(I should add that I think an empty Caprice will weigh about 900 pounds based on the plywood sheet count (eight sheets of 1/4", nine sheets of 3/8" , five sheets of 1/2" and one sheet of 3/4"). But any boat like this can hold an awful lot of gear and junk.)
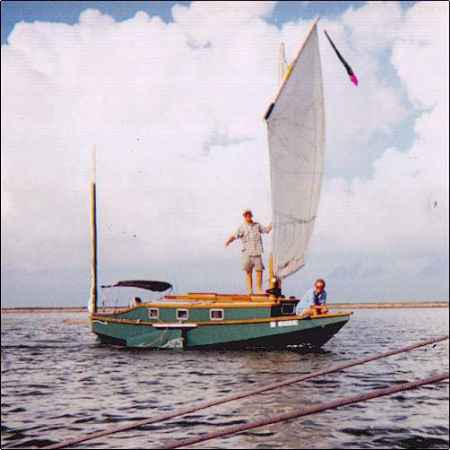
Caprice has the tabernacle setup that I first saw on Karl James' sharpie. The mainsail is 190 square feet, balanced lug. The mast is fairly short, stowing within the length of the boat when lowered. Chuck demonstrated putting up the mast, maybe a 15 second operation. I've been drawing these for a while on different boats but this is the first one I know of to get built and used. I'm greatly relieved that is all works so well. Before you decide to tack a tabernacle like this onto your boat, be advised that the tabernacle posts go clear to the hull bottom with big bolts all around a beefy bulkhead.
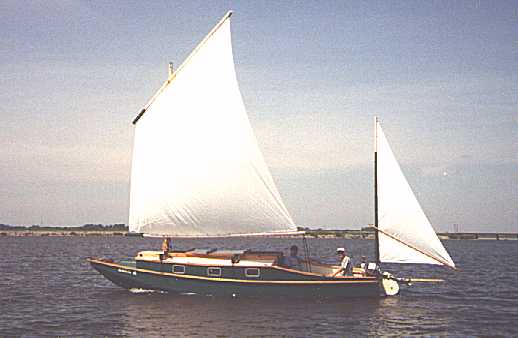
I thought Caprice sailed very well in the light winds we had that weekend. Tacked very smoothly through 90 to 100 degrees which is all you can ever get with a low tech rig. Very smooth and quiet compared to the sharpies I'm used to. It didn't seem at all sensitive to fore-aft trim. In the light winds it went 5 knots on the GPS which is certainly fast for the conditions.
Well, all in all I thought Caprice was everything I was hoping for.. Plans are $45.
Prototype News
Some of you may know that in addition to the one buck catalog which now contains 20 "done" boats, I offer another catalog of 20 unbuilt prototypes. The buck catalog has on its last page a list and brief description of the boats currently in the Catalog of Prototypes. That catalog also contains some articles that I wrote for Messing About In Boats and Boatbuilder magazines. The Catalog of Prototypes costs $3. The both together amount to 50 pages for $4, an offer you may have seen in Woodenboat ads. Payment must be in US funds. The banks here won't accept anything else. (I've got a little stash of foreign currency that I can admire but not spend.) I'm way too small for credit cards.
I think David Hahn's Out West Picara is the winner of the Picara race. Shown here on its first sail except there was no wind. Hopefully more later. (Not sure if a polytarp sail is suitable for a boat this heavy.
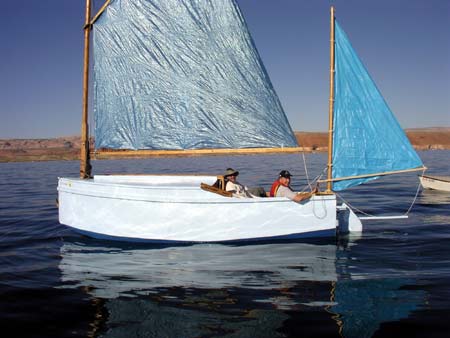
Here is a Musicbox2 I heard about through the grapevine.
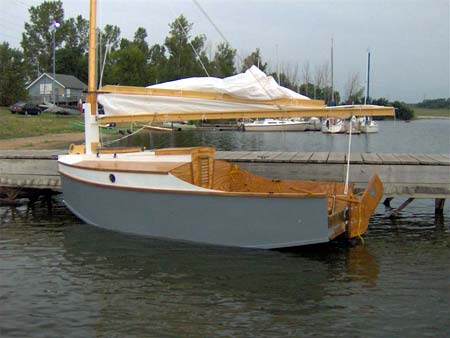
This is Ted Arkey's Jukebox2 down in Sydney. Shown with the "ketchooner" rig, featuring his own polytarp sails, that is shown on the plans. Should have a sailing report soon.
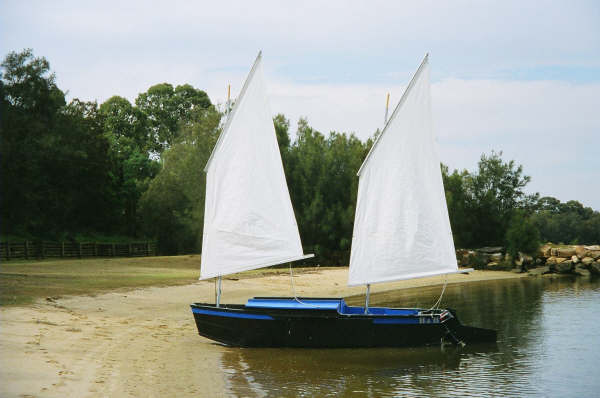
And the Vole in New York is Garth Batista's of www.breakawaybooks.com, printer of my book and Max's book and many other fine sports books. Boat is done, shown here off Cape Cod with mothership Cormorant in background, Garth's girls are one year older. Beautiful job! I think Garth is using a small lug rig for sail, not the sharpie sprit sail shown on the plans, so I will continue to carry the design as a prototype boat.
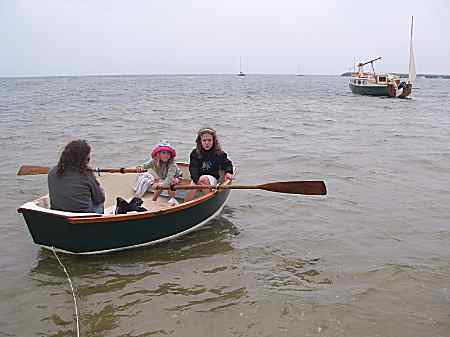
And the Leinweber's make another prototype! This one by Sandra, an Imresboat shown here on its first outing. They are taking it on a "cruise" so more about it later.
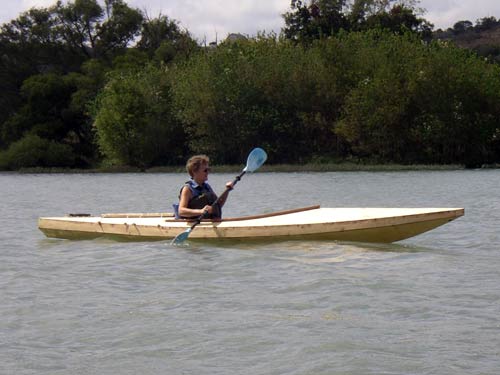
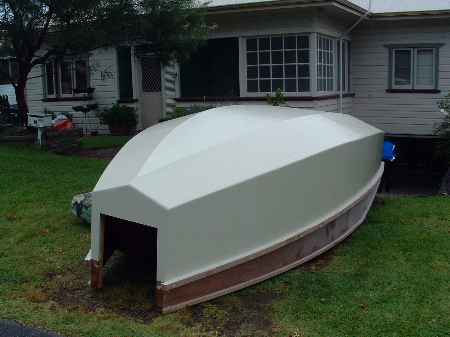
And a new Down Under Blobster, now upside down....
A view of the Caroline prototype showing a lot of the inside, crew on fore deck. Beautiful color:
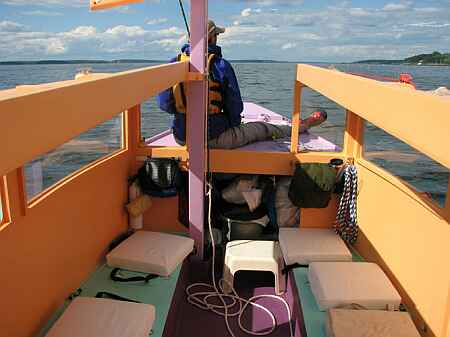
I gotta tell you that on the Caroline bilge panels I made an error in layout and they are about 1" too narrow in places on the prototype plans. I have them corrected but it always pays, even with a proven design, to cut those oversized and check for fit before final cutting.
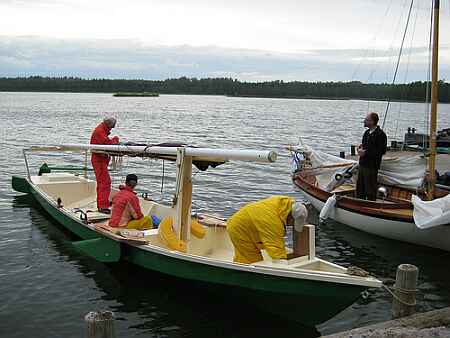
And the Raider of Norm Wolfe did indeed make it to the Finnish Raid. I'll bet the paint was still wet.
AN INDEX OF PAST ISSUES
Hullforms Download (archived copy)
Plyboats Demo Download (archived copy)
Brokeboats (archived copy)
Brian builds Roar2 (archived copy)
Herb builds AF3 (archived copy)
Herb builds RB42 (archived copy)