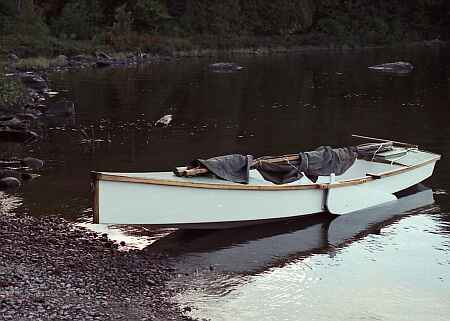
Richard Plaunt's beautiful Woobo "Patience" up in Canada.
Contents:
Contact info:
Jim Michalak
118 E Randall,
Lebanon, IL 62254Send $1 for info on 20 boats.
Jim Michalak's Boat Designs
118 E Randall, Lebanon, IL 62254
A page of boat designs and essays.
(1May09)This issue will take a look at rudders. The 15 May issue will rerun the rowing gear essay.
THE BOOK IS OUT!
BOATBUILDING FOR BEGINNERS (AND BEYOND)
is out now, written by me and edited by Garth Battista of Breakaway Books. You might find it at your bookstore. If not check it out at the....ON LINE CATALOG OF MY PLANS...
...which can now be found at Duckworks Magazine. You order with a shopping cart set up and pay with credit cards or by Paypal. Then Duckworks sends me an email about the order and then I send the plans right from me to you.
MESSABOUT NOTICE:
THE REND LAKE MESSABOUT WILL TAKE PLACE ON JUNE 12 and 13 AT THE PINTAIL LOOP OF THE NORTH SANDUSKY CAMP GROUND AT REND LAKE IN SOUTHERN ILLINOIS. THIS IS A CHANGE FROM PREVIOUS YEARS. I WON'T BE IN CHARGE OF THE MEET THIS YEAR. INSTEAD OUR TIRELESS FRIEND ROB ROHDE-SZUDY WILL TAKE A STAB AT IT. CONTACT HIM AT robrohdeszudy@yahoo.com FOR MORE CAMPING INFO IF YOU NEED IT .

|
Left:
Richard Plaunt's beautiful Woobo "Patience" up in Canada.
|
|
|
SMALL BOAT RUDDERS
GENERAL...
I have no rule that I use to size a rudder. I just draw something that looks like the proper size for the boat. I always make it shorter than the leeboard with the idea that the leeboard will bump the bottom first, you will notice that and prepare for shallow water or underwater objects with unlashing the main sheet and having a firm hand on the tiller. But the question arises, "How much rudder do you need?"
I think the worst condition the rudder will usually see is when running downwind with the sail boomed way out like this:
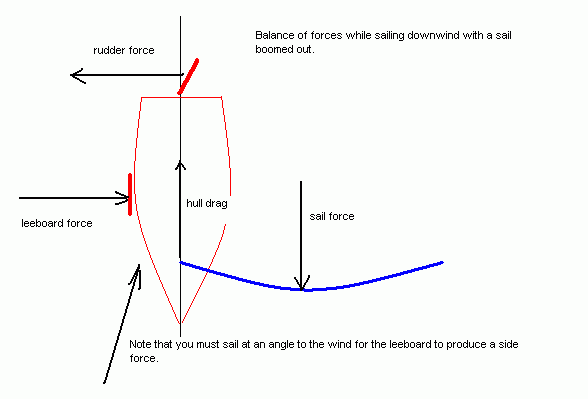
There might be conditions of imbalance during close wind sailing when the rudder will be overpowered but not if you have done your "sail area math". So what have we in the above picture? The sail is boomed out all the way and its force is pulling straight ahead but many feet off to the side. The hull has a drag equal to the sail's force and the boat has reached its terminal velocity so to speak. The distance between the sail force and the drag creates a torque that the rudder and leeboard must balance. I suppose on an old square rigged boat the sails would still be on centerline and this condition hardly occurs and you might hardly need a rudder running downwind. Perhaps the worst case would be the old catboats with huge booms, short hulls and very shallow rudders.
In the sailing I have done with my own boats the only case of ever running out of rudder came under this downwind condition with the original WeeVee. It had a gaff sail, was only 7' long, and I was trying a shallow end plated rudder. In a brisk downwind no amount of rudder deflection would hold it on course, it would swing around and round up into the wind. I found I could "tack" it downwind by sailing a broad reach instead of downwind. I tried various sizes of endplates but finally went to a deeper conventional swing rudder as shown in this article. That cured it! I gave up on shallow rudders.
I think Chris Feller has suggested the rudder on Mixer was too small. Maybe so but the clear answer on how to fix such a situation is simply to make the rudder bigger, deeper in particular since deeper is in general more effective than wider. Almost any rudder I've ever designed was something that hung on the stern transom so changing it is pretty easy, unlike say a rudder that is mounted to a shaft that runs through the hull. Anyway I wanted to point these things out before getting into the meat of this older article.
BACKGROUND...Here is an article I wrote a while back that appeared in the great paper magazine BOATBUILDER. I've included copies of it in my prototypes catalog since then. The article shows how I've made rudders for my own small boats.
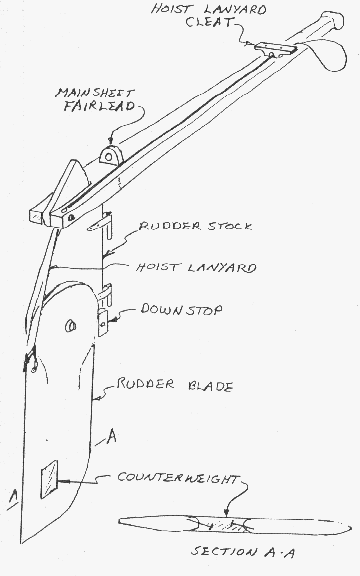
Where I sail only a kick-up rudder works well. It's not because once a year you might strike a ledge and break off a fixed rudder. It's because our waters are generally shallow and a fixed rudder would require endless fussing on every trip. With the weighted kick-up rudder shown here you just blast along without giving the kick-up blade a second thought.
I have also tried kick-up rudders that weren't weighted, but were held down by lanyards. Nearing a shore or shallow I had to play the thing like a puppet and quickly ran out of hands because the tiller, sheet, and board all needed handling at the same time. The weighted rudder blade is much better. In this article I'll show you how I build a kick-up rudder from the ground up from plywood. This sort of rudder can be suitable for boats up to about 22 feet length.
RUDDER BLADE...
The best way to make the blade is to laminate it from thinner plywood. I've seen warped blades made from a single piece of 1/2" plywood, but I've never had a problem with a blade built up from two layers of 1/4" plywood.
Cut out the plywood blanks and butter one up with glue. I prefer plastic resin glue. It comes as a dry powder and is mixed with water to the consistency of regular white wood glue. It's best to spread the glue with a notched trowel like you use to paste down floor tiles. Place the glued-up blanks together on a flat surface protected with plastic or paper, and tap a couple of light nails through them so they can't slide around on each other. Apply clamping pressure with weights like concrete blocks placed atop the blanks. Now stay away until the glue has set good and hard.
Now give the blade a final trimming and streamline the edges where required. (If your rudder, daggerboard, leeboard or centerboard vibrates in use, streamline the edges some more. That almost always cures the ailment.)
SINK WEIGHT...
I called this the "counterweight" in the drawing but "sink weight" is a better term.
The sink weight should be slightly heavier than the buoyancy of the immersed blade. Wood is about half as dense as water, and lead is about 11 times denser than water. It works out that the area of the lead weight should be about 1/16th the area of the immersed blade, or maybe 7 percent of the area to give a slight negative buoyancy. For example, a blade that is 10 inches by 15 inches immersed is 150 square inches. The lead weight could be 150 x .07 = 10.5 square inches, which would be a square 3.24 inches per side. Cut a hole in the blade for the lead to the proper size, preferably toward the tip and toward the trailing edge. Bevel the hole's edges so the lead will lock in place by forming flanges around the blade. Also place some rustproof nails or screws around the interior of the hole to further lock the lead in place. Clamp the blade to a flat metal plate and place it level on the floor.
To figure the weight of the lead required, multiply the area in inches by the thickness in inches and again by .4. In the example, if the example blade is 3/4" thick, the weight of the lead required is 10.5 x .7 x .4 = 3.15 pounds.
To melt the lead, I use a propane camp stove. I place it right next to the job so I woun't have to tote molten lead around the shop. For a crucible I use a coffee can with a 1/2" pour hole drilled about 3" above the bottom of the can, with a long metal handle bolted to the side of the can. The crucible goes on the stove with enough lead wheel weights inside sufficient for the pour.
Begin the pour as soon as the lead is molten. (The steel clamps on the wheel weights will float to the top and not pass through the pour hole.) Take your time and be very careful with the pour, but it must be done all at once. Overfill the hole in the rudder blade somewhat to allow for shrinkage on cooling. Shut off the stove and walk away from the job for a few hours. Lead stays very hot long after it has solidified.
If the weight gets loose in the blade due to shrinkage, you can tighten it by placing the weight over an anvil and hitting the lead with a hammer. That squeezes the center and expands the perimeter.
Now contemplate what it's like to pour a thousand pound keel!

RUDDER STOCK...
Laminate this exactly as you did the rudder blade. You need to add the downstop and it's amazing to me how sturdy this part needs to be. A block of hard rubber or phenolic plastic bolted in place might be best.
TILLER/HOIST LANYARD...
Don't make the tiller too short! Make it too long and shorten it later if needed. The tiller should fold neatly along the back edge of the rudder for storage.
Use light braided line, about 3/16" for the lanyard. Tie it to a small hole in the rudder's trailing edge. The hole needs to be located about where the raised rudder meets the aft end of the tiller. Then pass the lanyard through a hole in the back corner of the tiller, then forward to a small cleat on the top of the tiller. Pass the lanyard through a small hole in the base of the cleat and tie and loop for your fingers. To raise the rudder, yank on the lanyard and belay it around the little cleat. To lower the rudder, uncleat the lanyard and let the blade drop kerplunk against the stop.
SHEET FAIRLEAD...
This works very well on smaller sails that don't require multipart main sheets. Screw a fairlead solidly to the tiller's top face. Place the fairlead right above the rudder hinges so the sheet loads won't affect steering. Run the sail's sheet through the fairlead and forward along the tiller. You can secure the sheet merely by wrapping it a couple of times around the tiller's grip under your steering hand. Then you can steer and hold the sheet with the same hand. To release the sheet in a puff you need only slacken your grip without letting go of the tiller. You can also belay the sheet around the rudder lanyard cleat if you are feeling lucky.
HINGES...
I haven't figured out hinges yet. I think the best ones are welded up from stainless steel, but I'm working towards building boats totally from lumberyard stuff. Stevenson Projects used barrel bolt locks for hinges. Payson used eyebolts and rods. Dick Scobbie used door hinges with big cotter pins for pivots. Seeing those, I tried some door hinges on a dink rudder and was quite satisfied, especially since they came from the scrap bin. Most door hinges won't mount as simply as real boat fittings - check out the angles they swing through and do some head scratching.
One thing I'm sure of: Don't rely on gravity to keep your rudder on your transom. In a knockdown the rudder may unship and leave you with a very wet boat and no rudder. Also, with the sheet fairlead on the tiller as I've shown it, the sheet can produce a large upward force on the assembly in strong winds and lift the whole thing out of conventional fittings. Both of these things have happened to me. Now I secure conventional fittings against knockdowns and sheet loads by drilling as small hole in one pintle below the gudgeon and putting a cotter pin through the hole.
THE CARY HINGE...
I wrote the above a few years ago. But very recently I got letter from Ted Cary in Florida. He has a way of making effective rudder hinges from scrap seatbelts.
Here is his description:
"Thought you might be interested in my solution to the rudder pintle problem. My first experience trying to hit two gudgeons with the pintles in a big chop, while hanging over the transom, disqualified that system for me. I came up with a simple track and slide system, then epoxied up the slide and rudder stock around pieces of connecting webbing strap. The stap flexes when you steer. You can bend a seat belt a lot of times before it breaks, and nylon doesn't corrode in salt water. I found that you must align the strap longitudinally across the direction of the flex, and you must not allow the epoxy to harden on the strap where it has to flex. But the ends of the strap have to be well saturated to hold the slide and the rudderstock halves together. The most successful way I've used to avoid glue where I don't want it is to get the parts all glued up and assembled with clamps, keeping the glue off the flex line as much as possible. Then use a syringe or squirt bottle to saturate the flex line with vinegar, working it through the fibers, before the glue starts to set. The acetic acid neutralizes the amines in the epoxy hardener, so it won't polymerize. The clamped parts won't allow the vinegar to reach the glue on the strapping between them, so it goes off where you want it to."
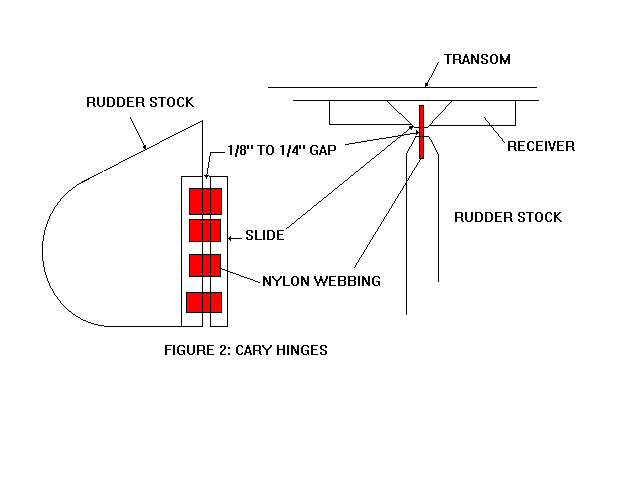
"Dropping the triangular section slide down the transom track installs the rudder in a fraction of a second.This hinge rig has been working great on several dinks for over 4 years now."
Well, I must try Ted's system sometime. I think model airplane guys have been using flexing plastic hinges for a long time. My only comment might be that I would also lock the slide it to prevent it from unshipping in a knockdown.
Robbsboat

ROBBSBOAT, SAILBOAT, 15' X 4', 550 POUNDS EMPTY
Robb really probably wanted a Matt Leydon cruiser like Paradox but was put off by the complexity and small size. It has been a while since I saw Paradox plans but I think the "complexity" of the design is mostly in the details that made such a small boat livable. And maybe the only way to make a small boat like this work well in the Paradox fashion is to install all those details. However, my feeling is that almost no one is going cruising the way that Matt does and can get by without many of those details. My feeling is that Matt was able to make those trips in his little boats by very careful and patient planning and lots of experience. And if anyone were to ask me if this new boat is safe for ocean travel my answer would be a very quick and loud NO. In the right hands, like Matt's, it might be but it is the old case of "If you have to ask, the answer is NO." because the question demostrates you don't have enough experience to start with (like me).
But for a couple of days cruising on Kentucky lake, etc. by a small nimble person, it might work well, and that is what most of you will do if you are lucky. So the idea of Robbsboat is a small cruiser, totally enclosed, you sail it from the inside, you sleep in it, and it is supposed to take care of you and be self righting. Robb wanted it really sturdy so we have all 1/2" plywood with a bottom of double 1/2" plywood. Conventional construction including the only time I have ever used internal chine logs at Robb's insistance. That heavy plywood makes for a heavy boat - say 550 pounds stripped. The boat is supposed to be OK up to 1500 pounds total so a lot of gear can be stuffed inside. Some will think this is a two person cruiser, but they won't think that again after trying it on for size. If you tell someone they won't cruise with wife/girlfriend more than once I suppose 100% of them will disagree but you would be right for about 90% of them, so the boat will be a success 90% of the time. Much better than a really big boat that ends up being the wrong boat 90% of the time.
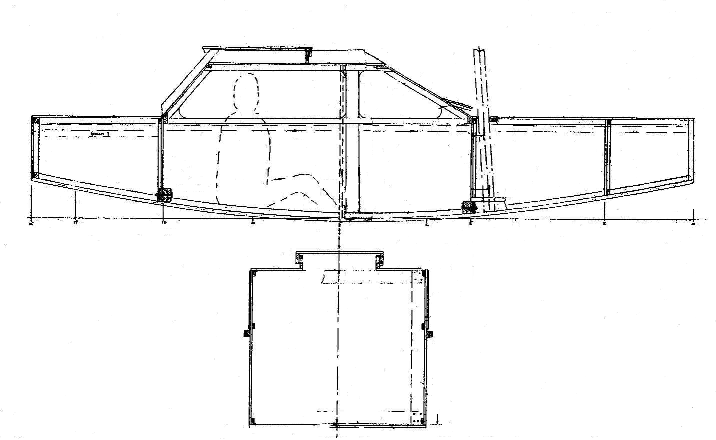
The sail rig shown is probably too large but then again it depends on the person and his cruising area. It is quite easy to reef or switch to a smaller sail since it is easy to get a balanced lug tuned up.
Eleven sheets of 1/2" plywood with conventional construction.
Plans for Robbsboat are $30 until one is built and tested.
Prototype News
Some of you may know that in addition to the one buck catalog which now contains 20 "done" boats, I offer another catalog of 20 unbuilt prototypes. The buck catalog has on its last page a list and brief description of the boats currently in the Catalog of Prototypes. That catalog also contains some articles that I wrote for Messing About In Boats and Boatbuilder magazines. The Catalog of Prototypes costs $3. The both together amount to 50 pages for $4, an offer you may have seen in Woodenboat ads. Payment must be in US funds. The banks here won't accept anything else. (I've got a little stash of foreign currency that I can admire but not spend.) I'm way too small for credit cards.
I think David Hahn's Out West Picara is the winner of the Picara race. Shown here on its first sail except there was no wind. Hopefully more later. (Not sure if a polytarp sail is suitable for a boat this heavy.
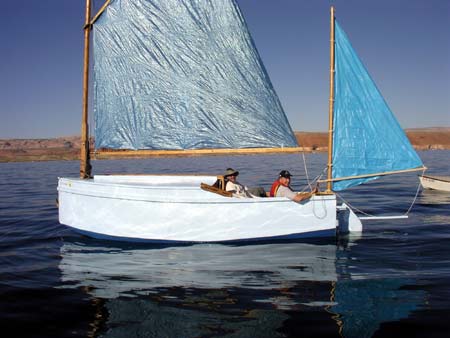
Here is a Musicbox2 I heard about through the grapevine.
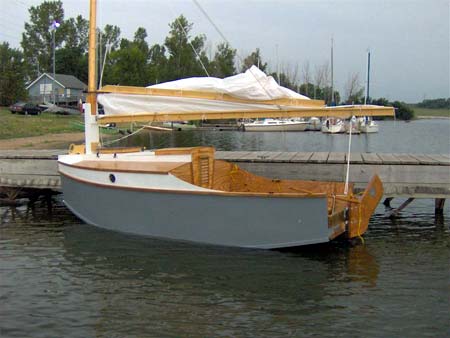
This is Ted Arkey's Jukebox2 down in Sydney. Shown with the "ketchooner" rig, featuring his own polytarp sails, that is shown on the plans. Should have a sailing report soon.
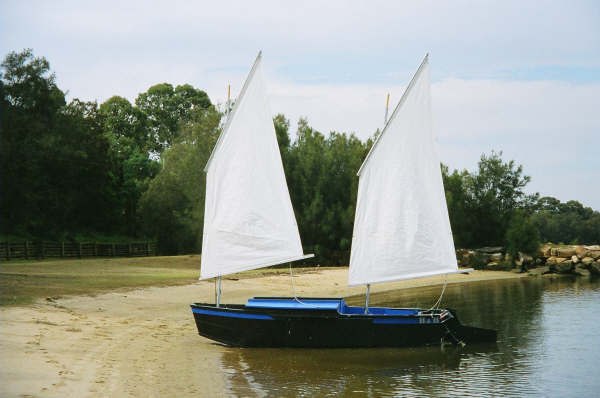
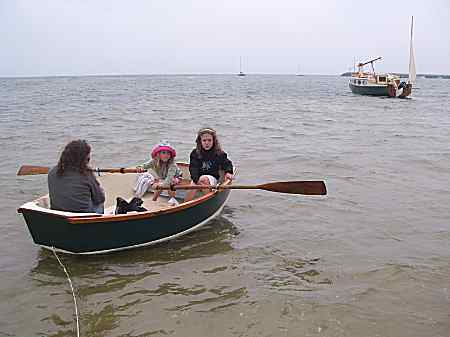
And the Vole in New York is Garth Batista's of www.breakawaybooks.com, printer of my book and Max's book and many other fine sports books. Boat is done, shown here off Cape Cod with mothership Cormorant in background, Garth's girls are one year older. Beautiful job! I think Garth is using a small lug rig for sail, not the sharpie sprit sail shown on the plans, so I will continue to carry the design as a prototype boat.
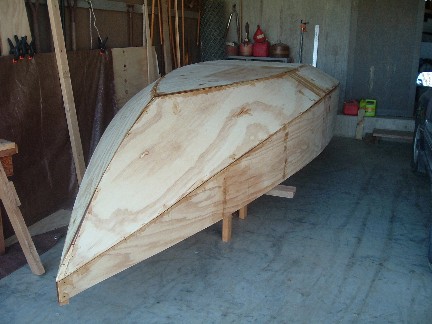
And a new Down Under Blobster, now rightside up for final finish. Looks like another beautiful job....
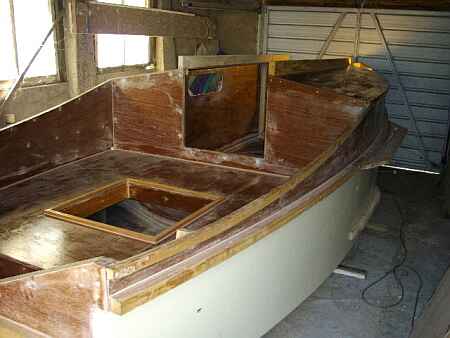
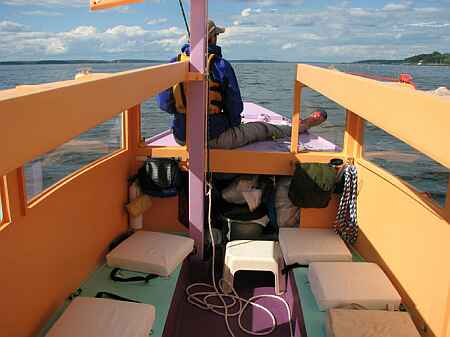
A view of the Caroline prototype showing a lot of the inside, crew on fore deck. Beautiful color:
I gotta tell you that on the Caroline bilge panels I made an error in layout and they are about 1" too narrow in places on the prototype plans. I have them corrected but it always pays, even with a proven design, to cut those oversized and check for fit before final cutting.
And a Family Skiff is going together in mid Missouri...
AN INDEX OF PAST ISSUES
Hullforms Download (archived copy)
Plyboats Demo Download (archived copy)
Brokeboats (archived copy)
Brian builds Roar2 (archived copy)
Herb builds AF3 (archived copy)
Herb builds RB42 (archived copy)