Contents
Rigging A Lugsail
BASIC BALANCE....
This applies to any sort of sail rig. For proper sailing the sail rig
forces need to balance around the hull forces.
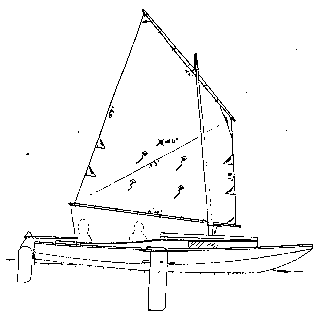
Look closely at Figure1 and see that the center of the sail area is
placed right above the center of the leeboard's area. For boats like
mine with shallow underbodies and deep narrow boards this is the way it
has to be. You can't tinker very much with this if at all.
Here is what happens. In general you can think of the force of the wind
as a giant finger pushing at the sail's center. Opposing that force is
a giant finger pointing the other way at the center of the leeboard.
The hull tends to rotate about that deep narrow board. So if those two
forces are in vertical line the boat will not try to rotate and will in
general maintain its heading.
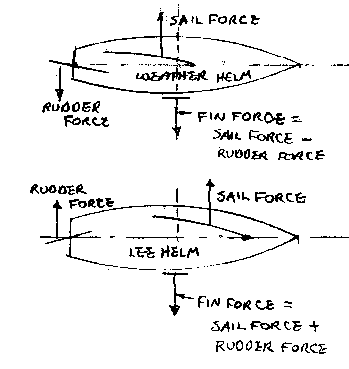
If the center of sail area is moved aft of the leeboard, the boat will
rotate into the wind if left on its own. To keep the boat on course the
skipper needs to tug on the tiller as shown in the top of Figure 2.
This is called "weather helm". Weather helm reduces the load on the
leeboard and should result in a faster boat. If the skipper falls
overboard the boat should rotate into the wind and stall and with luck
wait for the skipper. A light weather helm is considered to be ideal.
Now take the case of the builder who modifies the rig so that the sail
area centers forward of the leeboard. This might be by changing to a
rig style with a jib, or perhaps by relocating the mast forward. Now
the two opposing giant fingers on sail and leeboard are not in a
vertical line and the boat will want to rotate around the leeboard bow
going downwind. To hold the bow on course the skipper must correct by
pushing the tiller as in the bottom of Figure 2. This is called "lee
helm". Lee helm will increase the reaction load on the leeboard. If the
skipper falls overboard the boat will turn downwind and take off
without him. Lee helm is usually not considered to be good.
So the way I like to approach it is to keep the center of the sail area
directly above the aft half of the leeboard. You might find lots of
variations on the rules that hope to provide proper helm feel. Try them
if you wish. But keep in mind that if you build the boat and it has lee
helm, you need to move the sail area aft. If you have excessive weather
helm, the sail area needs to be moved forward.
NOW, BACK TO THE RIGGING DETAILS.....
TYING ON THE SAIL...
I greatly prefer individual ties through the grommets although lacing
looks neat. But the individual ties allow for last ditch sail shaping.
If you think you needed more round in the head of the sail for example,
you could make the ties in the center of the yard tighter than those on
the ends. Also, a failure of a tie or two is of little consequence
where a failure of a lacing line will be total.
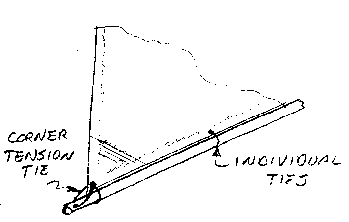
One important note. The ties in the corners take most of the load. They
should be tied as shown in the figure in two directions.
HALYARD/YARD ATTACHMENT...
Let's look at the sail and halyard attachment in Figure 1:

As you see, the balanced lug sail pivots around the mast. I guess all
sails do. But the balanced lug has the mast running through its middle
somewhere, as do other Lugsails, junk sails and lateens. While the mast
may interfere somewhat with the aerodynamics of the sail, great benefit
is gained in proper "balance" of the sail areas that are in front of
the mast. In particular if things are properly placed, the sail will
twist less than similar sails that use the mast as a leading edge. As a
result the lug is a low tech sail that can be more efficient to
windward than you might expect.
One trick to rigging these efficiently is to get the "balance" correct.
By my experience the yard should be hoisted about 40% aft on the yard.
If you hoist farther forward than that you will get harmful sail twist
when sailing to windward. Hoisting too far aft can make the sail
uncontrollable. I have often seen in the older literature the advice to
hoist at 33% aft. That will work OK but it has been my experience that
all the stretches and sags in the system conspire to pull the sail aft
with respect to the mast. So if you tie the halyard to the yard at 40%,
in use the sail swings aft very close to that 33% value.
(You see the designer has little choice of mast placement once the sail
has been chosen. The leeboard can only go at the hulls widest beam. The
sail area must center right above it. The mast must cross the yard at a
certain point. )
We need to rig the halyard so the sail stays near that 40% position by
binding it somehow to the mast. This is especially important while
reefed or while in rough water that will force the yard to pump back
and forth on the mast. I know of three suggestions.
First for small simple boats that won't be reefed the best solution is
to run the halyard through a simple hole in the top of the mast, tie it
to the 40% position on the yard, and hoist solidly to the top of the
mast. There must be a small amount of slack at the masthead of course
to allow the yard to swing but that will appear automatically when you
tension the sail with the tack line.
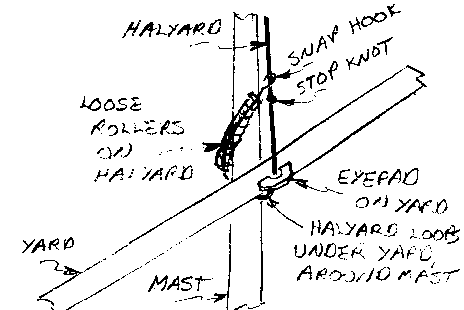
Second you can try the tightening noose system shown in Figure 3. Here
the halyard runs in a loose loop around the mast before going to the
masthead. It will stay loose until the yard is hauled up all the way.
Then additional tension in the halyard constricts the noose (until it
hits the stopper knot) and secures the yard to the mast. You will need
rollers on the noose to keep the halyard from binding on the mast. I
have a feeling that this is the most reliable system.
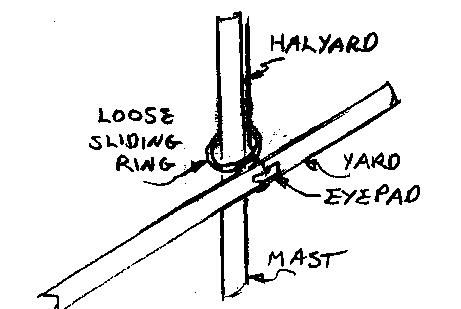
Third method works well with round and slippery masts. A loose slippery
ring is simply dropped over the halyard and mast. I use this system on
my Piccup Pram using a section of large PVC pipe as a ring.
THE TACK LINE....
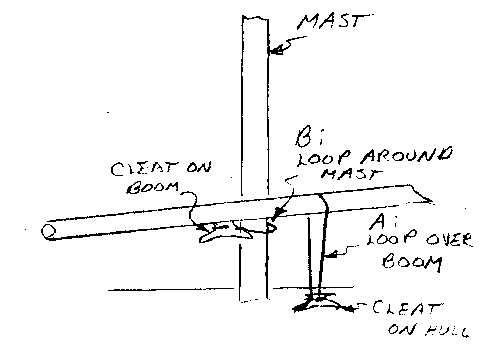
Figure 5 shows the tack arrangement I prefer. As with the yard, the
boom must be secured to the mast to prevent pumping in rough water. The
actual location of the tack on the yard is not too important. In fact
if it were at the very front of the boom you would have a standing lug.
The standing lug is probably easier to rig and reef than the balanced
lug but in my experience lacks the great manners of the balanced lug in
sailing downwind.
The boom has a small cleat on it with a lanyard that wraps around the
mast to locate the boom fore and aft. That loop should be fairly loose
to allow easy up and down motion of the boom. This loop needs to be set
up before the yard is hoisted to prevent the sail from blowing around
and making a spectacular and dangerous kite during hoisting.
The actual tack line I prefer is a simple line that runs from the mast
step over the boom and down to a cleat at the step. So with the boom
loop attached, the yard is hoisted, then the tack line is passed over
the boom, pulled very very tight, and cleated. In effect you have now a
two to one tackle. All sail tensioning is done with the short and handy
tack line and not with the halyard. On my Piccup I run the tack line
through a cam cleat to allow for quick adjustment although I don't
consider that to be as secure as the good old jamb cleat. In my opinion
the tack should always secure to the hull and not to the mast. Securing
the tack to the hull will secure the entire mast and rig to the hull in
event of a capsize.
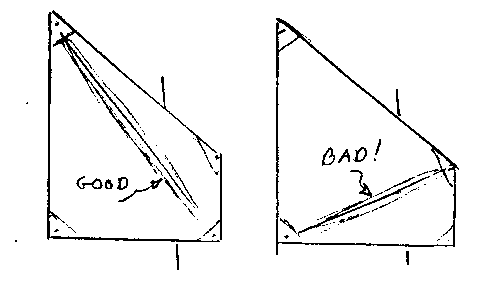
Here is some advice about how much to tension the tack line. It varies
with wind strength. Look at the sail as you do it. See Figure 6. As you
tension the sail with the force of the wind in the sail, stress folds
called girts will appear in the sail. If the girt runs from throat to
clew you need more tension. If the girt runs from head to tack you
either have it right or can reduce the tension. A perfect setting will
have no girts. Usually at the initial setup I put in a good girt from
peak to tack. Then I watch it while sailing to see if that girt
disappears. Then when convenient I trim as required. Remember that
changing sailing conditions will change the tension requirements.
THE SHEET...
Nothing fancy needed here. Almost anything will work. Because the sail
is balance already to a great degree the sheet forces are less than
with other sail types. Because the tack is pulling down in the middle
of the boom, the boom has less tendency to lift so downward pull of the
sheet on the boom is of less importance. The location and lead
directions of the sheet are of little importance also. It's another
advantage of the balanced boom. By the was, if the boom is omitted to
make the sail boomless, the sheet location is very critical and its
needs change all the time. I think the boom is a great invention! The
boom on a balanced lug can be quite light and still work.
SAILING ADVICE...
Watch the leading edge of the sail for luffing, as with about any sail.
You should be able to tack through about 100 degrees effectively,
although if you are really interested in getting somewhere you might
sail it more freely, say up to 120 degrees between tacks, especially if
the wind is unsteady. While reaching or running a balanced lug sail,
even a cheap polytarp one, will keep up with any conventional sail.
Also it should be mentioned that one of the most effective ways to trim
the boat, helm-wise, is to rake the mast as required to move the sail
are fore or aft. You can see that a small amount of rake will move the
mast head quite a bit and the entire sail will go with the masthead.
Old time boats had adjustable mast steps or partners. On my designs you
can usually shim the mast partner on the bulkhead. It's one place where
tinkering pays off. Making a mast a bit longer than shown on the plans
is also almost always a good idea as it allows for this tinkering not
to mention real life stretch of the rigging.
Contents
Laguna
Laguna, Sailboat, 23' X 5.5', 450 POUNDS EMPTY
This boat was designed for Duckworks to run the Texas200, 200 miles
of brisk downwind running they say in the somewhat protected waters
of the Texas intercoastal waterway. The boat was supposed to be cheap
and quick and hold two crew with floorspace for them to sleep on
board. The basic idea I had was to stretch the Mayfly16 with an 8'
plug in the middle. In the end I kept the basic cross section and
stretched it out with a simple flat iron skiff shape. The bottom is
the width of a sheet of plywood which simplifies things even more.
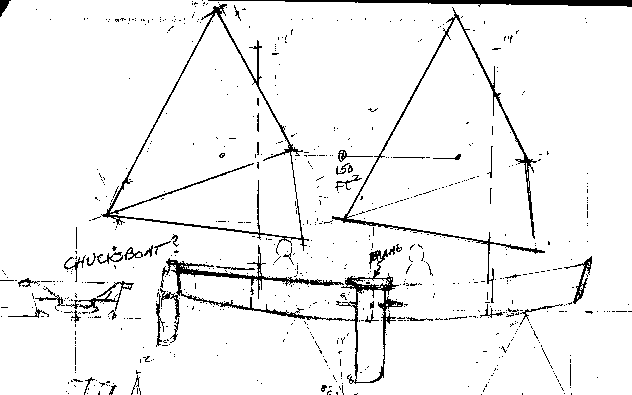
The first doodle looked like this:
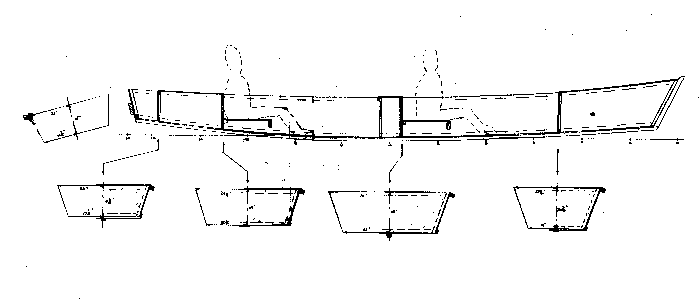
I drew it up in detail getting this:
And a card model from the detailed drawings looked like this:
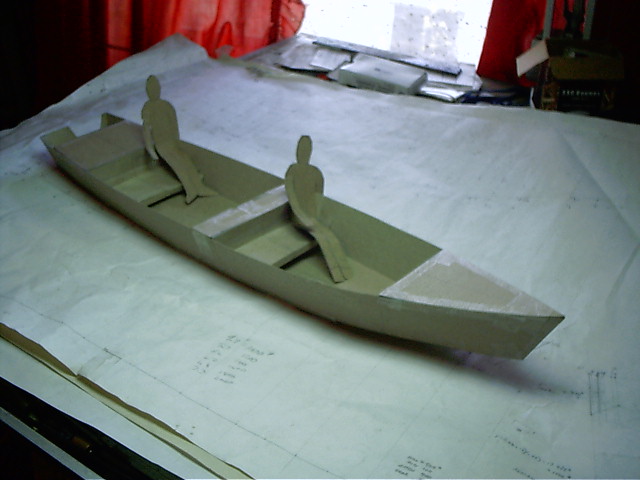
My cross seats are supposed to be big and comfortable and removable
to give sleeping room on the floor. Each crewman has his own
stateroom.
The sail rig was to be a split rig with identical lugsails fore and
aft with the option to sail with just one of the sails mounted in the
center, like this:
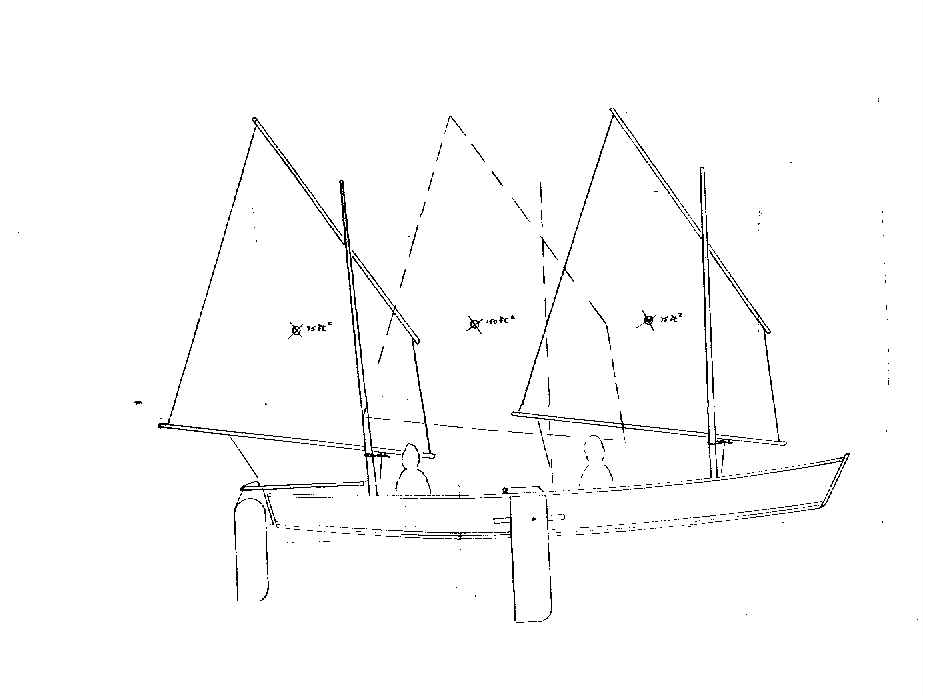
I think the single sail option would be preferred if sailing solo
since that fore mast is way up yonder and one may not be able to
handle it and the tiller at one time.
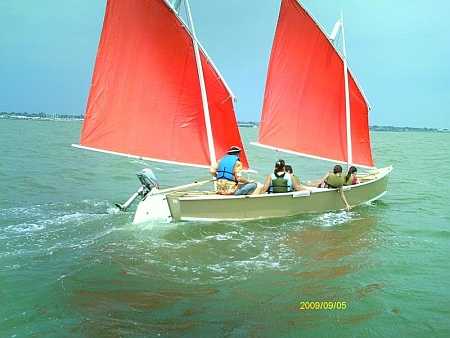
The prototype was quickly built by Gordo Barcom in Texas and here he
is blasting along with family and polytarp sails straining. It was
clearly a fast roomy boat:
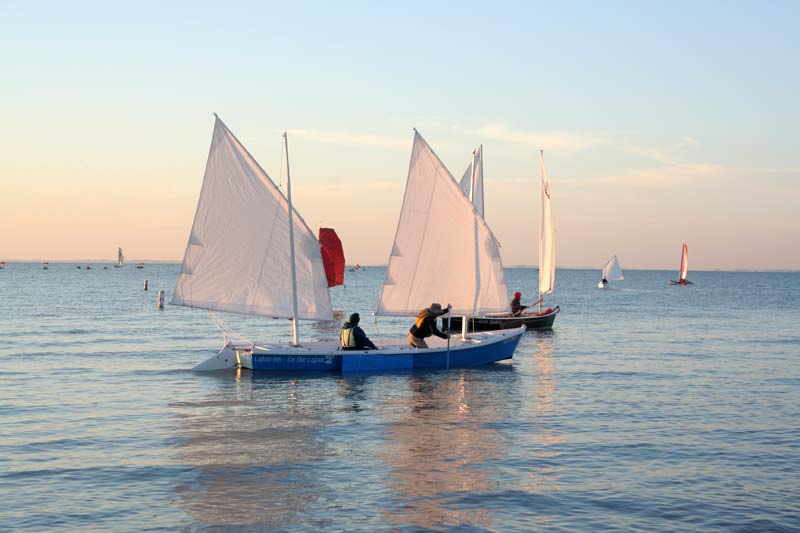
Then another, the Blue Laguna, was built and run in the 2010
Everglades Challange, 300 miles from Tampa to Key Largo, by Andrew
Linn and Michael Monies. This boat had very little testing time as
far as I know before the race. But they finished in 5 days and a bit
but I think they slept in motels for two of the nights while the
"press on regardless" guys were daring the night waters. Here they
are launching off the beach (a requirement for this race):

And then pushing off in shallow water (there is a Sea Pearl behind
them for comparison):
Finally a really nice photo of them approaching one of the three
checkpoints in the race:
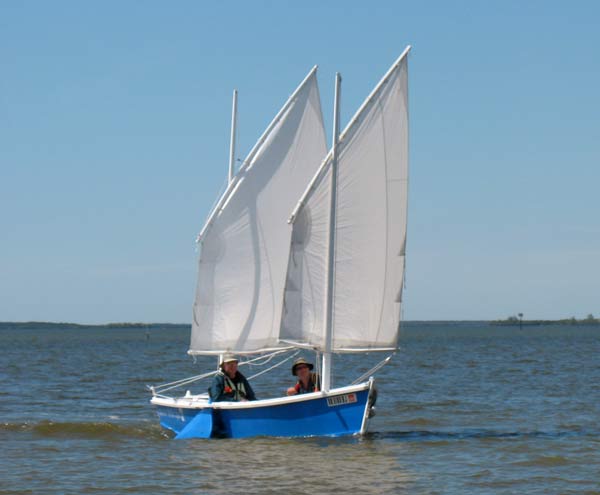
I think both Gordo's boat and the Blue Laguna have been modified in
details from the blueprint but the rigs and basic hull features all
look correct. I've noticed that no one takes sleeping floor space as
seriously as I do but that is OK.
Well, I was thrilled. My main caution would be that this probably is
not a good solo boat due to its size and split rig. I think it might
be a good family boat in that there is plenty of room for everyone
and a rope for all idle hands to play with. The other caution might
be that, even though the boat has big buoyance boxes, it also has
large cockpits to swamp in a knockdown and it will roll upright with
a lot of water to bail. So you note on Gordo's boat he has inflated
fender tied to the mast head, an idea to reduce the carnage of a
knockdown.
Plans for Laguna are $45. It is all simple nail and glue construction
needing six sheets of 1/4" plywood and five sheets of 1/2" plywood.
Contents
Prototype News
Some of you may know that in addition to the one buck catalog
which now contains 20 "done" boats, I offer another catalog of 20
unbuilt prototypes. The buck catalog has on its last page a list
and brief description of the boats currently in the Catalog of
Prototypes. That catalog also contains some articles that I wrote
for Messing About In Boats and Boatbuilder magazines. The Catalog
of Prototypes costs $3. The both together amount to 50 pages for
$4, an offer you may have seen in Woodenboat ads. Payment must be
in US funds. The banks here won't accept anything else. (I've got
a little stash of foreign currency that I can admire but not
spend.) I'm way too small for credit cards.
I think David Hahn's Out West Picara is the winner of the Picara
race. Shown here on its first sail except there was no wind.
Hopefully more later. (Not sure if a polytarp sail is suitable
for a boat this heavy.
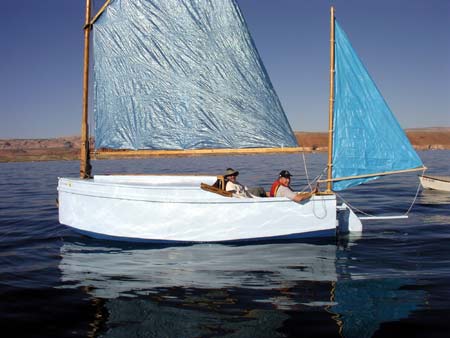
Here is a Musicbox2 I heard about through the grapevine.
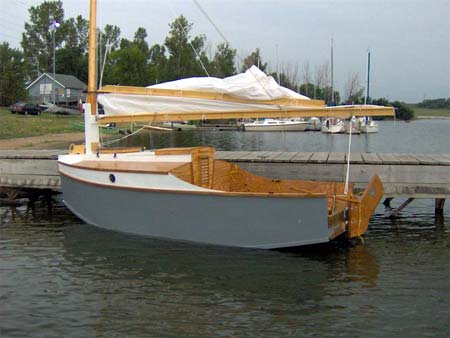
This is Ted Arkey's Jukebox2 down in Sydney. Shown with the
"ketchooner" rig, featuring his own polytarp sails, that is shown
on the plans. Should have a sailing report soon.
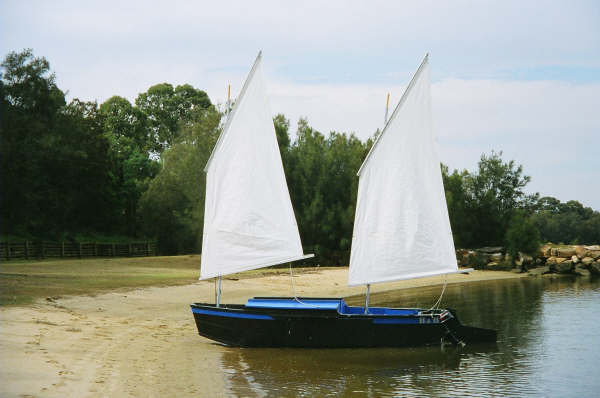
And the Vole in New York is Garth Battista's of
www.breakawaybooks.com, printer of my book and Max's book and
many other fine sports books. Boat is done, shown here off Cape
Cod with mothership Cormorant in background, Garth's girls are
one year older. Beautiful job! I think Garth is using a small lug
rig for sail, not the sharpie sprit sail shown on the plans, so I
will continue to carry the design as a prototype boat.

And a new Down Under Blobster is off cruising under outboard
power as it waits for its sailrig.
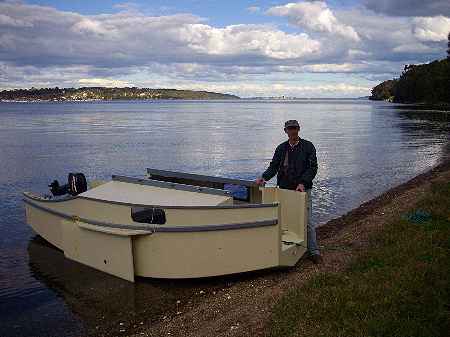
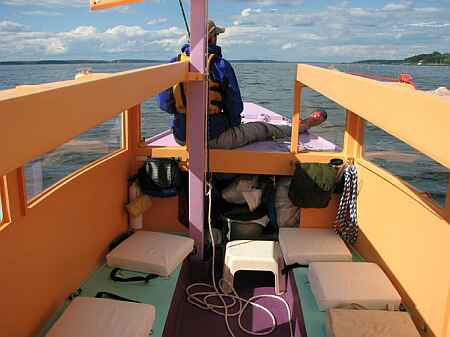
A view of the Caroline prototype showing a lot of the inside,
crew on fore deck. Beautiful color:
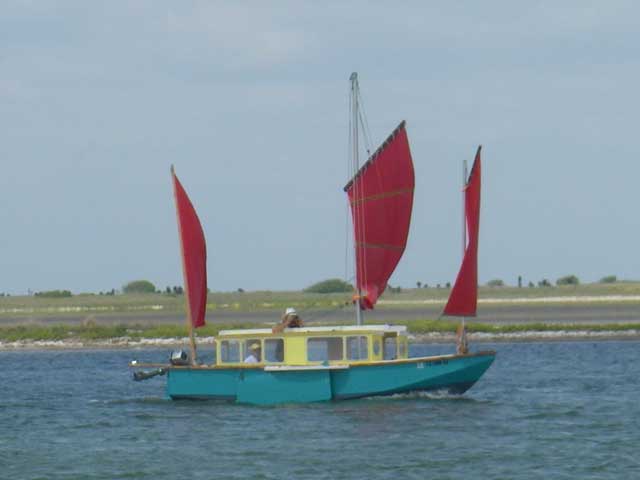
And here is another making I think its maider voyage in the Texas
200. (I'm told the Chinese rig will be replaced by the blueprint
rig.)
I gotta tell you that on the Caroline bilge panels I made an
error in layout and they are about 1" too narrow in places on the
prototype plans. I have them corrected but it always pays, even
with a proven design, to cut those oversized and check for fit
before final cutting.
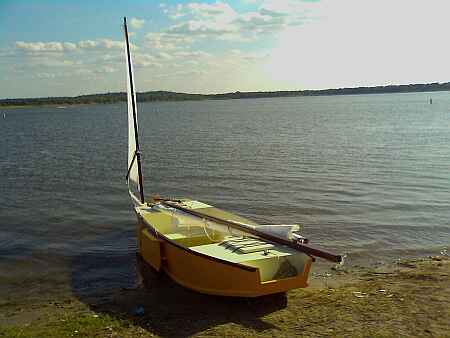
And a Deansbox seen in Texas:
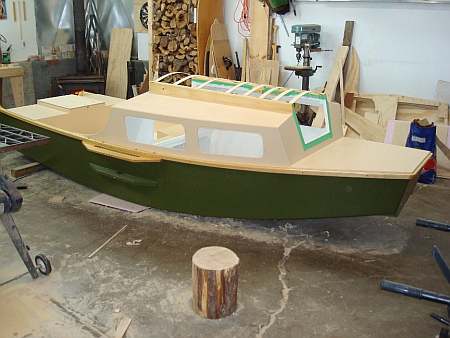
A Twister goes together in good shape. He moved the cabin
bulkhead aft for more cabin, less cockpit:
Contents
AN INDEX OF PAST ISSUES
BACK ISSUES LISTED
BY DATE
SOME LINKS
Mother of All Boat
Links
Cheap
Pages
Duckworks
Magazine
The Boatbuilding
Community
Kilburn's Power
Skiff
Bruce Builds
Roar
Dave
Carnell
Rich builds
AF2
JB Builds
AF4
JB Builds
Sportdory
Hullforms Download (archived copy)
Plyboats Demo Download (archived
copy)
Brokeboats (archived copy)
Brian builds Roar2 (archived copy)
Herb builds AF3 (archived copy)
Herb builds RB42 (archived copy)
Barry Builds
Toto
Table of
Contents
