RB42 FIRST FLIGHT
Contents:
Contact info:
Jim Michalak
118 E Randall,
Lebanon, IL 62254Send $1 for info on 20 boats.
Jim Michalak's Boat Designs
118 E Randall, Lebanon, IL 62254
A page of boat designs and essays.
(15Aug99) This issue will add to the polytarp files with flat patterns for making a 74 sq ft lugsail and a 113 square foot lugsail. Next issue, 1Sep99, will show some interesting AF3 building and testing that has been going on.
|
|
Left:
RB42 FIRST FLIGHT |
|
|
RECAP...
The last several issues showed how to make a 59 square foot sharpie sprit sail from common polytarp. There is enough info there to show you how to figure your own patterns for other sails but here are two new ones I've recently figured out for two customers. The first is a 74 square foot balanced lug sail for my designs Woobo and Cubit. I've also used this size sail on my Piccup Pram. The second is a 113 square foot balanced lug for my Frolic2 design. It is the same size as a Bolger Windsprint sail.The nitty gritty details about making a four sided sail (instead of a three sided sharpie sprit sail) can be found in the 15October1998 issue of this web site. You will find it down in the index at the bottom of this issue. A last word of caution is that neither of these patterns have been tried for real yet, although both should be within the next few months.
74 SQ.FT BALANCED LUGSAIL PATTERN...
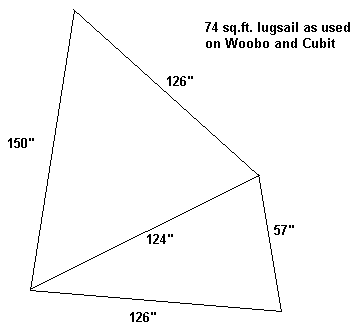
Here is the basic shape of the 74 square foot balanced lug sail used for my Woobo and Cubit designs:
The next picture shows the flat panel layout for this lugsail. Remember the red numbers are the true lenghts of the triangles that form the flat pattern. (These drawings aredone on the standard "paint" program and are not to scale). So to lay this one out you would first lay out triangle ADC, then BCE, then ECA2, then EDA2, then BEF, and finally EFD2.
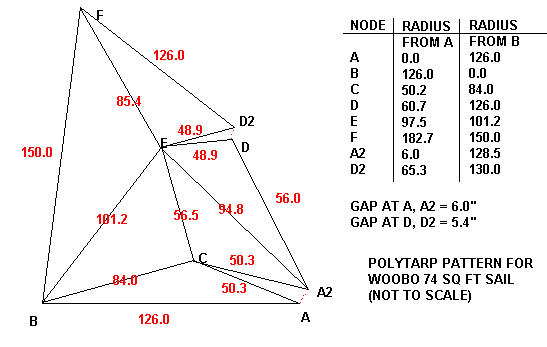
I've also shown the locations of the points with respect to points A and B. Thus you can pivot a measuring tape at point A, another at point B, swing the radii shown in the chart to find the location of all the other points without moving the tape pivots from A or B. For example point D is 60.7" from point A and 126.0" from point B. (To find these radii involves laying out the triangles one at a time with a spread sheet with formulas I couldn't begin to explain.)
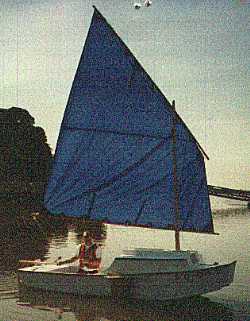
Here is a photo of Cubit being sailed with a polytarp version of this sail, but not with the seaming described above. Instead it has multiple vertical darts. In the photo you see a girt, or tension fold, in the cloth running from the clew to the throat. That is usally bad for the set of a lugsail and the sail shown could probably use more tension in the tack line. (Nowadays I would design this rig with the mast crossing the yard further aft. Usually that would mean a longer mast with more rake.)
THE 113 SQ. FT. BALANCED LUGSAIL PATTERN...
Here is the basic shape of the 113 square foot lugsail I used on my Frolic2 design. It's basically the same as the Bolger Windsprint sail.
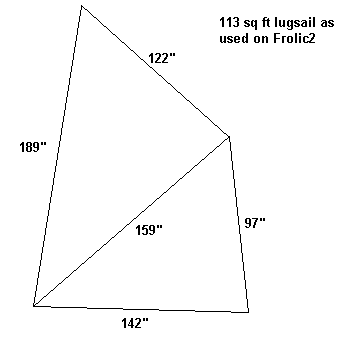
Here are the numbers for the 113 square foot lugsail flat pattern.
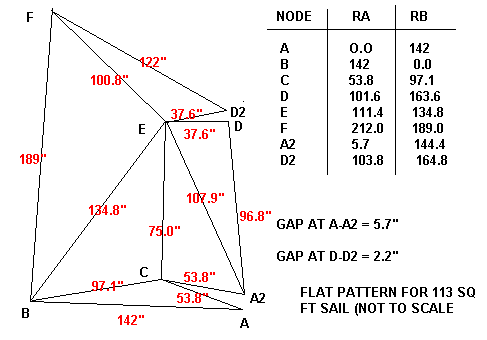
The pattern layout sequence is as with the 74 square foot sail and the radii from A and B are supplied.
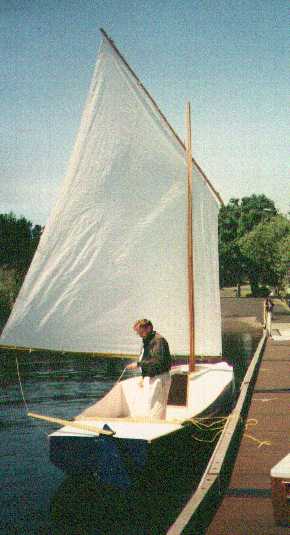
I don't have a photo of the Frolic2 sail in polytarp yet. I think there is one building in Colorado scheduled to use a polytarp sail at least at the start. In the meantime here is a file photo of the prototype Frolic2 with its lugsail done in real sailcloth.
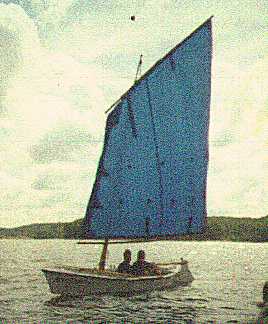
But I do have a photo of the same sail on a Bolger Windsprint, this one belongs to Steve Howe. Again it does not use the shaping method shown above but uses vertical dart shaping. Steve's sail sets very well indeed and will impress anyone who thinks polytarp sails don't work.
SCALING THE PATTERNS...
You could easily scale the patterns up or down to get a different size sail with the same shape. Remember that the new sail area will go as the square of the scale factor. For example, double the pattern dimensions and you get four times the sail area. If you scaled it large enough and placed it on a heavy boat you would eventually find polytarp isn't strong enough to handle the forces. I don't know where that point is just yet.
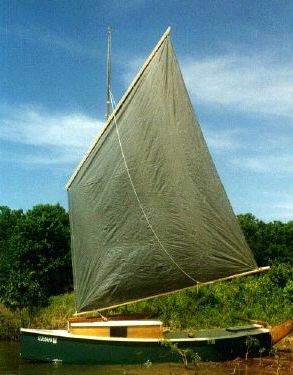
But the next photo shows a 250 pound Jinni trailer sailer rigged with a 116 square foot poly sail that is a straight 29% linear increase of the Piccup poly sail that was presented here last year. It was cut out of a 12' x 16' polytarp and behaves and sails very well. It eventually got three reef lines and a mast that was 5' shorter. (This Jinni was the prototype Bolger Jinni but modified as the years went by. It actually formed the basis of my AF3 design. I stuck with the orignal sharpie sprit sail for the AF3. The 116 square foot sail proved a bit too much for the boat for solo sailing and was sailed reefed most of the time.
THOUGHTS ABOUT CONSTRUCTION...
I would use the techniques described in the sharpie sprit sail essay with stiff cloth corner patches and fiberglass tape (or nylon webbing) around the entire perimeter. The one change I would make in construction would be to double the reinforcing tape down the luff edge, that is to use two strips sewn over each other instead of one. The luff on a balanced lug sail is very highly loaded and you can't overdo it.
NEXT TIME...
I'll present some construction photos and some interesting tests results for my AF3 design.
HARMONICA
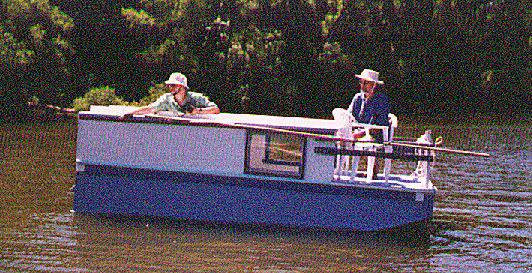
HARMONICA, MINISHANTY, 13' X 5', 400 POUNDS EMPTY
This is a repeat of last year's view of Harmonica. It is one of my personal favorites and I want to keep it up front.
Harmonica is a tiny shanty boat that sleeps two in its cabin. There is a porch up front suitable for lounging and a small utility room in the stern for the kitchen and water closet. I think the thing is arranged so that two people could wait out an all day soaker without feeling too pressed. For protected waters only. I've been asked more than once if Harmonica would be OK on the Ohio River, etc. My answer is no. In calm weather you might get away with it but you always run the risk of huge wakes, especially from large motor cruisers. The prototype Harmonica was built by Chris Crandall of Lawrence, Kansas.
This boat was originally called Fusebox. It was intended to be an electric boat for the wonderful little conservation lakes we have around here. But later I thought that the electric scheme was strained because few trolling motors could push this box on a windy day. And because I noticed none of the local conservation lakes have electric plugs at the docks. Putting a gallon of fuel on board is a lot easier than taking an 80 pound battery home. Chris used a 1 horse Tanaka and that was about the minimum required, pushing the boat at 2 or 3 mph. At the same time I would say that 5 hp would be a reasonable maximum. In short any small gas motor you might find at a yard sale should have enough power. The lakes I'm thinking of are limited to 10 hp or less. You don't need much power or speed because you never can go more than a mile in any direction. (I believe there is an experienced shanty boater in Florida building one of these with the intention of sticking with the electric idea, something he is also experienced with. Says his big shanty is a bother to launch by himself and Harmonica will fill the bill for a quiet solo overnight. In my opinion a solo boater who is not easily bored might spend a week or so on Harmonica.)
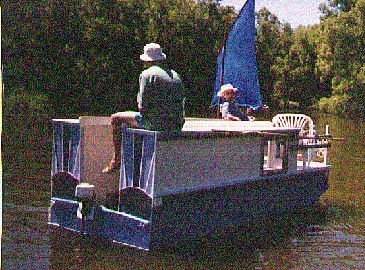
Harmonica soaks up four sheets of 3/8" plywood and six sheets of 1/4" plywood and uses simple glue and nail jigless construction. Blueprints with keyed instructions are $25.
(I've also done a slightly larger version of Harmonica called Shanteuse. It was featured at Shanteuse in the 15apr99 issue.)
Prototype News
Some of you may know that in addition to the one buck catalog which now contains 20 "done" boats, I offer another catalog of 20 unbuilt prototypes. The buck catalog has on its last page a list and brief description of the boats currently in the Catalog of Prototypes. That catalog also contains some articles that I wrote for Messing About In Boats and Boatbuilder magazines. The Catalog of Prototypes costs $3. The both together amount to 50 pages for $4, an offer you may have seen in Woodenboat ads. Payment must be in US funds. The banks here won't accept anything else. (I've got a little stash of foreign currency that I can admire but not spend.) I'm way too small for credit cards.
Usually when a design from the Catalog of Prototypes starts getting built and is close to launch I pull it from the catalog and replace it with another prototype. So that boat often goes into limbo until the builder finishes and sends a test report and a photo.
Here are the prototypes abuilding that I know of:
Jonsboat: I suspect a few of these have been built but I've never gotten a report. Just got word of at least one more going together and hopefully we'll get a photo and a report.
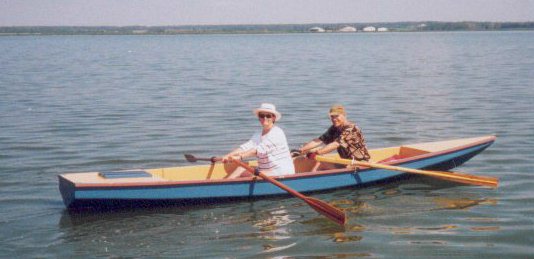
RB42: This is an 18' rowboat meant for two. Herb McLeod up in Edmonton has it completed. Imagine the Oracle shown in the 1may99 issue stretched to 18' and you have it. Here is a photo of its first time out. In a few issues we'll have a full report. Right now Herb is tinkering with the skeg and oarlock locations to fine tune it. RB42 plans are $25 if you are interested. Six sheets of 1/4" plywood.
< WIDTH="534" HEIGHT="259">
Mayfly12: A Mayfly12 is going together up in Minnesota. The decks are on and he's into the sailing bits. By the way, the sailing bits on almost any sailboat large or small consume about half of the effort in labor and materials. Just when you thought you were about finished!
AF4B: A builder in Virginia is building AF4Breve, a 15.5' version of the 18' AF4. I tried to talk him into building the 18' version but he had two very good reasons to go shorter - a short trailer on hand and insufficient building space for the larger boat. The AF4B is essentially a "scrunched" version of AF4 but comes from a whole new set of drawings.
Herb builds AF3 (archived copy)
Hullforms Download (archived copy)