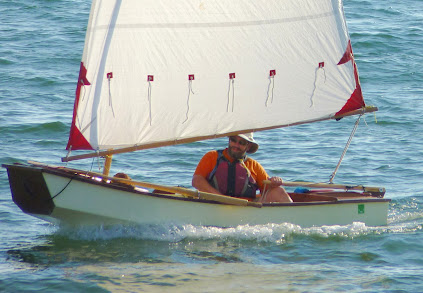
Jim Michalak's Boat Designs
118 E Randall, Lebanon, IL 62254
A page of boat designs and essays.
(1 September 2012) This issue will continue with making an "instant" boat (originally aired on 15 Feb 2002). The 15 September issue will continue the topic.
THE BOOK IS OUT!
BOATBUILDING FOR BEGINNERS (AND BEYOND)
is out now, written by me and edited by Garth Battista of Breakaway Books. You might find it at your bookstore. If not check it out at the....
ON LINE CATALOG OF MY PLANS...
...which can now be found at Duckworks Magazine. You order with a shopping cart set up and pay with credit cards or by Paypal. Then Duckworks sends me an email about the order and then I send the plans right from me to you.
The 21st Annual Lake Monroe Midwest Messabout will take place on September 14, 15, 16, 2012, in middle Indiana just south of Bloomington. You can read all about it at https://sites.google.com/site/lakemonroemidwestmessabout/home
Making A Hull 3
THE BOTTOM...
With the hull inverted on saw horses, go over the bottom edges with sanding blocks, or rasps, or belt sanders, or what ever is required, to make the bottom fair and ready to accept the bottom planks.
Here is another warning about checking your alignment. As you start to box the hull in it will get really rigid. If you install the bottom correctly so that the hull is straight, you will have a good straight hull with its shape locked in. If your boat is crooked after you put on the bottom it will be crooked forever. Check that those centerlines are all in a row.
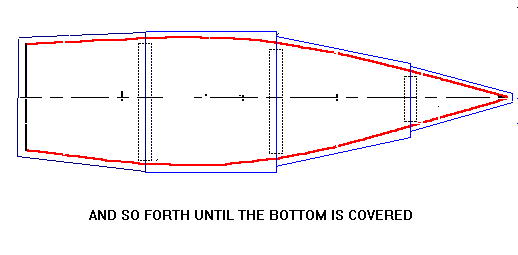
Only the smallest of boats can be planked over the bottom with a single sheet of plywood. All the rest require joining plywood panels together. Unlike joining the side planks, the bottom planks will not be precut to shape and joined with butt plates before assembly to the hull.
The bottom of a flat iron skiff is put on oversized and trimmed to shape after assembly, like a pie crust. Here is how I do it.
Where you start with the first panel is not too critical. Usually the plans will show you where to start. Let's say you have a 15' boat and the plans show to start planking the bottom with a 4' long piece at the stern. I would hoist the piece into position and clamp it in place long enough to track the hull shape on it. Then remove it and cut to shape well outside of the traced line. Put it back in place with temporary screws or clamps.
Now to prepare that piece with a butt plate that will join it to the next piece. The plans will suggest the size of the butt plate. Let's say it is a piece of lumber 3/4" x 3-1/2". This piece will be centered on the joint of the two bottom panels, 1-3/4" on each side of the joint. So draw a line down the center of the of the piece, trial fit it into position, and mark where it would need to be cut to fit at that joint, inside the bottom, between the sides.
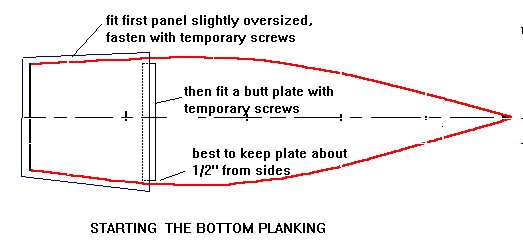
I prefer to cut the butt plates on the bottom about 1/2" short of the sides to provide a limber channel to prevent the trapping water at the butt plates (which may later cause rot) and to provide a place for an epoxy fillet later which will help seal the plywood edges of the sides (and makes the boat easier to clean). But there is no doubt that the bottom is slightly weaken at those points and I wouldn't argue with anyone who ran the butt plates right out to the sides. Take care in gluing and fastening the butt plates, especially near the ends of the plate.
With the butt plate cut to length, butter up the surface that will mate with the bottom panel you just installed, clamp it into position and secure it with screws or nails. What you have now is a bit of a shelf at the end of that bottom panel to accept the next panel.
When you do a bottom like this you don't have to wait for the glue to cure on one panel before going to the next. In fact I would suggest you do the entire bottom in one session if you can.
So right on to the next panel. Hoist it onto the bottom, trace it, cut slightly oversized and screw it temporarily into position. Glue and nail it down at the butt plate. (In some cases you might have to remove the bottom panels to permanently install the butt plates because the curvature of the bottom is too great to install it in place without a "kink" resulting at the butt plate.) Install the butt plate that will take the next section. It is a bit like laying bricks. On a 15' boat the bottom could have as few as two panels or as many as four.
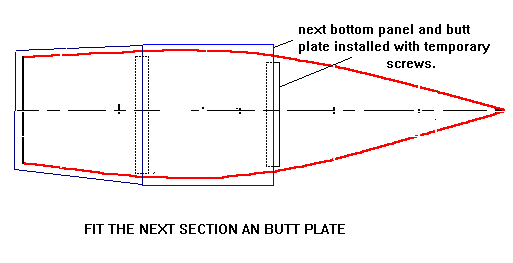
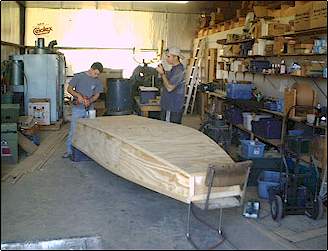
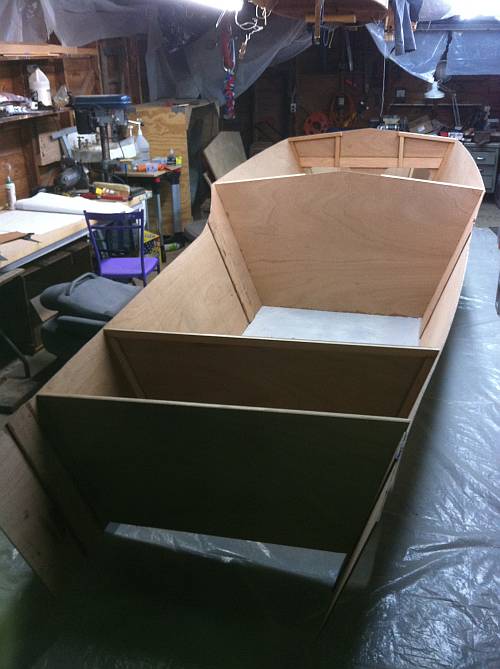
In real life it might look like this:
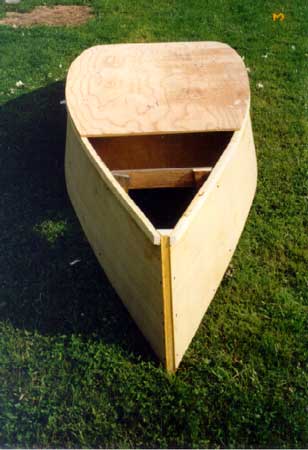
Finally undo the temporary bottom screws, shift the bottom so you can butter up the chines with glue, replace the bottom and reinstall the temporary screws. Nail about every 6" and replace the temporary screws with nails.
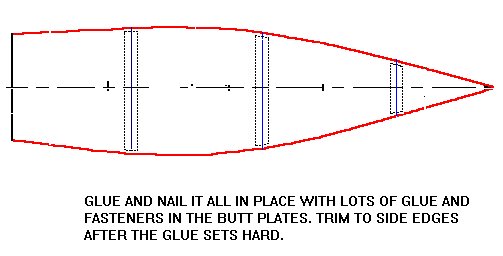
At this point it is probably too late to change any hull alignment problems. It will be too rigid. Prop it up and clean up all the glue drips you can find so you don't have to sand them off later. Walk away from the project and let the glue cure hard.
FINISHING THE BOTTOM...
TO GLASS OR NOT TO GLASS...
If you expect to get hard use out of your boat you should think about fiberglassing the entire bottom. If not you can save money and work and weight by just glassing the chine edges and the butt joints.
Carefully trim the out edges of the bottom panes flush to the chine logs and give the chine corners a good radius, at least 1/4" radius. A belt sander is a great tool for that job.
Go over the bottom with epoxy putty and fill any flaws and gaps. Allow it to cure hard and then sand smooth. Draw a centerline on the bottom. Mask the sides of the boat so that epoxy dripping down on the sides will not leave you with lumpy sides.
It must be stressed that you have to do the epoxy work all at once. If you allow one section or layer to cure before applying the next, you must sand everything and even then you may not get the adhesion that you will if the whole job sets up at once. So be well prepared. (I'm reminded of the early days of foam/epoxy homebuilt airplanes. The designers bragged you could build the wing in a day. The people who prefered the older techniques pointed out you MUST build the wing in one day.)
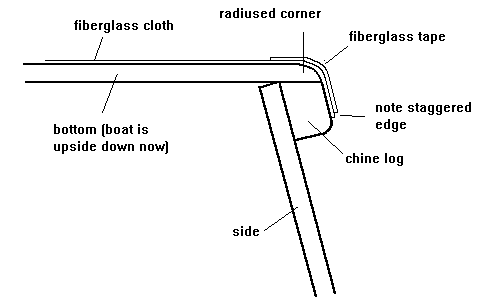
If you are glassing the entire bottom use something like 6 ounce fiberglass cloth. Trial fit the glass panels you will use, wrapping them around the chine corners about an inch. Mix up some slow setting epoxy, the thinner the better. Lift up a piece of you bottom glass and paint a heavy coat of epoxy on the bottom wood, getting it really heavy on the chine corners where the edge grain will soak up the epoxy. Lay that section of glass over the wet epoxy and paste it down. Soak the cloth with more epoxy until the cloth texture is full, rubbing the epoxy in with a paint brush or a squeegee. Be very careful of the chine edges. Make sure there is plenty of epoxy there and that the glass sticks tightly to the corners with no sign of epoxy starvation there. Glass which has been wetted through looks clear. Glass which is not completely wetted through will have a white appearance.
Once the bottom glass is on and before it cures, paste on another layer of 3" wide fiberglass tape (it comes in rolls and is not adhesive tape) over the chine corners. It is a nice touch to offset the edge of the second layer about 1/4" to make for a more gradual transition from wood to glass. Paint it down very well with unthickened epoxy. The corner will now look like this:
If you are not glassing the entire bottom, you must armor at least the chine edges with two layers of fiberglass tape set in epoxy and seal the bottom butt joints with a layer of fiberglass tape set in epoxy.
Walk away from the job again until the epoxy has totally cured. Then I advise that you give the entire bottom a light sanding, filling flaws with thickened epoxy.
If your boat has a bottom skid/stiffener, now is the time to put it on. These parts aren't easy to install. Getting the joint between the bottom and the skid watertight is pretty important to avoid rot. Draw the location of the skid on the bottom and drill screw holes in the bottom about every 6". Apply a lot of thick glue or epoxy to the area of the joint and press the skid into position. Most likely you will have to hold it down temporarily with a few screws driven from the outside. Then crawl inside the project and install the screws from the inside through those holes you predrilled. Not much fun but you should be able to get a good straight installation with good glue squeeze out all along the skid. Remove the temporary screws that you drove from the outside in.
Right now you can finish the bottom of your boat with paint and with luck never have to turn the boat upside down again. Fill and sand to your satisfaction but remember that pro boat builders spend half of their labor sanding and painting. Once satisfied, apply paint. Usually I suggest two layers of latex primer followed by two coats of color. Paint is always a big arguing point with boats. A good brand of latex house paint should do you well. If you have coated the bottom with epoxy you won't really need the primer if you are using latex. If you are using oil paints, be sure to check to see if the paint is compatable with epoxy because some will not cure on top of epoxy. They say there is no way of checking besides to paint a section and see what happens because paint companies change their formulas all the time. Others say to allow paint to cure for a week or two before trying to move the boat. I was never so patient.
With the bottom totally done you can put your boat on a trailer now if you wish. Wheel it around as needed. Block it up steady when you work on the project.
Usually you can remove the temporary forms at this point.
With the boat upright and forms removed, you should add a fillet of thickened epoxy around all the interior joints like this:
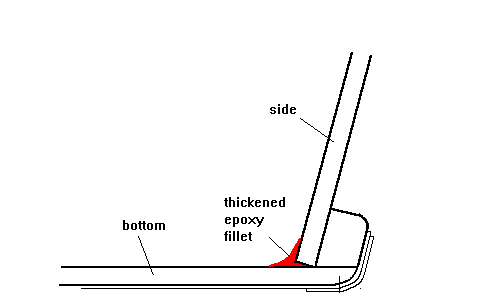
I think these fillets are the most useful thing a fellow can do to improve the lifespan of his boat. They keep water from getting into the nooks and crannys and prevent water from seeping up the endgrain of the wood. They also make the boat a lot easier to clean. Epoxy is the stuff to use here. In my experience materials like auto body filler and RTV aren't suitable.
DECKS...
Trial fit your decks, mark the plywood to shape and cut it out.
Before you install the decks consider whether to first paint the interior of the hull.
Hatches in decks can be installed now. Cut the hatch opening in the deck plywood and frame the opening with lumber coamings. I try to interlock the ends of the coamings like this:
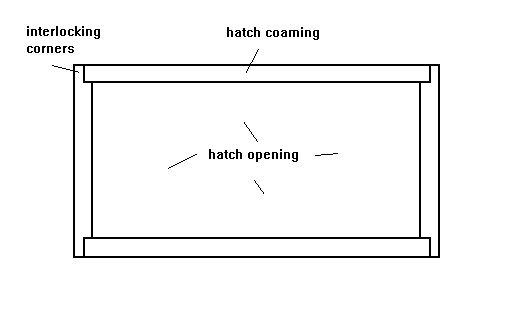
There will be some decks that may need to be removed in the future. In those cases you probably should secure them to the hull with screws and a sealing caulk. Latex caulk is usually what I use since RTV sealants can be so adhesive that they will prevent removal of the deck - you will have to cut it away.
Most decks can be installed with nails and glue.
There is one trick to installing decks in cuddy cabins that I want to show. On many designs the deck "clamp", which is the piece of lumber that connects the deck to the hull, curves around the front of the boat and ends abruptly at a bulkhead, where the sides and wales continue in a smooth curve to the stern. If you were to install the clamp in the usual way and end it aburpty at the bulkhead as shown on the plans, you would find that it doesn't want to take the same curve as the sides! What has worked very well to correct the situation is to extend the clamps past well past the bulkhead into thin air, and then spring those ends inward with a cross stick. Like this:
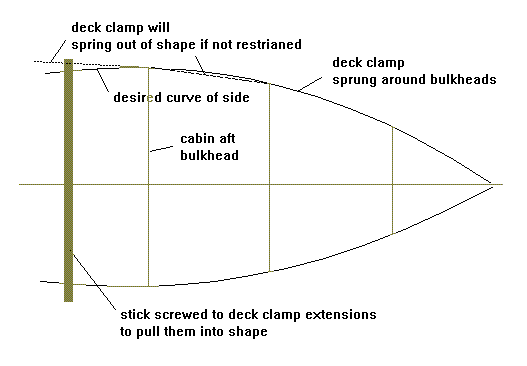
Keep the clamp extensions and stick in place until the cabin decks are shaped and nailed in place. That will hold the clamps in shape and you can then trim them to final length.
NEXT TIME...
...We continue building a hull.
Contents
Hapscut
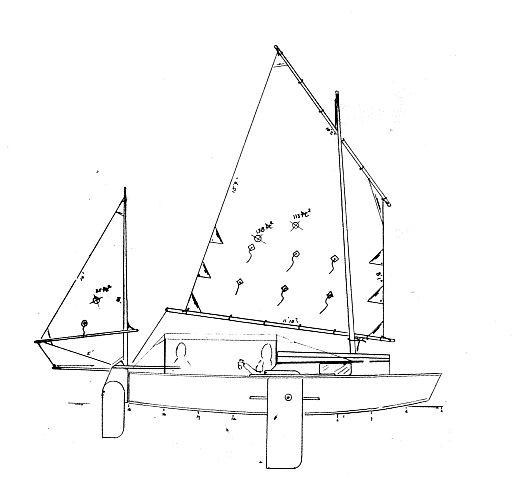
Hapscut, Sailboat, 18' X 5.5', 450 POUNDS EMPTY
In 2010 I was lucky enough to sail the TX200 with Chuck Leinweber in his Caprice. Chuck had me design Laguna just for this event and the Laguna fleet did quite well with the mention on the side that apparently in 2010 the winds were abnormally light, the veterans complaining about how mild it all was even though we were at hull speed pretty much all the time. What a great time I had!
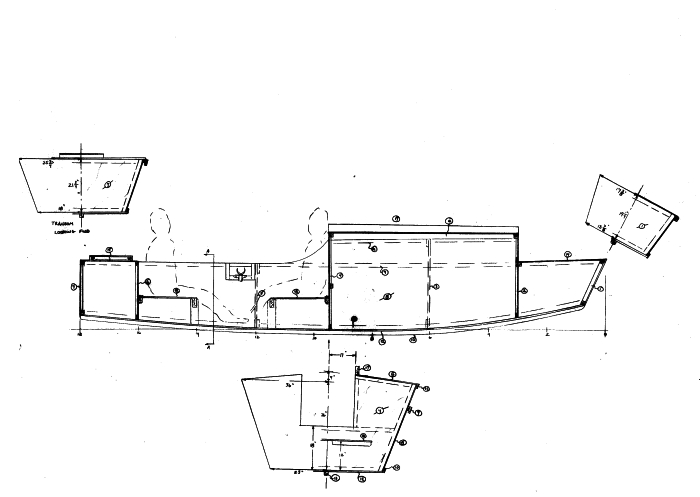
The first stop on the trip is at a place called "Haps Cut", a large drainage channel really from a large shallow lagoon to the intercoastal waterway, which is a man made ditch in this area. By this time Chuck was already talking about some sort of minimal cabin for Laguna, at least in the bow cockpit.
As we sailed along I started getting ideas about another possible TX200 boat. I play this little mind game all the time while I am boating - how could this boat be better?, etc. Well, the thing about the TX200 that I noticed was that the sun is a real killer. I noticed some of the local fishermen are totally covered, even though the daytime temp is in the 90's, right down to gloves. Some were wearing what looked like full body stockings, right up over the face and head, sort of like a super hero costume. All of the veteran boats on the cruise had serious bimini tops and such, Chuck's included, and for a new TX200 design that would be a must.
I thought shallow water beaching was important too, especially at Hap's Cut. If you could run your bow ashore you might be able to step on dry land and avoid the totally repulsive mud there, at least knee deep, at least that is how far I sank in when I tried it.
And some sleeping shelter like Chuck was talking about, mostly to avoid the land tenting situation. All the night spots had good places to tent but I know for experience that with a small cabin you can leave the tents behind, your comings and goings become much quicker and easier. And if you have a crewman you can maybe flop down inside for siesta while the copilot follows the ditch.
Another impression I got was that a crew of two was about ideal, much easier going overall than a solo effort. It's a lot like taking a long driving trip where the ability to swap drivers regularly means you can almost carry on forever.
There was almost no sailing to windward. Only when making ports did one have to do that. And maybe while running up the Aransas ship channel. So I thought a really refined hull shape was not required. A simple scow might do it, at least in 2010 winds.
So I drew up my best guess and called it Hapscut.
Simple scow flat bottomed square toed hull. Narrow on the bottom so like Laguna it could be planked with 4' wide plywood. Wide on the top, a lot more flare than I normally draw, because I was quite impressed with the small San Francisco Pelican on the trip as it handled 2 grown men in it 12' length with seemingly no problems. Square bow to make beaching easier mostly. The idea is that you can easily stroll through the cabin and out over the bow to avoid stepping at all in any nasty yuck.
The cabin itself is long enough to sleep on the floor but really only wide enough for one person. It is high enough to sit up in and read. It is minimal but I think a big advance over a land tent. Two people could wait out a storm in there. It has the usual slot top so with top stowed it becomes an open boat allowing one to walk from cockpit, through cabin and out the bow without climbing over anything more than 2' tall. With luck the cabin will prevent swamping of the entire boat in a knockdown, another good thing about a large amount of flare in the sides.
The crewmember is supposed to sleep in the cockpit but that requires the quick removal of the two large seating flats. Given a good sun top this might be the preferred place to sleep. On the 2010 trip there were no bugs or mosquitos but if needed you could quickly net in the sides of the cockpit. By the way, the length of the boat is really determined by the need to sleep two on the narrow bottom, thus you need 13' minimum just for that.
Aft of the cockpit is the buoyancy/storage volume. This buoyancy will save your butt in a knockdown since it will support the stern, float the boat level on it side until you recover. Don't compromise it.
One thing I goofed on maybe in Hapscut was that I did not draw a motor well as I did with Laguna. I know if I were building one of these for myself I would have it. Extend the stern back another 18" with the open well ending with a transom angled 15 degrees. Then you could easily mount a motor and store a lot of messy gear back there. The motor sounds like cheating but it can save you butt on occasions and in general you can cover a lot more water even if you seldom use it because you won't play light winds so cautiously. But I don't know if a little motor can save your butt in really rough going.
Although Hapscut was designed for a long cruise, it clearly has the makings of a good daysail family boat as long as you stay out of rough water. It has the room, shelter, and ease of use that make for a good family boat. Finally, although designed to take two men on a long trip, it clearly is not too big or complicated for single handing.
Update, 2012. John Goodman built the prototype. John is a very experienced builder and sailor which is a great thing for me. He found a few errors in the plans. The main flaw was in not allowing enough room between leeboard and hull with the result that the leeboard can at time bind against the widely flaring hull side. The simple fix was to make the leeboard guards wider. I fixed that on the drawings. There was another potential issue with the bevel given for the sides of the bow transom. John didn't agree with my number and supplied his own. I must admit I have rerun the space age rocket science vector analysis that I use to give the bevel and I keep getting the same wrong answer so I don't really know what to think. I have added John's bevel to the plans beside my own so you will have to assemble the parts enough to scope it out, never a bad idea anyway. There can be an explanation in this depending on where the bevel is measured.
John did the right thing and made his hull with the 18" stern extension. I should have drawn it that way in the first place. On the updated drawings I now show the layout for the added length to the side panel and the resulting transom pattern. But the extension does not appear in the side views, etc.
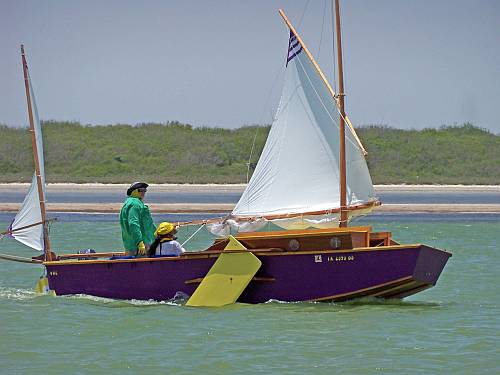
John took her out on a few short shakedown runs and then immediately into the Texas200 for which she was designed. He crewed for his wife Rosa. They camped in the boat at the stops. He reported no severe problems although he said she had stout weather helm until he rerigged the main further forward. Now, I drew the rig to balance well without the mizzen so this is not too much surprize, especially in the strong winds of the TX200 where the main is always reefed but the mizzen is not. To add to this I believe his mizzen is mounted on his new transom extension 18" aft of the original mizzen location which would add to the weather helm. But not to worry. These rigs are very easy to adjust and a quick and permanent fix, if needed, might be to adjust the rake of the mast by moving the mast partner, which simply bolts to the deck slot beam, forward as required. Anyway, that is how I look at it now. I would not be too quick to change it until I also sailed her in light winds since high winds almost always add to weather helm. Also, in the strong TX200 winds with the boat going hull speed all the time he found the sink weight in the rudder to be too small, with the result that the rudder would not hang vertically and instead would slant back a bit. That increases the helm forces which could be quite tiring given 40 mile legs of the TX200. So maybe the rudder could stand more lead, or maybe the sails adjusted to remove the helm force. Here are a few photos. You can see that the extra stern extension adds a lot to the boat.
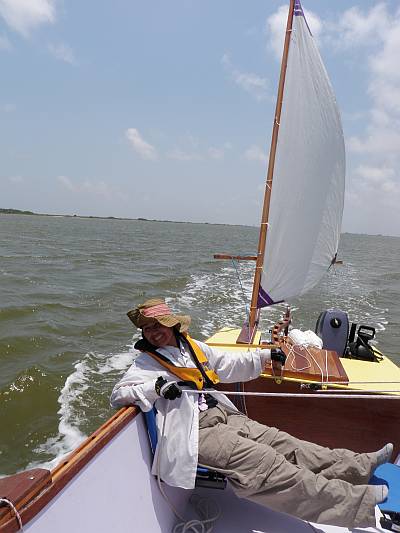
The line of fine bubbles following the boat in that photo means to me she was pretty much at or above hull speed, maybe planing. Also, note that the boat looks comfortable to the skipper, very important on the long stretches of the TX200. Someone sent this shot of the boat at that time and she is trying to rise up and plane. And note that the power of the coastal wind is such that you can get this speed in flat water with just a scrap of sail:
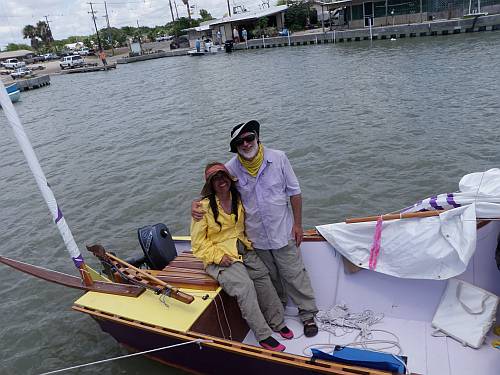
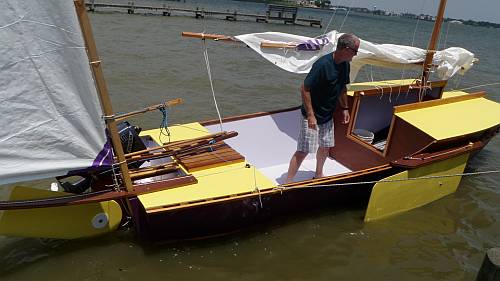
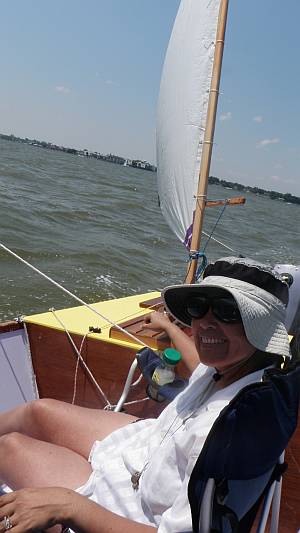
John also posted some great videos of this boat and others on YouTube. I hear he writing up a report on Hapscut which should appear maybe at Duckworksmagazine.com soon.
Plans for Hapscut are $40. It is all simple nail and glue construction needing nine sheets of 1/4" plywood and four sheets of 1/2" plywood.
Contents
Prototype News
Some of you may know that in addition to the one buck catalog which
now contains 20 "done" boats, I offer another catalog of 20 unbuilt
prototypes. The buck catalog has on its last page a list and brief description
of the boats currently in the Catalog of Prototypes. That catalog also
contains some articles that I wrote for Messing About In Boats and Boatbuilder
magazines. The Catalog of Prototypes costs $3. The both together amount
to 50 pages for $4, an offer you may have seen in Woodenboat ads. Payment
must be in US funds. The banks here won't accept anything else. (I've got
a little stash of foreign currency that I can admire but not spend.) I'm
way too small for credit cards.
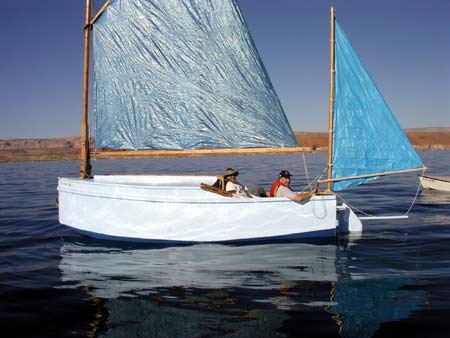
I think David Hahn's Out West Picara is the winner of the Picara race. Shown here on its first sail except there was no wind. Hopefully more later. (Not sure if a polytarp sail is suitable for a boat this heavy.
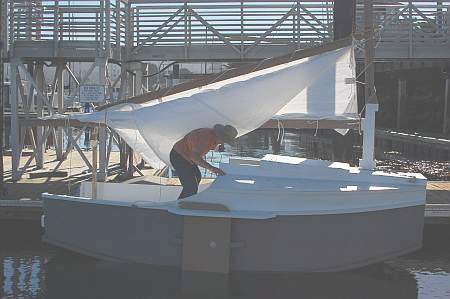
Here is a Musicbox2 out West.
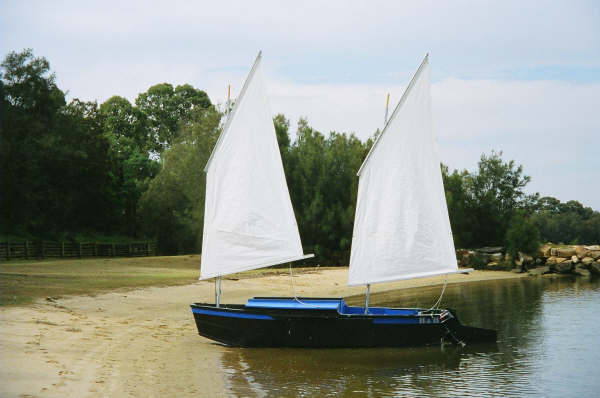
This is Ted Arkey's Jukebox2 down in Sydney. Shown with the "ketchooner" rig, featuring his own polytarp sails, that is shown on the plans. Should have a sailing report soon.
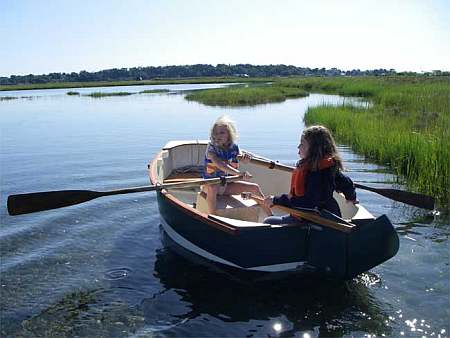
And the Vole in New York is Garth Battista's of www.breakawaybooks.com, printer of my book and Max's old outboard book and many other fine sports books. Beautiful job! Garth is using a small lug rig for sail, not the sharpie sprit sail shown on the plans, so I will continue to carry the design as a prototype boat. But he has used it extensively on his Bahamas trip towed behind his Cormorant. Sort of like having a compact car towed behind an RV.
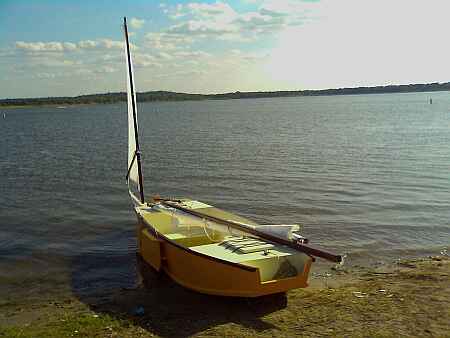
And a Deansbox seen in Texas:
Another prototype Twister is well along:
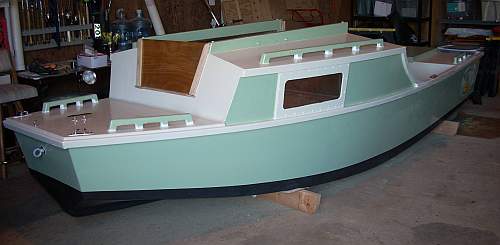
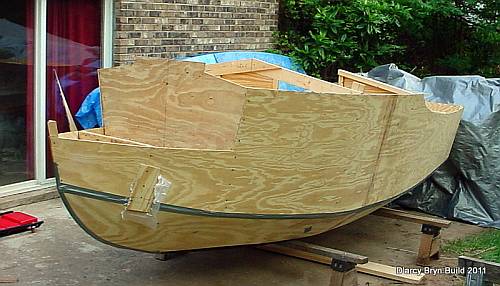
And the first D'arcy Bryn is ready for taping. You can follow the builder's progress at http://moffitt1.wordpress.com/ ....
Contents
AN INDEX OF PAST ISSUES
A NOTE ABOUT THE OLD WAY BACK ISSUES (BACK TO 1997!). SOMEONE MORE CAREFUL THAN I HAS SAVED THEM. NOW IT IS A QUESTION OF REINSTALLING THEM IN AN ACCEPTABLE FORMAT.
15sep11, Balanced Lug Jiffy Reef, Philsboat
1oct11, Boat Costs, Larsboat
15oct11, Sail Area Math, Jonsboat
1nov11, Sail Oklahoma 2011a, Piccup Pram
15nov11, Sail Oklahoma 2011b, Caprice
1dec11, Taped Seams, Trilars
15dec11, Bulkhead Bevels, Sportdory
1jan12, H14 Rig, Olive Oyl
15jan12, Knockdown Recovery 1, DarcyBryn
1feb12, Knockdown Recovery 2, Caroline
15feb12, Underwater Board Size, IMB
1mar12, Underwater Board Shape, Paddleplank
15mar12, Underwater Board Shape2, Frolic2
1apr12, Underwater Board Shape3, Marksbark
15apr12, Rowboat Setup, Toon2
1may12, Electric Boats 1, Blobster
15may12, Electric Boats 2, Electron
1jun12, Messin With Motors, AF4
15jun12, Rend Lake 2012, Toto
1jul12, Prop Thrust, Brucesboat
15jul12, Making A Hull1, Mikesboat
1aug12, Making A Hull2, Paulsboat
15aug12, Olympic Thoughts, Cormorant
SOME LINKS
Mother of All Boat Links
Cheap Pages
Duckworks Magazine
The Boatbuilding Community
Kilburn's Power Skiff
Bruce Builds Roar
Dave Carnell
Rich builds AF2
JB Builds AF4
JB Builds Sportdory
Hullform Download
Puddle Duck Website
Brian builds Roar2
Herb builds AF3
Herb builds RB42
Barry Builds Toto
Table of Contents
