Jim Michalak's Boat Designs
118 E Randall, Lebanon, IL 62254
A page of boat designs and essays.
(15July2012) This issue will rerun an old old article about making an "instant" boat (originally aired on 15 Jan 2002). The 1 August issue will continue the topic.
THE BOOK IS OUT!
BOATBUILDING FOR BEGINNERS (AND BEYOND)
is out now, written by me and edited by Garth Battista of Breakaway Books. You might find it at your bookstore. If not check it out at the....
ON LINE CATALOG OF MY PLANS...
...which can now be found at Duckworks Magazine. You order with a shopping cart set up and pay with credit cards or by Paypal. Then Duckworks sends me an email about the order and then I send the plans right from me to you.
Making A Hull 1
THOUGHTS ABOUT MAKING A JIGLESS BOAT....
FIRST....
If you are making a sailboat and intend to make you own sail, be sure to make the sail before you start the hull. Here is why. The sail and hull usually need about the same assembly area. That is to say if you are building a boat that is 16' long and 5' wide you will need a clear work space that is about 20' x 10'. Usually you will need about the same area to make the sail for that boat. So if you clear that work space and make your sail first, you can bundle it up and stow it in a closet or in a corner while you work on the hull. If you make the hull first you will be out of luck for a work space to make your sail since you will need that space to store your hull. Not to mention having the space spattered with glue and paint. So make your sail first and get that over with in your head. Having the sail done will give you a jump start on making your hull.
NEXT, TEMPORARY FORMS....
Look over your plans and see if there are any temporary forms. Usually these will be made of lumber, sometimes plywood, and will be discarded after the hull has reached a point where they are no longer needed. You want to make these frames and forms first.
I suggest you make the lumber forms first. Take one of the sheets of plywood that will be used for the hull panels and draw the shape of the forms on it. Here you aren't going to cut the plywood, only use it as a platform to assemble the lumber forms. Cut the lumber to fit the full sized layout on the plywood and screw it together so it fits. Usually an acceptable tolerance for something like this is 1/16" but you can get away with more sometimes. The last step is very important: be sure to mark bold centerlines on both sides of the forms and on the top and bottom edges too. Temporary forms seldom have bevels on any edges.
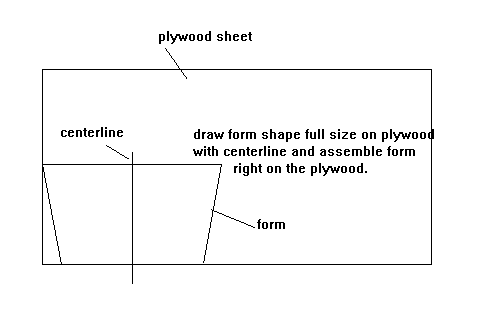
Sometimes the temporary forms are made from plywood. In that case lay out the form full size on the plywood, complete with its centerlines, and cut it out with a circular saw or with a saber saw. You will need to attach cleats around the perimeter, usually 3/4" x 1-1/2" and attached with screws, to screw the hull panels to and to stiffen the form. As always, mark centerlines boldly.
Store your forms flat against a wall.
STEM...
Now is a good time to make a stem piece. (Pram shaped boats will not have a stem piece. And double ended boats may have both a stem piece and a similar stern piece).
Normally on my designs the stem is made from a piece of 2x4 lumber (which is 1-1/2" x 3-1/2" in reality). You should make the stem piece longer than required with the idea of trimming it to length later in the assembly.
You need to cut the sides of the stem piece on a bevel. I usually dimension the stem bevel both with degrees and with inches, and I usually show the stem cross section full sized.
The best tool for this job is a table saw although a circular saw or bandsaw, or even a saber saw will also do the job. Set the saw at an angle that will cut the bevel correctly in one pass and slice off one side. Then set the saw fence carefully so that when you slice off the other side at the proper bevel the piece also have the correct total width. And as with the forms be sure to mark the centerlines on all sides of the piece.
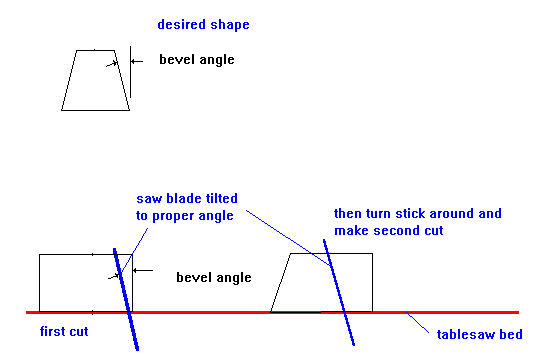
You can also make the stem piece bevels with a plane as was usually done in the old days. In this case draw the shape of the piece on all four sides and work it down a shave at a time. Don't forget the centerlines.
SIDES...
It is time to cut plywood. Look over the plywood panel layout drawing for a while. The parts almost always fit together like a jigsaw puzzle on the plywood sheets. It would be nice right now to cut out the bulkheads and transom(s) but often you can't do that without first laying out the shapes of the larger hull panels. (Why is it done that way? I've found the most effecient way to lay out the pieces from the standpoint of getting the boat out of the least number of plywood sheets is to start by drawing the largest panels first and then fitting the smaller ones on what is left over.)
Here is how to lay out the shape of the side panels.
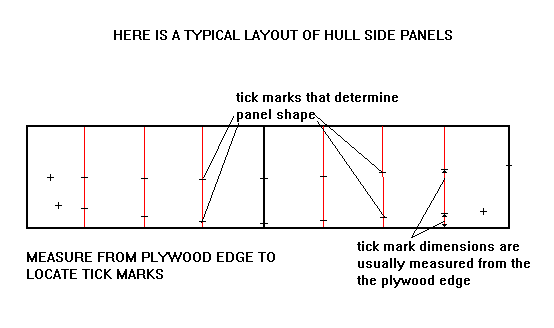
What you are going to do is enlarge the scale drawings right onto your plywood sheets. The scale drawings have sort of "digitized" the curved shapes by laying out a grid of sorts. Often there are dimensions every foot or two. Look on your drawing and see what the spacing is. Then place your plywood sheets on the floor and draw lines across the sheets at that interval. These lines need to be perpendicular to the bottom length of the sheet. You might check them with a square, but usually (not always so you have to check) plywood is made very accurately both is squareness and in size. And once you have verified that the edges of the plywood are square, then you can lay out the grid lines with great accuracy by just making them parallel to the ends of the sheet as shown. It's very easy. If your side demands two sheets of plwyood, then you lay them both down on the floor end to end and lay out the grid making sure the two sheets never shift.
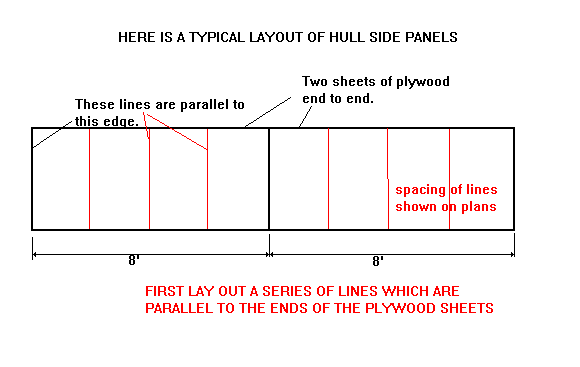
Next step is to lay out the actual curved lines that give the shape of the hull panel. That is done by making tick marks at just the right places on those grid lines you just drew and connecting them. On my plans almost all the tick marks are measured up from the bottom of the plywood sheet. So you can hook your measuring tape on that edge and make the required ticks on each grid line. It might look like this:
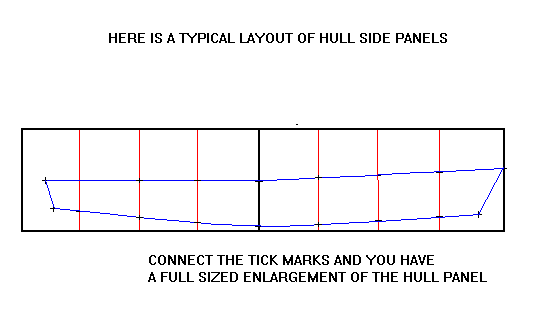
Last, lay a batten down on the plywood and bend it through the tick marks and secure the batten in place with weights (bricks can work OK if the bend isn't too severe) or with temporary nails or screws. Then draw through the tick marks with a fairly dark pencil or pen. You have enlarged the shape of the panel!
It should look like this:
(What is a batten?? Just a long flexible stick. The best ones seem to be about 3/8" x 3/4" in cross section with no knots. It doesn't have to lay straight on its own - it can have a natural curve and still be a good batten. Often you can see a really good batten in a larger piece of wood. For example if you have a 16' 1x4 piece of lumber with one knot free edge, you might rip off that good edge and save it as a batten. Once you get a good batten, save it!)
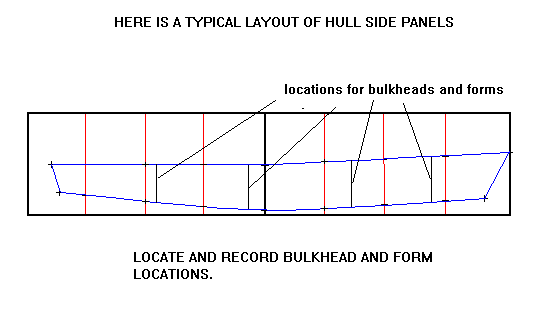
There is one last important step in laying out most hull panels. Many also must have the location of the bulkheads and forms drawn in. Locate them as shown on the plans and draw the locations boldly on the panel layout, like this:
Now you are done with one panel! You will need to make a mirror image of it on other sheets of plywood. You don't need to do the layout all over again, although you could if you wanted to. You could also use the first panel as a pattern for the mirror image panel. You could cut out the first panel and trace around it to shape the mirror image. Some builders clamp the first pattern over another layer of plywood and cut them both out with one cut! I think all of those methods will be fine. Just remember that the mirror image must indeed be a mirror image and not a straight copy of the first panel - butt plates used to connect the sheets and lines locating bulkheads and forms need to be on opposite sides of those mirror images.
CUTTING OUT THE HULL PANELS..
You have a few options now. You can go ahead and draw in all the bulkheads, etc., everything that you can before you cut out the hull panels that you have just layed out. (You won't be able draw in the last "cut to fit" items such as the decks and bottom panels in some cases. ) Or you can cut out the major panels and then lay out the remaining parts on the remaining plywood pieces. Either way is OK.
As to cutting out the hull panels you have also have options. You can cut out the pieces with the idea of gluing them together with butt plates later. Or you can often glue the big plywood panels together with butt plates before cutting out the hull panels. Doing that can be more accurate than gluing the panel sections together after first cutting them out, but sometimes the layout on the plywood sheets does not allow it.
Either way cutting out the large plywood panels goes like this. Raise the plywood off the floor with sacrificial bits of lumber, such as 1x4's, so your sawblade stays clear of the floor. Set your circular saw so it cuts to a depth about 1/4" deeper than the thickness of your plywood, and saw away. A circular saw with its blade set about 1/4" deeper than the plywood thickness will easily cut most boat curves. That is one way to do it. I suppose another way is to place the panels on saw horses one at a time and cut them out a few feet at a time. You can cut one out with a saber saw that way. But a circular saw with a good sharp blade seems to give smoothest cuts.
Once the larger hull panels have been cut out, the plywood pieces that remain should be more managable and you can lay out the remaining bulkheads, etc., and cut them out.
MAKING THE BULKHEADS...
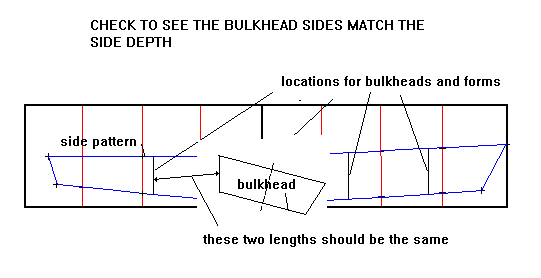
Lay out the bulkheads and cut them out with a circular saw or a saber saw. Here is a bit of boat building reality. The length of each bulkhead's side should match the depth of the hull when installed at its proper place. Now that you have the hull sides cut out and have the bulkhead locations marked on the sides, take a minute and measure the depth of the side panel there. For the bulkhead to fit properly that depth should match the length of the bulkhead's side edge. Check the length of the bulkhead's side edge to be sure. Don't be surprised if it isn't quite right. There are lots of assumptions and tolerences involved in these lengths and getting them to come out exactly correct is rare. But once you measure the depth of the side panel at the bulkhead location, you can often adjust the bulkhead prior to cutting it to allow for the variation. It is a lot easier to do it now than after the bulkhead has been assembled with its framing sticks.The usual "adjustment" is to add or subtract some material from the top and/or bottom edge of the bulkhead. Like this:
The perimeters of the bulkheads usually have framing sticks, 3/4" x 1-1/2" lumber usually on a small boat. I've written an essay about making the bevels on the edges of bulkheads. There are several ways to do them. You will need to look at the drawing to see the angle of the bevel and to see which way the bevel slopes.
The framing sticks can be beveled before or after they are assembled to the bulkhead's plywood. The sticks should be both glued and nailed to the bulkhead but it always pays to "dry fit" the sticks in place. With today's dry wall screws that is easily done. Here is how I would assemble a typical bulkhead. I would cut the bevels on the sticks before assembly on a table saw. Then I would cut the sides sticks to be long and dry fit them to the plywood panel, first holding them with clamps, then drilling some lead holes for drywall screws, then fix the sticks to the plywood with two drywall screws per stick. Remove the clamps.
Next I would carefully fit the top and bottom framing sticks, install them with screws, and then trim the ends of the side sticks to length and to match the beveled edges of the top and bottom sticks. (Often a hand hacksaw with a metal cutting blade does a very good job at making these fussy end cuts.)
Lastly I would remove one stick and butter it with glue. Slightly thickened epoxy is best but Weldwood plastic resin glue will work. So will PL Premium, the only tube glue that I would try at this time. Put the piece back on the assembly and reinstall the screws. It will go back exactly into its original position. Drill some lead holes for nails at about 6" spacing and drive in some nails. You can now remove those two screws and drive nails in their holes.
Glue the remaining sticks in place the same way but make a point of getting a wad of glue in the areas where the end of one stick meets the side of another. I think that is the most likely place for leaks and rot to get started.
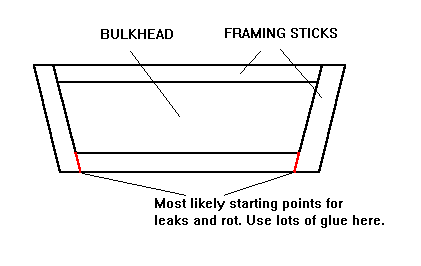
Set it aside to cure. After cure be sure to mark centerlines boldly.
TAKING STOCK...
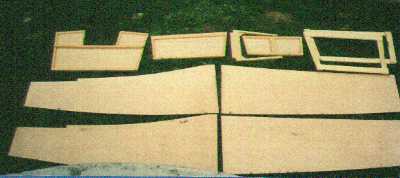
At this point you have the sides cut, the frames, stem and bulkheads assembled. You are ready to start assembling your hull! Here is what the pile looks like for an AF3, photo supplied by Pierre-Yves Gabi in Switzerland:
NEXT TIME...
...Putting the pieces together.
Contents
Mikesboat
MIKESBOAT, SAILBOAT, 17' X 5.5', 450 POUNDS EMPTY
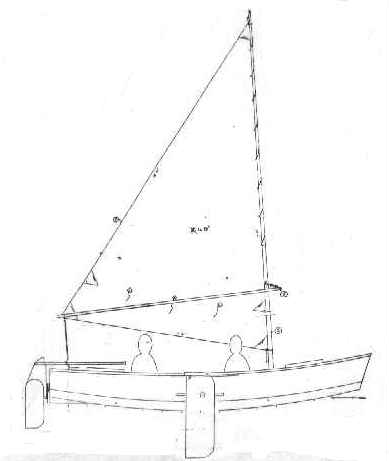
Mikesboat is a big Piccup Pram. It is slightly narrower in proportion.
The idea was to have something like Piccup that was large enough to take
the family so she has two bench seats 8' long. It should be a good
expedition solo boat with a boom tent fitted over the cockpit. Mikesboat
has the Piccup layout with buoyancy/storage chambers fore and aft but now
there is also enough room for a small motor well across the stern. As a
rule something like this needs maybe 2hp to run at hull speed and even
then there would be some extra. This shape of hull with multichines has
proven good in rough water with fair speed.
Sail rig is the same 96 square foot sharpie sprit rig that I used on
AF3 and a few other designs (actually it is the mainsail from a Bolger
Jinni design I built 20 years ago). This is a change from the balanced lug
rig that Piccup uses but Mike had good experiences with his Mayfly12 which
used the sharpie rig and that is what he wanted. I would expect the
sharpie sprit to be slightly better to windward than the lug but not by a
lot and the sailmaker's talents might be the deciding factor here. There
is no doubt that the sharpie sprit mast is perhaps 50% longer than a
similar lug sail might need.
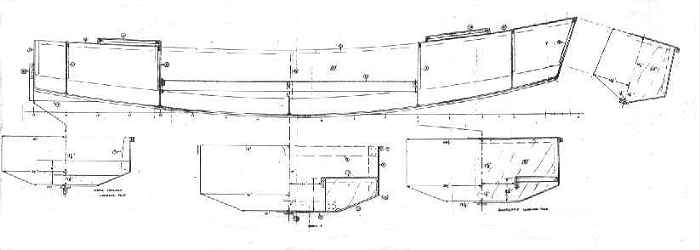
Mikesboat uses taped seam construction. Takes nine sheets of 3/8"
plywood and three sheets of 1/2", compared to Piccup's fives sheets o
1/4". So you see that scaling up a boat makes for a lot more wood and
weight.
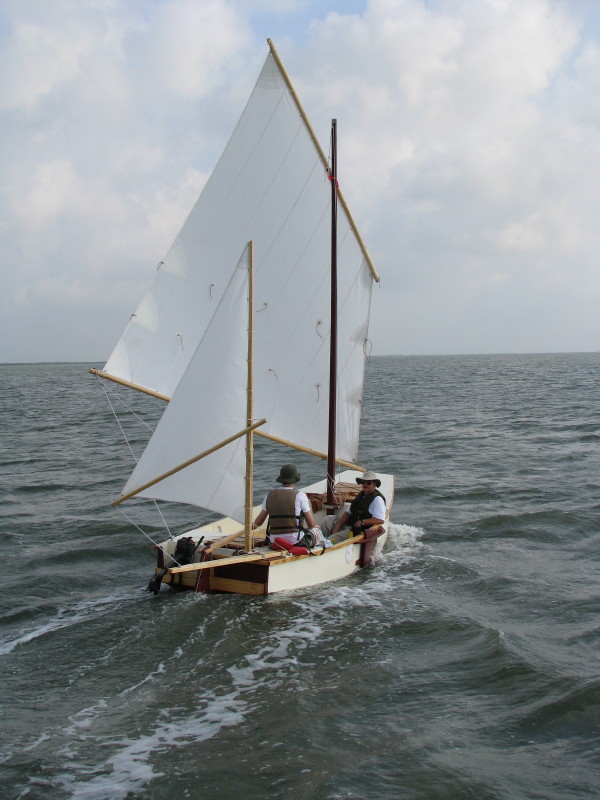
I dunno if Mike ever built his boat but Bill Moffitt in Atlanta made one to run the Texas200. He is an experienced builder and sailor and made a thorough job of it in a big rush towards the end. Launching at the Texas200 was its first time in the water. His wife sewed the sails the day before he left for the cruise, and this was her first set of sails! The sail rig he wanted was a lug main with a sharpie mizzen. I drew those up for him and they are now included in the plan set. Here is his boat under sail:
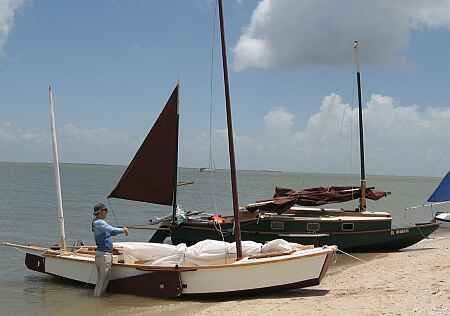
Here is another photo of the boat beached beside Chuck Leinweber's mothership Caprice (which was designed originally for Bill Moffitt!) at the end of the cruise:
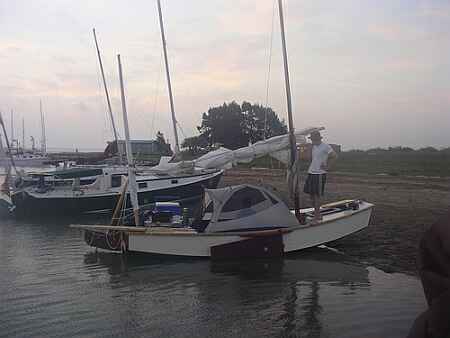
The cruise involved camping through several nights and Bill did something I have always thought about but had never seen. He pitched a standard tent in the large Mikesboat cockpit. A lot cheaper than a custom boat tent, for sure, but it takes a big cockpit to handle it. Mike also had some sort of center platform to fill the space between the long bench seats:
Well, three cheers for Bill and son Paul!!! As far as I know the 200 mile cruise went off without a hitch, the boat right on. But I suggest that most of us couldn't get away with going on a long cruise with an untested design.
And here is another Mikesboat, owned by David Chase...
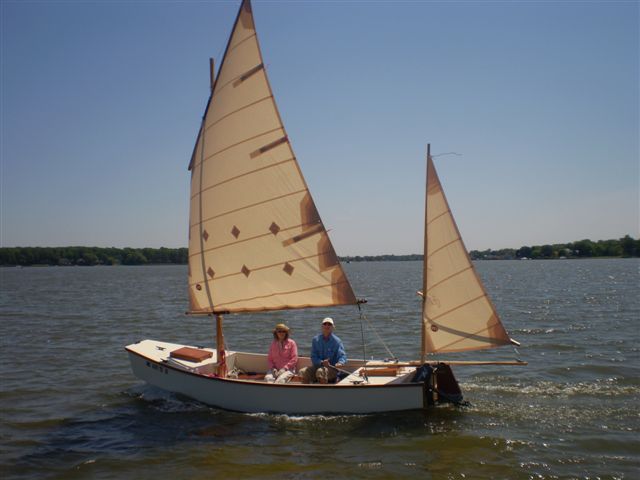
Plans for Mikesboat, showing both sailrigs, are $45.
Contents
Prototype News
Some of you may know that in addition to the one buck catalog which
now contains 20 "done" boats, I offer another catalog of 20 unbuilt
prototypes. The buck catalog has on its last page a list and brief description
of the boats currently in the Catalog of Prototypes. That catalog also
contains some articles that I wrote for Messing About In Boats and Boatbuilder
magazines. The Catalog of Prototypes costs $3. The both together amount
to 50 pages for $4, an offer you may have seen in Woodenboat ads. Payment
must be in US funds. The banks here won't accept anything else. (I've got
a little stash of foreign currency that I can admire but not spend.) I'm
way too small for credit cards.
I think David Hahn's Out West Picara is the winner of the Picara race. Shown here on its first sail except there was no wind. Hopefully more later. (Not sure if a polytarp sail is suitable for a boat this heavy.
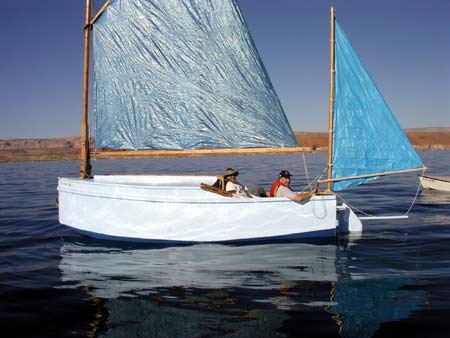
Here is a Musicbox2 out West.
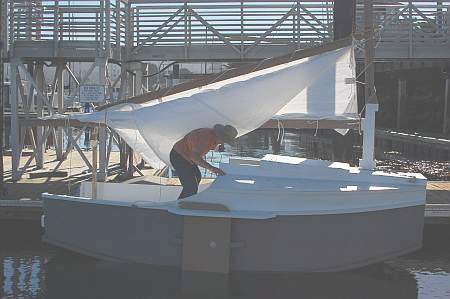
This is Ted Arkey's Jukebox2 down in Sydney. Shown with the "ketchooner" rig, featuring his own polytarp sails, that is shown on the plans. Should have a sailing report soon.
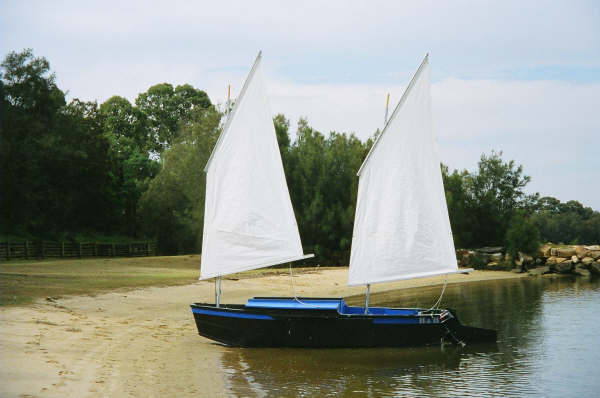
And the Vole in New York is Garth Battista's of www.breakawaybooks.com, printer of my book and Max's old outboard book and many other fine sports books. Beautiful job! Garth is using a small lug rig for sail, not the sharpie sprit sail shown on the plans, so I will continue to carry the design as a prototype boat. But he has used it extensively on his Bahamas trip towed behind his Cormorant. Sort of like having a compact car towed behind an RV.

And a Deansbox seen in Texas:

The prototype Twister gets a test sail with three grown men, a big dog and and big motor with its lower unit down. Hmmmmm.....

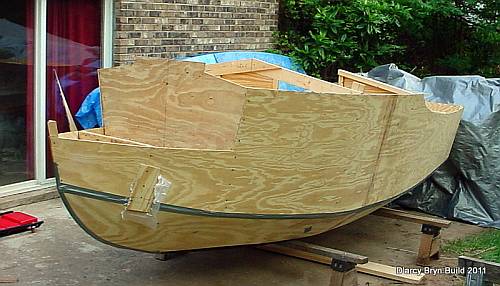
And the first D'arcy Bryn is ready for taping. You can follow the builder's progress at http://moffitt1.wordpress.com/ ....
The Texas Hapscut, built by John Goodman, is shown here doing a low flyby on the Texas200. This year he took his wife! This boat looks like it is motor planing but it is not, just using strong steady Texas200 winds. (He has scarfed some material on the stern to finish the boat with a built in motor well like Laguna. Good idea.) Full report soon.
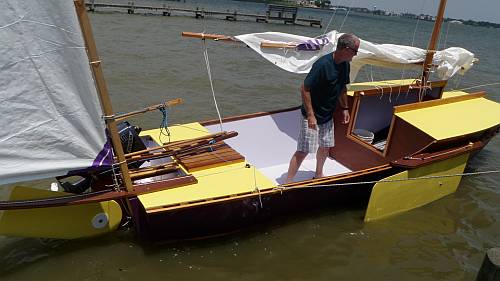
This is the Paulsboat sailing canoe. It is done and as you see here has been sailing. You might search youtube for "paulsboat" and watch. Built by Paul Moffitt of the famous boating Moffitts. Full report soon.

Contents
AN INDEX OF PAST ISSUES
A NOTE ABOUT THE OLD WAY BACK ISSUES (BACK TO 1997!). SOMEONE MORE CAREFUL THAN I HAS SAVED THEM. NOW IT IS A QUESTION OF REINSTALLING THEM IN AN ACCEPTABLE FORMAT.
1aug11, Cartopping, Family Skiff
15aug11, Plywood Butt Joints, Cormorant
1sep11, Lumber Scarf Joints, Trilars
15sep11, Balanced Lug Jiffy Reef, Philsboat
1oct11, Boat Costs, Larsboat
15oct11, Sail Area Math, Jonsboat
1nov11, Sail Oklahoma 2011a, Piccup Pram
15nov11, Sail Oklahoma 2011b, Caprice
1dec11, Taped Seams, Trilars
15dec11, Bulkhead Bevels, Sportdory
1jan12, H14 Rig, Olive Oyl
15jan12, Knockdown Recovery 1, DarcyBryn
1feb12, Knockdown Recovery 2, Caroline
15feb12, Underwater Board Size, IMB
1mar12, Underwater Board Shape, Paddleplank
15mar12, Underwater Board Shape2, Frolic2
1apr12, Underwater Board Shape3, Marksbark
15apr12, Rowboat Setup, Toon2
1may12, Electric Boats 1, Blobster
15may12, Electric Boats 2, Electron
1jun12, Messin With Motors, AF4
15jun12, Rend Lake 2012, Toto
1jul12, Prop Thrust, Brucesboat
SOME LINKS
Mother of All Boat Links
Cheap Pages
Duckworks Magazine
The Boatbuilding Community
Kilburn's Power Skiff
Bruce Builds Roar
Dave Carnell
Rich builds AF2
JB Builds AF4
JB Builds Sportdory
Hullform Download
Puddle Duck Website
Brian builds Roar2
Herb builds AF3
Herb builds RB42
Barry Builds Toto
Table of Contents
