Jim Michalak's Boat Designs
1024 Merrill St, Lebanon, IL 62254
A page of boat designs and essays.
(1 November 2018) We will make some sink weights. The 15 November issue will take a look at Piccup Pram spinoffs.
THE BOOK IS OUT!
BOATBUILDING FOR BEGINNERS (AND BEYOND)
is out now, written by me and edited by Garth Battista of Breakaway Books. You might find it at your bookstore. If not check it out at the.... ON LINE CATALOG OF MY PLANS......which can now be found at Duckworks Magazine. You order with a shopping cart set up and pay with credit cards or by Paypal. Then Duckworks sends me an email about the order and then I send the plans right from me to you.
Making Sink Weights
WHY SINK WEIGHTS????....
Tidmarsh Major has been plugging away at the prototype Skat for a while now and sent me some fine photos of his method of pouring the lead sink weights in his centerboard and rudder blade. Why do they need sink weights? They are made of wood and will float up a lot if they are not ballasted to stay down.
Right here I need to say that the pivoting leeboards that I design don't seem to need sink weights. When they are all the way down and snugged up a little bit they usually stay put in ordinary sailing. And when they hit something they pop up maybe 70% and will stay up until you haul them down again. I have designed very few centerboard boats, Skat being one of them and don't consider myself to be expert on ballasting them. My Birdwatcher, the last Bolger design I built before trying my own, has I think about 40 pounds of lead in its centerboard.
But pivoting rudders always need lead weights I'm quite sure. Some will be shown with a large wing nut that you are expected to tighten when afloat. That just doesn't work. Once out on the water in a small boat with the sails already up the last thing you want to have to do is lean over the stern to try to get the rudder down and locked.
And if you think that a clever set of lanyards to pull the rudder up and down will be fine you are quite wrong also. I tried that for a couple of years. Here is what happens. You approach a shallow area or beach with rudder held down by a lanyard that you have cleated to somewhere convenient. Your leeboard starts to bump the bottom and rise on its own. You have one hand on the sail's sheet and another on the tiller. Now you rudder starts to bump the bottom but won't swing upward until you release the lanyard which you can't do in spirited conditions because your hands are already quite full. OK, you take a chance and release the sheet and release the rudder and grab that sheet again. Now your rudder blade swings up and trails behind the boat so now you have no rudder! So eventually I weighted my rudders and they bump along the bottom very nicely and swing full down again as soon as they can. None of you are as persistant as gravity!
MELTING THE LEAD...
This is Tidmarsh's setup.
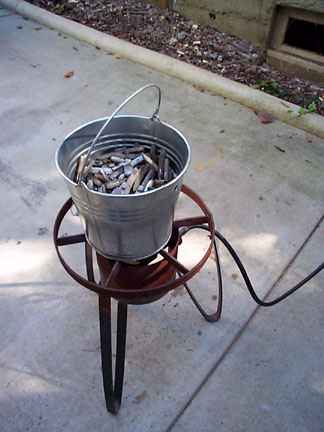
Looks like maybe a plumber's melting stove with a pail of wheel weights on top. I also use wheel weights which I got from my local tire guy (UPDATE HERE. Now modern wheel weights are not lead and won't melt this way.) For heat I use the normal campers propane stove. For a pail I use a coffee can with a handle bolted to it. There is a pour hole on mine about half way up the side of the can so I don't have to tip the can all the way to pour the lead and there is little chance of it sloshing over the top by accident. The pour hole is too small to pass the steel clips of the wheel weights (they float nicely on top of the molten lead).
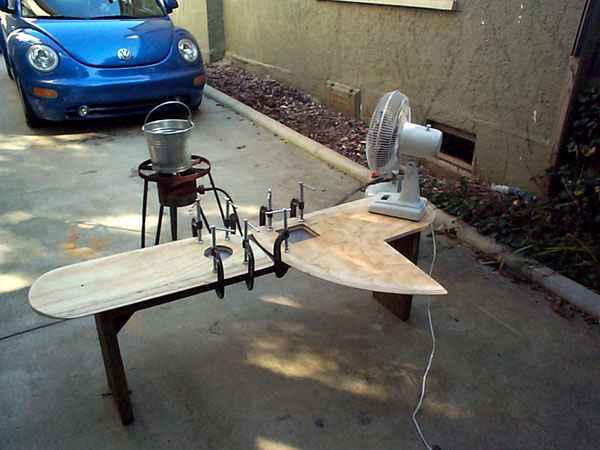
Here is a photo of Tidmarsh's total set up. Lead melting, fan to blow away any fumes, rudder and leeboard near and ready for the pour, and Volkswagen warmed up and ready to go for more wheel weights if needed.
Here is a close up of the holes prepared for the lead pour:
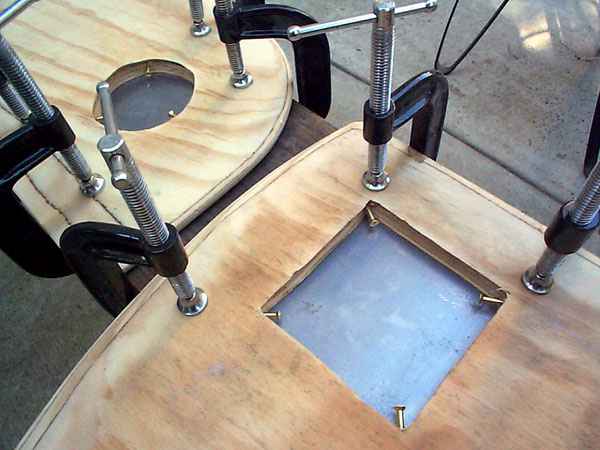
They are clamped to a metal plate the will form the bottom side of the casting form. Note the screws in the corners of the pour holes. The idea is that the lead will flow around the screws and harden, locking the lead solid to the wood. Use nails or screws that won't rust. I might add here that it is also good to bevel the edges of the holes. The lead will flow into the bevels and form flanges that also help to trap the lead.
Now the lead is poured into the holes, slightly overfull to allow for some shrinkage when the lead cools.
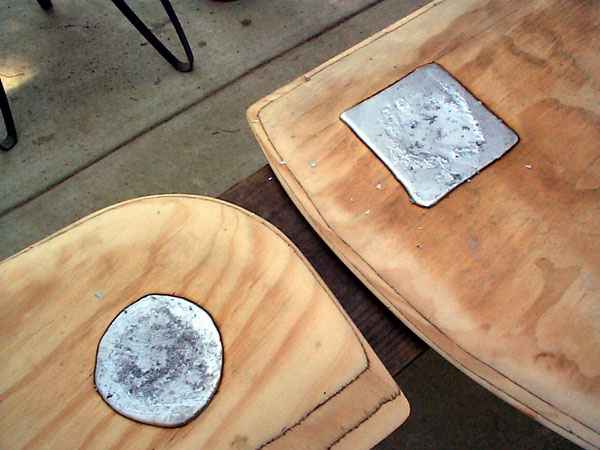
That is about it except sometimes shinkage will cause the lead block to loosen. I found I could put the lead over an anvil and whack it with a hammer. That flattens it a tiny bit but expands it at the perimeter, tightening it in the hole. You might have to trim the lead flush with the wood's surface. Lead likes to clog files and sandpaper so I found a rasp is a good start and something like a 20 grit disk gets it down to where you want it.
Shanteuse
SHANTEUSE, SHANTYBOAT, 16' X 6', 700 POUNDS EMPTY
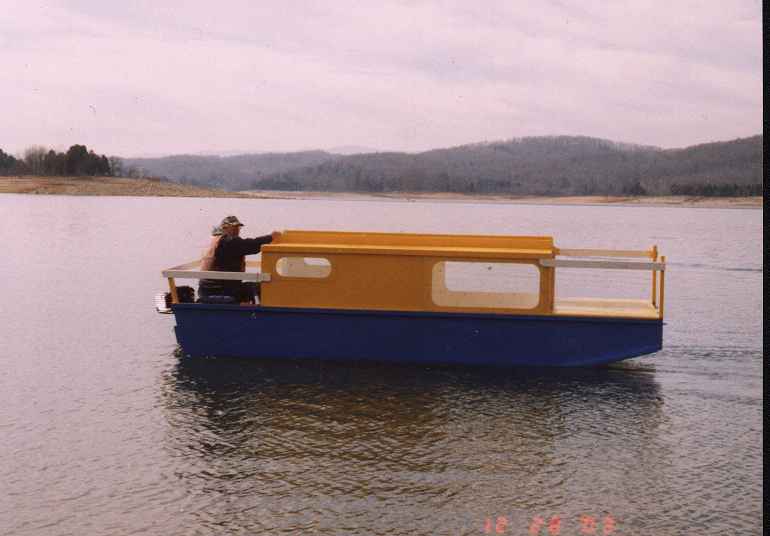
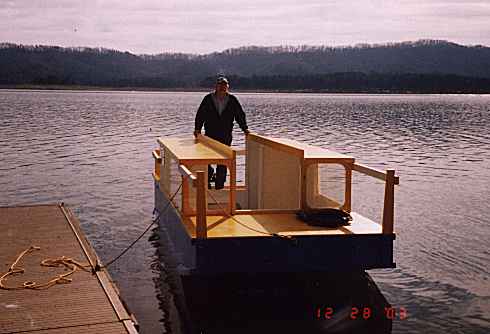
Shanteuse is a slight enlargment of the mini shanty Harmonica. Shanteuse is 1' wider than Harmonica and has a 3' extension on the stern to allow a small back porch and a motor mount that is totally out of the living area.
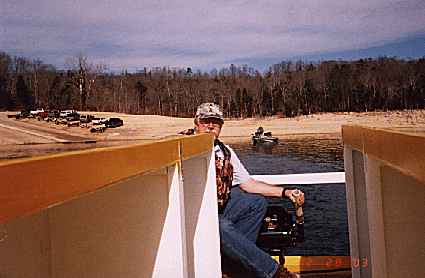
There was a Shanteuse built in Florida by Vince SantaMaria a couple of years back but he stretched his to 24' so I couldn't really call that one a Shanteuse. But here is one by Douglas Snelson in Tennessee that looks to be right to the plans so I will call this one the prototype. He sent a bunch of photos:
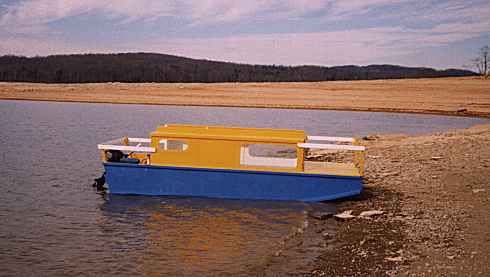
I've also made Shanteuse a little heftier. I'm thinking this one will weigh about 700 pounds empty where Harmonica comes in at around 400 pounds. I'm not sure if the extra beef is needed because Harmonica seemed totally adequate to me as far as strenght and stiffness go. But the extra size of Shanteuse is probably going to take it out of the compact car tow class. The plywood bill for Shanteuse looks like six sheets of 1/2" plywood and eight sheets of 1/4" plywood. I would not use fancy materials on a boat like this and am reminded of Phil Bolger's warning to never spend a lot of money building a design that was intended to look cheap. I see pine exterior plywood at my local lumberyard selling for $11 or a 3/8" sheet and this entire boat could be built of it. So the plywood bill would be less than $200 and I'm thinking the entire bill less than $500. The pine plywood looks quite good to me, its main drawback being that it doesn't lay very flat.
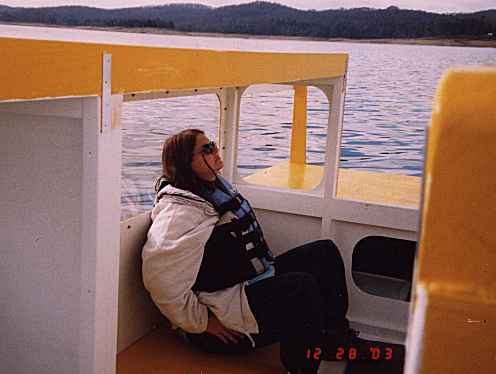
These boats can be very comfortable to camp in. The interior volume and shape are not unlike the typical pickup camper or the volume in a full sized van. It's not huge, it's cozy. The top has an open slot 28" wide from front to back on centerline. You can close it over with a simple tarp, leave it open in good weather, or rig up a full headroom tarp that covers the entire boat. I've shown lots of windows but the window treatment can be anything you like. You do need to see out. I would be tempted to cover the openings with screen and use clear vynal covers in the rain or cold. For hard windows I think the best material might be the Lucite storm window replacements sold at the lumberyard. Easily worked, strong, and not expensive.
As for operation, these are smooth water boats. So it is best to stay on small waters that never get too rough. On bigger waters you need to watch the weather very carefully. For power I would stick to 5 or 10 hp but I'm very much a chicken about these things.
Plans for Shanteuse are $35.
Prototype News
Some of you may know that in addition to the one buck catalog which now contains 20 "done" boats, I offer another catalog of 20 unbuilt prototypes. The buck catalog has on its last page a list and brief description of the boats currently in the Catalog of Prototypes. That catalog also contains some articles that I wrote for Messing About In Boats and Boatbuilder magazines. The Catalog of Prototypes costs $3. The both together amount to 50 pages for $4, an offer you may have seen in Woodenboat ads. Payment must be in US funds. The banks here won't accept anything else. (I've got a little stash of foreign currency that I can admire but not spend.) I'm way too small for credit cards.
We have a Picara finished by Ken Giles, past Mayfly16 master, and into its trials. The hull was built by Vincent Lavender in Massachusetts. There have been other Picaras finished in the past but I never got a sailing report for them...
And the Vole in New York is Garth Battista's of www.breakawaybooks.com, printer of my book and Max's old outboard book and many other fine sports books. Beautiful job! Garth is using a small lug rig for sail, not the sharpie sprit sail shown on the plans, so I will continue to carry the design as a prototype boat. But he has used it extensively on his Bahamas trip towed behind his Cormorant. Sort of like having a compact car towed behind an RV.
And a Deansbox seen in Texas:
Another prototype Twister is well along:
A brave soul has started a Robbsboat. He has a builder's blog at http://tomsrobbsboat.blogspot.com. (OOPS! He found a mistake in the side bevels of bulkhead5, says 20 degrees but should be 10 degrees.) This boat has been sailed and is being tested. He has found the sail area a bit much for his area and is putting in serious reef points.
AN INDEX OF PAST ISSUES
THE WAY BACK ISSUES RETURN!
MANY THANKS TO CANADIAN READER GAETAN JETTE WHO NOT ONLY SAVED THEM FROM THE 1997 BEGINNING BUT ALSO PUT TOGETHER AN EXCELLENT INDEX PAGE TO SORT THEM OUT....
THE WAY BACK ISSUES
15nov17, Scram Pram Capsize, Harmonica
1dec17, Sail Area Math, Ladybug
15dec17, Cartopping, Sportdory
1jan18, Trailering, Normsboat
15jan18, AF3 Capsize Test, Robote
1feb18, Bulkhead Bevels, Toto
15feb18, Sail Rig Spars, IMB
1mar18, Sail Rig Trim 1, AF4Breve
15mar18, Sail Rig Trim 2, Harmonica
1apr18, Two Totos, River Runner
15apr18, Capsize Lessons, Mayfly16
1may18, Scarfing Lumber, Blobster
15may18, Rigging Sharpie Sprit Sails, Laguna
1jun18, Rigging Lug Sails, QT Skiff
15jun18, RendLake 2018, Mixer
1jul18, Horse Power, Vireo14
15jul18, Motors per the Coast Guard, Vamp
1aug18, Propeller Pitch, Oracle
15aug18, Propeller Slip, Cormorant
1sep18, Measuring Prop Thrust, OliveOyl
15sep18, Taped Seams, Philsboat
Table of Contents

