Jim Michalak's Boat Designs
1024 Merrill St, Lebanon, IL 62254
A page of boat designs and essays.
(15 April 2019) We continue a series on polytarp sails. The May issue will finish the topic.
THE BOOK IS OUT!
BOATBUILDING FOR BEGINNERS (AND BEYOND)
is out now, written by me and edited by Garth Battista of Breakaway Books. You might find it at your bookstore. If not check it out at the.... ON LINE CATALOG OF MY PLANS......which can now be found at Duckworks Magazine. You order with a shopping cart set up and pay with credit cards or by Paypal. Then Duckworks sends me an email about the order and then I send the plans right from me to you.
REND LAKE 2019...
...will take place on June 7 and 8, always on the weekend before Father's Day weekend. I promised to remind all of us to try to get the good campsites on the North Sandusky loop. They are sites 24 through 30 and especially 26 through 29 if possible, this at the North Sandusky campground at Rend Lake. Let's give it a try. This is not really organized but if you nail one down, let me know. I will be trying too. UPDATE: AS OF DEC 6 WE HAVE ALREADY NAILED SITES 26 THROUGH 28. IF YOU DON'T GET A SITE NOW, DON'T FORGET THAT SEVERAL TENTS ARE ALLOWED AT EACH SITE AND YOU CAN DOUBLE OR TRIPLE UP ON A SITE. THERE WILL BE ROOM FOR ALL.
 | Left:
Another Blobster is going together Down Under, this one by Steve Kosch. |
|
LUGSAILS FROM POLYTARP 2
NOW, BACK TO OUR STORY......
You recall the pattern we developed for a small lugsail to be made from a single sheet of polytarp. The pattern was predetermined to give a certain draft. The pattern below is for a Piccup Pram sail, about 70 square feet of area and 10% draft. We're going to cut and sew this sail.

As we discussed last episode, we have this pattern drawn in felt tip pen on polytarp such that no edge comes within about 2" of the edge of the tarp. We will not use any of the preformed edging on the tarp. Don't be tempted to do so. As for tarp material, I prefer the "Coleman" brand sold at Wal-mart stores although I doubt if the other ordinary tarps are much different. I haven't tried any of the "heavy duty" tarps although they might be worth a try. A few issues ago I suggested looking at the polysail page for gourmet tarps. Since I wrote that I saw some examples of those tarps at the messabout at Bloomington, Indiana in September. They are indeed superior to the common tarps, not only slightly heavier, but they can be bought in pure white, something I've never seen in a polytarp.
CUTTING THE TARP....
The tarp will be hemmed along the foot, head, and leech. So those lengths should be cut about 2" outside the line. The luff can be cut right to the line. DON'T CUT THE LONG V'S FROM A-C-A2 AND FROM D-E-D2! Instead cut straight across from A to A2 and from D to D2.
SEWING THE DARTS...
The darts at the two major shaping seams will be sewn as shown in Figure 3. In Figure 2 the two shaping seams appear as the deep V's of A-C-A2 and D-E-D2.
Break out the sewing machine. Any sewing machine will sew polytarp although you should use one that will sew a zigzag stitch. Use a rot proof thread like the V69 polyester SailRite sells. Practice a bit if you aren't used to sewing. Read the manual if you've got one.
I'd suggest you try the widest seam first, the wide ones seem the easiest. Practice sewing one or two with some scrap. First fold the cloth on the centerline of the seam. You might secure the fold temporarily with clothespins or paperclips. Then sew, using a straight stitch, from the inner part of the seam to the outer edge along the smoothly curved line shown in the figure. If you were to sew a straight line from point C to A you would end up with the double wedge shape of the original pattern (or something like it - the flexible cloth probably wouldn't take the exact shape.) But if you sew the ever-broadening curved line shown you will get a sail with smooth curves and the original double wedge will be converted to a smooth airfoil with the desired draft.
Next open the fold and pull the cloth tight across the seam. It won't be flat anymore but that's the whole point of the special seams. There will be a little flap of material sticking out. Fold it flat and sew down the loose edge with a zigzag stitch. Then sew over the other edge of the flap, that is the edge with the straight stitch, with the zigzag stitch to further secure it.
Repeat with the other seam.
Let's take stock of what we've done. The sail has already been cut to its final dimensions and seamed to its final shape. All that remains to complete the sail is to sew in the corner reinforcements, sew the perimeter hems and reinforcements, and set the grommets. It took me an hour to get to this point on the Piccup sail. It took me two more hours to complete the finish details.
CORNER REINFORCEMENTS.....
The corners and reefing areas need to be reinforced with four layers of polytarp. Two layers of regular Dacron sailcloth would also do the job.) That provides strength against tear out of the grommets and stiffens the material to prevent folding under stress. I usually make the reinforcements about 8" long on a side. There are lots of ways to shape these patches. Sew the patches down well with a zigzag stitch.
BORDER HEMS...
On a smaller sail like this 70 square footer I usually make all the hems, except the luff hem, with a simple folded over hem about 2" wide. I've had no trouble. Some might prefer to reinforce all the edges, especially the head edge, with something like 4 ounce sailmaker's tape, 3" wide, folded in half and sewn over the edge. Sew it all down with a zigzag stitch. Reed Smith, who sometimes sails his Piccup in the open ocean (Gulp!) said he had a problem with the leech stretching so perhaps that edge might get a treatment similar to that of the luff.
The luff hem needs a stiffer and stronger treatment. I've been using 3" wide fiberglass tape, the same stuff used to make taped seam plywood hulls. It's fairly inexpensive and very easy to sew. It's edges are treated to prevent unraveling. Dacron sailmaker's tape would also be ideal. Here is how I do the job with fiberglass. I just sew a 3" wide tape down each side of the luff. The ends, which will unravel badly if left raw, are doubled under the last 6" or so before being sewn down. That prevents unraveling and also provides a second layer of material in the region of the end grommets, the most highly loaded grommets in the system. It might be advised to sew a final protective layer of tarp over the top of the glass tapes as the tapes seem to abrade easily with handling. All the luff sewing is with zigzag.
At this point all the sewing is done.
GROMMETS....
A smaller sail like this one can use ordinary brass #3 grommets all around. A good hardware store might have them plus the simple tools needed to install them. A bit of warning - I've heard that some of the grommets are brass plated steel. That type looks exactly like real brass when new in the box but they will rust shortly. Try to get real brass.
Practice setting a few grommets in scrap. They need to clamp tightly on the cloth but not so tight as to cut the cloth.
Place grommets at each corner with about 1" edge distance. Then along the hems in the head and foot spaced about every 15".
Large sails and heavy boats need better grommets in the corners. I've had very good luck with SailRite's riveted "Jiffy " grommets. (SailRite also has all the types and sizes of brass grommets.)
The sail is done! It took me three hours of work to get to this point. No doubt it could be done quicker. If you're not used to sewing you should expect to take longer.
Mayfly16
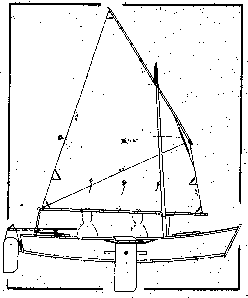
SAILBOAT, 15' X 5.5', 350 POUNDS EMPTY
Mayfly16 is large enough to swallow up three men or maybe a family with two kids. She has two benches that are 7' long and there should be plenty of room for all. I would say that her fully loaded maximum weight might be 900 pounds and her empty weight about 350 pounds, leaving 550 pounds for the captain and crew and gear.
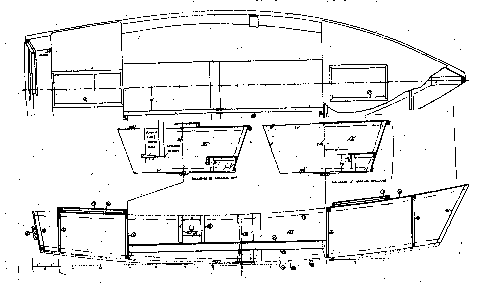
At the same time the Mayfly16 can easily be handled solo, although with just the weight of her skipper she will not be as stable as when heavily loaded. The boat also has two large chambers for buoyancy/storage and I can see her used as a solo beach cruiser because the floor space is large enough for a sleep spot. I've made her deep with lots of freeboard.
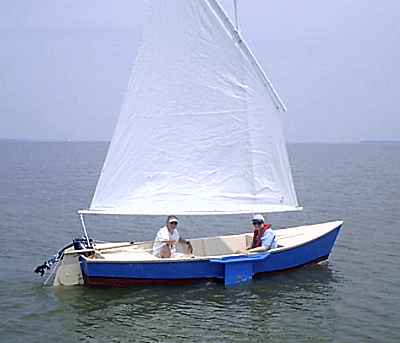
Mary and George Fulk built the prototype and passed by here with the prototype on their annual migration north for the summer and I had a chance to see and sail in Mayfly16 for a short bit. Weather was hot and the wind light and steady, perfect for testing. She sailed quite well I thought and everything worked as planned. It certainly was roomy and easy to rig and use.
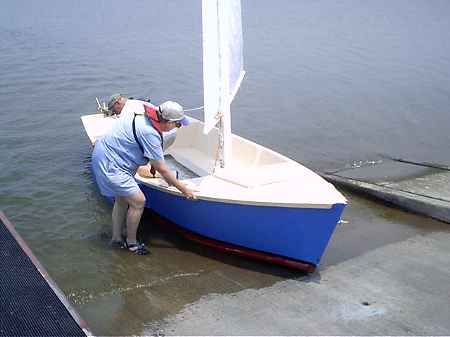
The balanced lug rig sets on short spars and sails very well reefed, in fact can be set up with jiffy reefing. The spars are all easily made and stowed, the mast being but 14' long setting 91 square feet of sail. In addition there are oar ports for those with lots of time and little money and a motor well for those with lots of money and no time. Two horsepower is all that a boat like this can absorb without going crazy.
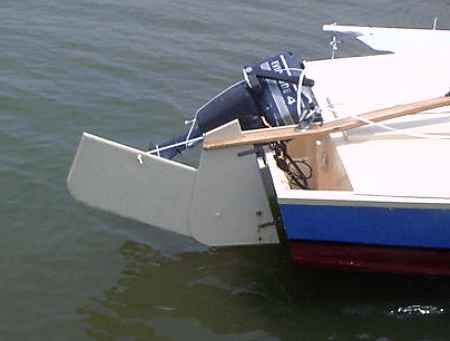
The motor well is an open self draining well that uses the full width and depth of the stern. It will come in handy for storing wet muddy things you don't want inside the boat, like boots and anchors. I've suggested in the plans that the rudder can be offset to one side a bit to give more room for the motor. We did not use George's little Evinrude since the boat sailed easily in all directions, but George says the sidebyside sharing on the stern of the motor and rudder works fine. There was no interference with the rudder. (As with any outboard on any sailboat, the motor has a desire to grab the sheet with each tack so you usually have to tend the sheet a bit.)
Mayfly16 uses conventional nail and glue construction needing six sheets of 1/4" plywood and two sheets of 1/2" ply.
Plans for Mayfly16 are $35.
Prototype News
Some of you may know that in addition to the one buck catalog which now contains 20 "done" boats, I offer another catalog of 20 unbuilt prototypes. The buck catalog has on its last page a list and brief description of the boats currently in the Catalog of Prototypes. That catalog also contains some articles that I wrote for Messing About In Boats and Boatbuilder magazines. The Catalog of Prototypes costs $3. The both together amount to 50 pages for $4, an offer you may have seen in Woodenboat ads. Payment must be in US funds. The banks here won't accept anything else. (I've got a little stash of foreign currency that I can admire but not spend.) I'm way too small for credit cards.
We have a Picara finished by Ken Giles, past Mayfly16 master, and into its trials. The hull was built by Vincent Lavender in Massachusetts. There have been other Picaras finished in the past but I never got a sailing report for them...
And the Vole in New York is Garth Battista's of www.breakawaybooks.com, printer of my book and Max's old outboard book and many other fine sports books. Beautiful job! Garth is using a small lug rig for sail, not the sharpie sprit sail shown on the plans, so I will continue to carry the design as a prototype boat. But he has used it extensively on his Bahamas trip towed behind his Cormorant. Sort of like having a compact car towed behind an RV.
And a Deansbox seen in Texas:
Another prototype Twister is well along:
A brave soul has started a Robbsboat. He has a builder's blog at http://tomsrobbsboat.blogspot.com. (OOPS! He found a mistake in the side bevels of bulkhead5, says 20 degrees but should be 10 degrees.) This boat has been sailed and is being tested. He has found the sail area a bit much for his area and is putting in serious reef points.
AN INDEX OF PAST ISSUES
THE WAY BACK ISSUES RETURN!
MANY THANKS TO CANADIAN READER GAETAN JETTE WHO NOT ONLY SAVED THEM FROM THE 1997 BEGINNING BUT ALSO PUT TOGETHER AN EXCELLENT INDEX PAGE TO SORT THEM OUT....
THE WAY BACK ISSUES
1may18, Scarfing Lumber, Blobster
15may18, Rigging Sharpie Sprit Sails, Laguna
1jun18, Rigging Lug Sails, QT Skiff
15jun18, RendLake 2018, Mixer
1jul18, Horse Power, Vireo14
15jul18, Motors per the Coast Guard, Vamp
1aug18, Propeller Pitch, Oracle
15aug18, Propeller Slip, Cormorant
1sep18, Measuring Prop Thrust, OliveOyl
15sep18, Taped Seams, Philsboat
1oct18, Plywood Butt Joints, Larsboat
15oct18, Small Boat Rudders, Jonsboat
1nov18, Sink Weights, Shanteuse
15nov18, Piccup Spinoffs, Piccup Pram
1dec18, Electric Boats 1, Ladybug
15dec18, Electric Boats 2, Sportdory
1jan19, Sail Area Math, Normsboat
15jan19, AF3Capsize, Robote
1feb19, Bulkhead Bevels, Toto
15feb19, Leeboard Issues, IMB
1mar19, Hollow Spars, AF4 Breve
Table of Contents

