Jim Michalak's Boat Designs
1024 Merrill St, Lebanon, IL 62254
A page of boat designs and essays.
(15 Febuary 2023) We discuss trailering plywood boats. The 1 March issue will cover rudders.
REND LAKE MESSABOUT 2023...
...Lets try it again. Rend Lake 2023 will take place on June 9 and 10, always on the weekend before Father's Day weekend. I promised to remind all of us to try to get the good campsites. They are sites 24 through 30 and especially 26 through 29 if possible, this at the North Sandusky campground at Rend Lake.
ORDER NEWS
THE BOOK IS OUT!
BOATBUILDING FOR BEGINNERS (AND BEYOND)
... is out now, written by me and edited by Garth Battista of Breakaway Books. You might find it at your bookstore. If not check it out at the....
ON LINE CATALOG OF MY PLANS...
...which can now be found at Duckworks Magazine. You order with a shopping cart set up and pay with credit cards or by Paypal.
ALSO...In addition to the Duckworks downloads I also now have access to a large format inkjet printer which is making very nice full sized prints on paper. So I can return to what I started 30 years ago, you order direct from me by snail mail using the address above only with cash or check in US funds with the prices shown on this website, and I mail you full sized 2'x 3' paper prints. The price includes first class mail to US and Canada.
Trailering Plywood Boats
...WHEN TO TRAILER...
A boat weighing over 100 pounds will be difficult to cartop solo. Get a boat trailer. Also consider getting one if your boat has lots of pieces to be assembled with each use, if you load a lot of fishing gear every time you go boating, or if your car isn't suited to roof carriage.
...TOW VEHICLE...
In general I've found it prudent to tow about half the manufacturer's rated tow weight. I don't think the guys who rate tow weight are concerned with you vehicle's longevity or its ability to pull the weight up a steep slippery ramp. I've seen several times where a vehicle could pull a boat on the highway, but couldn't pull the rig up a ramp.
...TRAILER TYPES...
In general, traditional boat trailers made of galvanized channel are best. Frames of tubing are stiffer in torsion but can rust out from the inside without warning. The simplicity of traditional leaf spring suspension is nice. Use "Bearing Buddy" type hubs. I've heard it's preferred to pump grease into the hubs at the ramp just before launching to boat so there will be no air pockets in the bearings when they go into the water.
A low trailer is best.
Used trailers are usually pretty inexpensive but can be hard to find. Look around for one as soon as you think you'll need one - say as soon as you start building a boat.
I've found it very convenient to finish a boat to the point of painting the bottom and turning it upright for the last time and then mounting it straight on the trailer to complete the interior and top. It's sort of a work site on wheels. Wheel it around the shop as required.
...CUSTOM BUNKS...
Most likely the trailer you get will be set up to carry a flat bottom or V bottom fishing hull with a long straight run. The bunks usually are padded 2x4's running fore and aft.
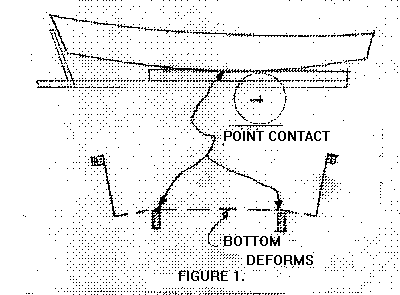
Most likely you'll have to scrap that bunk system and build a custom set for your boat. Most homebuilt sailers and rowboats have enough rocker in their bottoms to contact those longitudinal bunks only in one spot. The entire weight bears on that one spot and the hull will deform there. See Figure 1 for what can happen. We'll return to this subject after we've found the best place for your boat on the trailer.
...TONGUE WEIGHT...
First you need to locate your boat fore-and-aft on the trailer such that the tongue weight (the weight that rests on the hitch ball) is 10 to 15% of the total. I doubt if there are a dozen people in the world who know the weight of their boat/trailer combination. A fifteen footer like my plywood Pencilbox probably weighs 400 or 500 pounds with a typical trailer. So 50 pounds would be a good tongue weight. (It's also all most of us care to lift and push around. If your trailer tongue is too heavy to lift with reasonable effort you will need a wheeled trailer jack on the tongue.) Slide the hull fore and aft on the trailer until you've got it. Be ready for a surprise. Most likely a sailing or rowing hull will be well aft of the typical power fishing boat location the trailer manufacturer expected. I found a trailer meant for a 12 foot powered skiff is just right for a 16 foot plywood trailer sailer.
Most trailers will allow you to adjust the tongue weight by shifting the axle fore and aft. They have their suspension simply clamped in position. Unclamp the whole works and shift it to relocate the wheels and change the tongue weight.
...NOW FOR THOSE BUNKS...
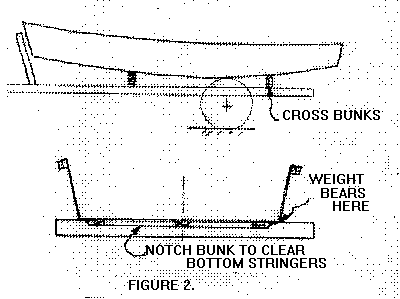
With the boat located fore and aft, we'll size up some custom bunks. I can think of three ways to support the typical rockered hull and none include the 2x4 longitudinal bunks that come with most trailers. See Figure 2. Here a flattie is mounted on two crosswise bunks, one forward and one aft, such that the weight bears only on the chines. The chine corners are very stiff and strong and nothing will happen to her.
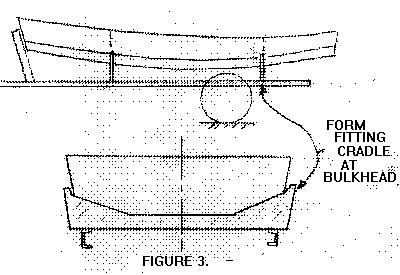
Look at Figure 3. Here a multichine is supported similarly, but with no hard chine to carry the load, she must be carefully cradled. The cradles should be located directly under hardpoints such as bulkheads to avoid deforming the hull. A V bottom hull with a lot of rocker should be supported the same way.
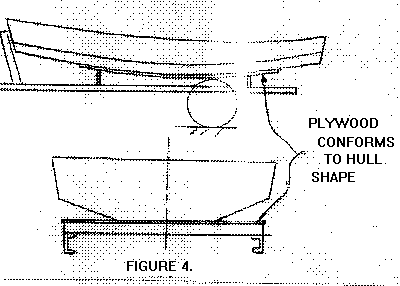
Look at Figure 4. Here a plywood sheet as wide as the bottom forms a "sling" and distributes the load over a wide area instead of just at a couple of points. This is probably the most gentle system and has other advantages such as being able to do general hauling. This type of bunk doesn't need padding, but the other two types should.
WINCH POST
Keeping in mind the tongue weight conditions, the winch post must be shifted to meet the boat and not visa versa.
This part provides a strong point for a winch and for a rubber block which acts as a forward stop for the hull. With the hull sitting on its bunks, the bow line to the winch should be almost all forward force with little down force. I've seen boat bottoms deformed by being winched down tightly at the bow.
For lighter boats - say 500 pounds or less, try going winchless. Fasten a very sturdy belaying cleat or bar to the winch post. Push the bow hard to the rubber stop block and belay the boat's bow line to the post.
...GOAL POSTS...
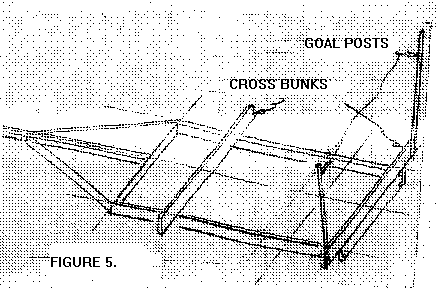
Trailers should have at least a pair of goal posts to keep a boat well aligned with the trailer as the boat is floated in a crosswind. See Figure 5. Without the posts, launching and retrieving solo in a crosswind is about impossible without getting wet and strained. You may not need posts if you have a V bottom sitting in high cradles which act as goal posts as in Figure 3.
I've seen fishermen use very tall posts with trailer lights mounted on the tops. Not only does that preclude having to disconnect the lights while launching, but the trailer is better illuminated in the driver's rear view mirror at night. (That's a problem with normal trailer lights. Sometimes you can't see your own boat and trailer tagging along behind you.) At any rate the posts need to be tall enough so they stick up about a foot out of the water when the trailer is immersed. Then you know exactly where your trailer is.
To launch a boat from a trailer with goal posts, you back down the ramp until the boat is almost totally afloat - perhaps only the bow is resting lightly on its bunk. You disconnect the bow line, push the boat aft, totally afloat now, beyond the goal posts, and pull the boat back to the ramp on the downwind side of the trailer.
People who go fishing everyday get very good at this. They untie the boat before backing and retie the bow line to the trailer with lots of slack. They back down the ramp until the boat is nearly afloat, jab the brakes, and drive forward a bit. The boat jerks off the trailer when the brakes are applied, the bow line catches it after it has drifted past the end of the trailer. Then the boat is pulled forward by the vehicle until its bow rests gently on the ramp. The driver now only disconnects the bow line which is totally high and dry at this point. Essentially he's launched his boat without getting out of his car!
To retrieve you put the trailer on the leeside of the boat and, HOLDING THE BOW LINE, push the boat beyond the goal posts and let the wind (or momentum) drift it between the posts. Then pull it onto the trailer with the bow line, secure it and drive off. Power boaters often just drive their boats onto the partially submerged trailer.
...SIDE BUNKS...
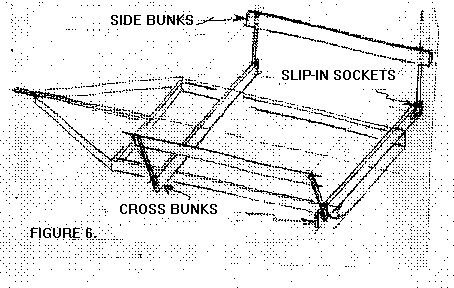
With a goal post on each side of your trailer your boat can still try to escape at an angle between the posts. The solution is another set of posts forward with padded boards connecting to the aft posts. See Figure 6. You create a slot in which to berth your boat. It's probably the most secure bunk system.
I recommend you make the side bunks fit into sockets for quick removal. I did that with my 24' Birdwatcher and have no trouble launching and retrieving solo. Here's how.
Arriving at the ramp I take close note of the wind direction and remove the bunk that will be upwind during the launch. I back down the ramp until she's just afloat, tied loosely at the bow, and the wind pushes her against the downwind bunk. Now I need only untie the bow and pull the boat off to the upwind side of the trailer and beach it next to the rig. I don't have to push the boat aft through the goal posts and float it to the downwind side of the rig, which can get pretty frightening with a big boat in a big wind. The downwind bunk is always there to catch and hold the boat. Retrieval is the reverse of the loading.
...TIE DOWNS...
Heavy boats will need winches to be pulled securely to the winch post. (You'll be surprized how greasing the trailer bunks makes this easier.) Then the boat is secure fore and aft. With the elaborate bunks that fishermen use, the hull is secure sideways, too. And that's all that's really needed. Sometimes the stern is also strapped to the end of the trailer.
With a sailing hull that weighs less than 500 pounds, I forego the winch. I leave the hull tethered loosely to the winch post while she's still on the ramp. The goal posts secure her sideways. Once I pull her up the ramp and onto the parking lot, the hull settles onto the bunks and I shove it forward hard against the winch post stop. Then I retie the bow line by belaying it to a heavy cleat on the winch post.
Next I have a 1/2" diameter line tied to the trailer frame, near the aft bunk, which I pass tightly over the hull and down to a stout cleat on the other side of the trailer frame, to which I belay the line. I prefer the pull of that aft line to be not only down but slightly forward to provide a backup for the line to the winch post. I usually run the aft line through oar sockets so it won't slip on the hull.
Between the two lines and the goal posts, there is redundancy. Only two of the three are needed to secure the boat. And yet untying the boat is a 30 second operation with no loose lines to keep track of. The bow line stays with the boat and the aft line stays with the trailer.
...LIGHTS...
Trailer lights should be unplugged before dunking in the water.
For a long sailboat which protrudes way beyond the end of the trailer, make a board which holds the lights to the stern of the hull, up high so you can see them yourself in the mirrors at night. It should be quickly removable. I mount the license plate up there too, but I'm not sure if that is legal. As for wiring, simply have a long loose lead that you unreel from the board down the boat's center to mate with your tow car's plug. This sort of rig is far better than normal trailer lights which are mounted low and well short of the hull's stern.
If your lights stop working and you've checkd all the plugs and switches, just remember the advice Dirk Fraser shared with me at a messabout saying, "It's the Ground, stupid." Yes, it was.
...FINALLY.....
Always keep in mind that your trailering should be a quick, safe and easy operation. After each use give some contemplation to any irritations and dream up some solutions.
IMB
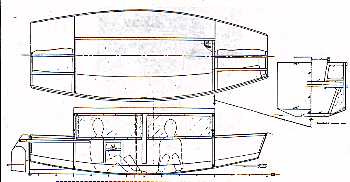
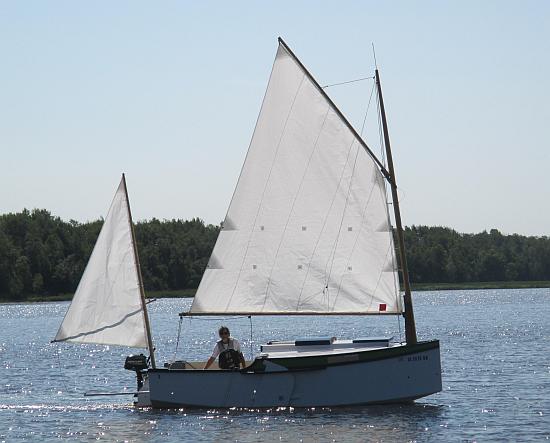
IMB, SAIL BEACHBOAT, 13.5' X 5.5', 350 POUNDS EMPTY
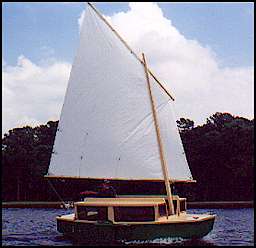
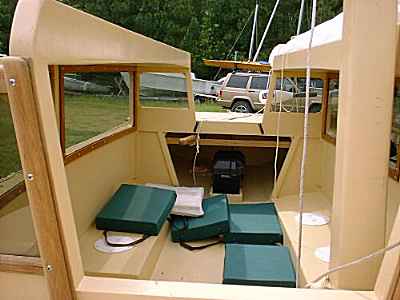
IMB features a "Birdwatcher" cabin, full length with panoramic windows and a center walkway slot in the roof. Everyone rides inside. This style of boat was invented by Phil Bolger in the early 1980's.
These boats can be self righting with minimal, or no, ballast because crew weight works as ballast. They sit low looking out through the windows (although standing in normal winds is quite acceptable). The cabin sides provide lots of buoyancy up high to ensure a good range of stability. IMB, which is small with a light bottom, should reliably self right from 60 or 70 degrees and in the test described above self righted from a full 90 degrees of roll.
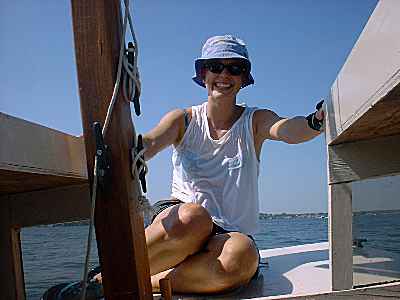
These boats are operated from within the cabin, like an automobile. No one need ever go on deck. For boating with children I can see no equal.
These are usually cool inside. The tinted windows cut the sun's power. The crew can sit in the shade of the deck. Downdraft from the sail cascades through the walkway. (By the way, at the Conroe messabout two boaters with Lexan windows noted that mosquito spray will ruin Lexan with one application and they noted belatedly that the back of the spray can says so.)
IMB has an 8' long cabin on a multichine pram hull. The prototype was built to perfection by Gerry Scott of Cleveland, Texas. At the Conroe (Houston) messabout I got a chance to look over his boat plus the only other IMB I know of built by Bob Williams. Both boats were quite true to the plans. Both had added low inside seats which made them more pleasant to use to the point that I will show some seats on the plans. I was worried when I drew IMB that the headroom would be minimal so drew no seats thinking the crew would sit on the floor, as with the original Birdwatcher.
While I was sailing with Gerry, Bob's boat came out on the lake with four adult males and no sign of bogging down, showing that these fat pram shapes, very much like my Piccup Pram, can handle a lot of weight in the 13.5' length.
(Later they rescued a mermaid and returned to the dock with five total.)
I don't know if either boat had ever been weighed and the 350 pounds I quote as the empty weight is just a guess. One of the ideas behind the boat was that it might be towed behind a compact car and I was glad to see that Gerry tows his behind a 1500cc mini SUV.
Both men adjusted well to the lug sail/leeboard rig. Gerry's has the blueprint 104 square foot sail and Bob's uses the 114 square foot Bolger Windsprint sail available from Payson. I used to worry a bit about running a leeboard on a full cabin boat like this since handling must be done by remote control, so to speak. No problem. Both boats have the leeboard lanyard running to a cleat on the aft deck. The leeboard position is plainly in view at all times through the cabin window. In use these leeboards need only lanyards to pull them down. Once down they will usually stay down until they strike something. Then they pop up and you will need to pull them down again. I've never seen a need for a lanyard to pull the board up although I've seen several rigged that way. The Dovekie design had elaborate cam operated levers in the cabin that operated the leeboards and I thought that all very clever. But in talking to some Dovekie owners I found the internal levers are not universally loved since they can often be in the way. Anyway, my idea was not to run the down lanyard to the aft deck but rather through a small hole in the side of the boat, say 1/2" for a 1/4" lanyard, so it could be operated totally from inside the cabin.
Both Gerry's and Bob's boats used electric trolling motors. The plans show rowing ports and no provisions for a motor. A boat like this won't be a fast row boat but it might be useful in a calm. Even the 24' Birdwatcher would row about 2.5mph in a calm. But I'll admit that adding a motor to Birdwatcher makes it a much more useful thing.
IMB takes two sheets of 1/2" plywood, eight sheets of 1/4" plywood and one sheet of 3/16" Plexiglass. Taped seam construction using no jigs or lofting.
IMB plans are $30.
Prototype News
Some of you may know that in addition to the one buck catalog which now contains 20 "done" boats, I offer another catalog of 20 unbuilt prototypes. The buck catalog has on its last page a list and brief description of the boats currently in the Catalog of Prototypes. That catalog also contains some articles that I wrote for Messing About In Boats and Boatbuilder magazines. The Catalog of Prototypes costs $3. The both together amount to 50 pages for $4, an offer you may have seen in Woodenboat ads. Payment must be in US funds. The banks here won't accept anything else. (I've got a little stash of foreign currency that I can admire but not spend.) I'm way too small for credit cards.
We have a Picara finished by Ken Giles, past Mayfly16 master, and into its trials. The hull was built by Vincent Lavender in Massachusetts. There have been other Picaras finished in the past but I never got a sailing report for them...
And the Vole in New York is Garth Battista's of www.breakawaybooks.com, printer of my book and Max's old outboard book and many other fine sports books. Beautiful job! Garth is using a small lug rig for sail, not the sharpie sprit sail shown on the plans, so I will continue to carry the design as a prototype boat. But he has used it extensively on his Bahamas trip towed behind his Cormorant. Sort of like having a compact car towed behind an RV.
And a Deansbox seen in Texas:
Another prototype Twister is well along:
A brave soul has started a Robbsboat. He has a builder's blog at http://tomsrobbsboat.blogspot.com. (OOPS! He found a mistake in the side bevels of bulkhead5, says 20 degrees but should be 10 degrees.) This boat has been sailed and is being tested. He has found the sail area a bit much for his area and is putting in serious reef points.
AN INDEX OF PAST ISSUES
THE WAY BACK ISSUES RETURN!
MANY THANKS TO CANADIAN READER GAETAN JETTE WHO NOT ONLY SAVED THEM FROM THE 1997 BEGINNING BUT ALSO PUT TOGETHER AN EXCELLENT INDEX PAGE TO SORT THEM OUT....
THE WAY BACK ISSUES
1mar22, Small Boat Rudders , AF4Breve
15mar22, Rudder Sink Weights , Scram Pram
1apr22, Sail Rig Spars , RiverRunner
15apr22, Water Ballast, Mayfly16
1may22, AF3 Capsize, Blobster
15may22, Mast Tabernacles, Laguna
1jun22, Underwater Board Shape, QT Skiff
15jun22, Capsize Lessons, Mixer
1jul22, Scarfing Lumber, Vireo14
15jul22, Rigging Lugsails, Frolic2
1aug22, Horsepower, Oracle
15aug22, Sharpie Sprit Sails, Cormorant
1sep22, Measuring Prop Thrust, OliveOyl
15sep22, Leeboard Issues, Philsboat
1oct22, Prismatic Coefficient, Larsboat
15oct22, Figuring Displacement, Jonsboat
1nov22, Lugsail Jiffy Reef, Mayfly14
15nov22, Sharpie Reefing, Piccup Pram
1dec22, Making Oars, Batto
15dec22, Taped Seams, Sportdory
1jan23, Rowboat Setup, Normsboat
15jan23, Sail Area Math, Robote
