Jim Michalak's Boat Designs
1024 Merrill St, Lebanon, IL 62254
A page of boat designs and essays.
(1 January 2023) We will set up a rowing boat. The 15 January issue will discuss sail area math, very very important.
ORDER NEWS
THE BOOK IS OUT!
BOATBUILDING FOR BEGINNERS (AND BEYOND)
... is out now, written by me and edited by Garth Battista of Breakaway Books. You might find it at your bookstore. If not check it out at the....
ON LINE CATALOG OF MY PLANS...
...which can now be found at Duckworks Magazine. You order with a shopping cart set up and pay with credit cards or by Paypal.
ALSO...In addition to the Duckworks downloads I also now have access to a large format inkjet printer which is making very nice full sized prints on paper. So I can return to what I started 30 years ago, you order direct from me by snail mail using the address above only with cash or check in US funds with the prices shown on this website, and I mail you full sized 2'x 3' paper prints. The price includes first class mail to US and Canada.
ROWBOAT SETUP
I've been showing photos of Max Wawzyniak's Oracle prototype for the past few months. The project was done a while back but we were frozen in until about the first week of March. Then it all burst out then and we had a day in the 70'sF and it was time to launch. That particular day the wind was gusting to 30 and no testing was going to get done but it was a good day to take photos and also to set the boat up in the way I like to see it done.
We went to Washington County lake here in Illinois which is about a mile long and with many arms, steep hills around and a shallow launch ramp in a protected area. A very nice rowing lake.
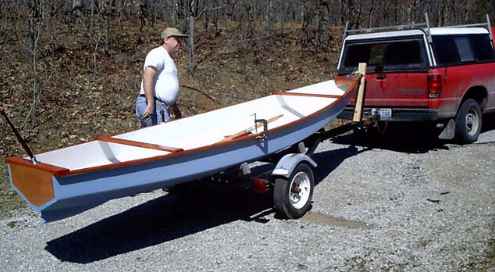
The first thing I must say to those who are finishing a new rowing boat is to not install the rowlocks in the shop! I usually show a rowlock location on the drawing but that is just my best guess at the time I drew the boat. If you have a little patience you can get it just right the first time by following this essay.
Max unloaded his new Oracle and showed me his gear. He had made a low rowing seat, 3-1/2" high, and had some nice 8' oars. The seat looks low but you will usually have a cushion on top and this is a low sided boat. This seat turned out to be just right for Oracle.

Next the boat was placed in the water tied loosely to the dock. Max climbed in and we looked for the seating position that would provided a level boat.
Here he is too far forward and you can see that the bow is down and the stern is up. I might add that it really takes two people to get this just right - one to be the skipper, and another to watch for the correct trim since seeing the trim from inside the boat can be difficult.
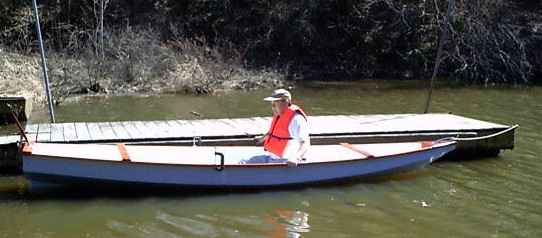
Here he is too far aft. The bow is up and the stern is down:
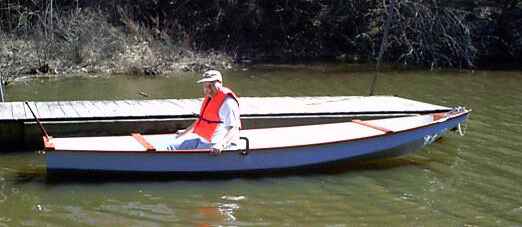
Here he is with his weight located properly for a level boat. At this time he marked the seat location on the bottom of the boat so he could easily repeat the location in the future.

Sitting in the properly trimmed boat Max holds the oars comfortably and notes where they cross the wale.
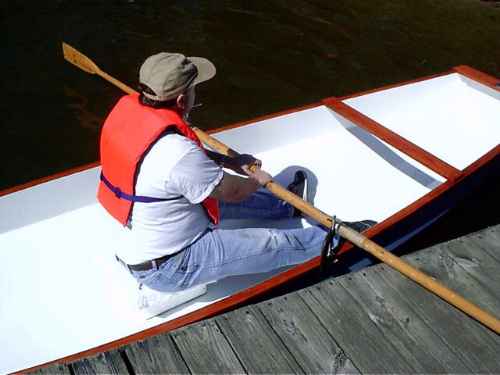
At those points he places a large C clamp in position to simulate the rowlocks.

Now for a test row using those C clamps as thole pins. If the clamps are large enough you might pass the oar through the opening or you might tie the oars to the clamps. In this case Max was just careful to keep the oars against the clamps.
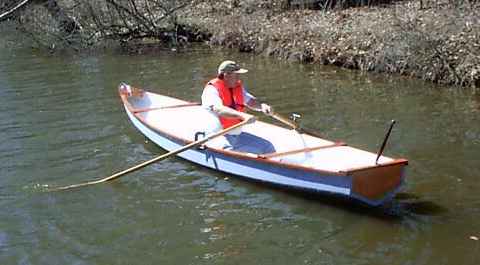
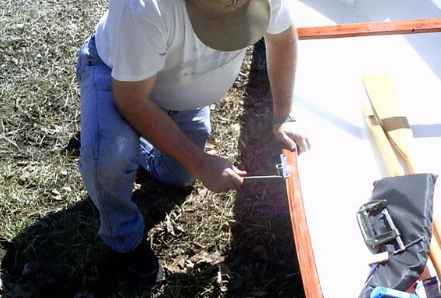
At this point you can shift things around. Once you find the best place for the oarlocks, note the position and install the lock sockets. In this case Max used common sockets mounted outside the wale. He screwed them into position for now, to replace the screws with small bolts in the future. (Screws have a bad habit of working loose at the worst time.) Sockets mounted outside the wale instead of inside? They function a lot better outside with no chafing on the wale but if you are using the boat as a tender then inside the wale might be better because there will be no metal to gouge the mothership.
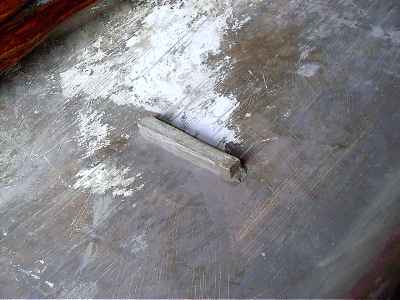
Not quite done yet. A good rowing setup will also have cleats inside the hull against which you can brace your feet. It's not a big deal in calm conditions but for rowing hard, and in some conditions all rowing will be hard, the cleats will make a huge difference in the amount of force you can deliver to the oar.
Max didn't install his on his test day but the cleats can be about 3/4" square and 6" long and mounted in a comfortable position. Many rowing boats will have several cleats spaced maybe 3" apart to allow for different sizes of oarsmen. Here is a photo of the cleat in my old Roar2. It was meant to be a temporary fit and was plopped in place with a blob of Bondo. Still temporary after 12 years!
Perhaps just as good as a cleat is the arrangement that Rob Rohde-Szudy made for his Piccup Pram with a rope loop to the seat that captures a bracing bar that rests on the floor of the boat:
NORMSBOAT

NORMSBOAT, 18' X 5-1/2", 600 POUNDS EMPTY
Normsboat was designed for Norm Wolf of Washington D.C. to join a group of trailer traveling shallow water sailors. He wanted the ability to motor and self rescue in a knockdown. Simplicity of rigging was also of importance. The prototype was built mostly by Richard Cullison of Cullison Smallcraft with some items done by Norm. Richard has presented a fine photo essay of the construction at his web site.
A real motor mount is the first reality that you face with almost any boat that is supposed to be on a schedule. Normsboat has a very short motor well in the stern that is full width. Small fuel cans can go there too, as can the extra anchors, boots, etc. Actually Norm hasn't used the motoring ability of his boat (yet) and uses a 12' long yuloh oar instead which you can see lashed to the deck of his boat - it looks like a bow sprit but it isn't. I show oarports on the drawings, another way of getting around without a motor in calm conditions. That, by the way, is the achilles heel of the idea of using oars instead of a motor on a sailing boat. The oars will work in calm conditions but they can't save your butt in really bad going like a good motor might.
Just forward of the well is a buoyancy/storage chamber. Very important in a knockdown, a chamber like this is supposed to hold the stern up when the cockpit floods, keeping the boat level and preventing flooding in the cabin. Forward of that is a 6' long cockpit with bench seating giving Normsboat the capacity to sail several adults. Forward of that is a 7-1/2' cuddy cabin right out of AF4. It has a slot top which allows you to walk right to the bow of the boat. In bad weather you cover the slot with a tarp. There is room to sleep two but they have to be great chums, the idea is for it to be a solo cabin. And finally there is a small well in the bow for a messy anchor.

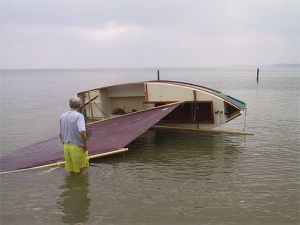
Norm did a practice capsize in calm conditions. It worked but I think most of us hoped the cabin slot would have more freeboard when the boat was on its side. I thought the AF3 capsize test went a lot better in that respect. I'm not sure why there is so much difference between the two. Anyway, I'm hoping for an AF2 practice capsize before making any decisions about it. Normsboat righted very easily when Norm grabbed the bottom and very little water inside the cockpit and none anywhere else. But I would be worried about a wave washing into the cabin slot in rough water and would make an effort to fit watertight hatches over the slot in rough going. I hope to write more about this in a later issue (if I figure it out).
The sail rig is right out of AF2 except here it is rigged as a balanced lug sail to make the rigging quicker. It also allows a lighter mast. On the downside, the mast must be stepped in the cabin but it won't be a bother to a solo cruiser. The boat could be rerigged as a gaffer as with AF2. Pivoting leeboard and rudder make sailing in shallows very easy.
Norm used to have a Dovekie. Phil Bolger, who designed Dovekie, would point out that the idea behind Dovekie was that it be non motorized and he would be disappointed that no one wants to row and everyone adds a motor. But almost every feature of Normsboat is something I learned from Bolger ..... the highly rockered sharpie hull, the double planked bottom (strength and weight where it is needed), the draining wells bow and stern, the emergency buoyancy system, the slot top cuddy, the lug sail with off center mounting, and the single pivoting leeboard.
Fourteen sheets of 3/8" plywood with simple nail and glue construction. No jigs, no lofting.
Plans for Normsboat are $40.
Prototype News
Some of you may know that in addition to the one buck catalog which now contains 20 "done" boats, I offer another catalog of 20 unbuilt prototypes. The buck catalog has on its last page a list and brief description of the boats currently in the Catalog of Prototypes. That catalog also contains some articles that I wrote for Messing About In Boats and Boatbuilder magazines. The Catalog of Prototypes costs $3. The both together amount to 50 pages for $4, an offer you may have seen in Woodenboat ads. Payment must be in US funds. The banks here won't accept anything else. (I've got a little stash of foreign currency that I can admire but not spend.) I'm way too small for credit cards.
We have a Picara finished by Ken Giles, past Mayfly16 master, and into its trials. The hull was built by Vincent Lavender in Massachusetts. There have been other Picaras finished in the past but I never got a sailing report for them...
And the Vole in New York is Garth Battista's of www.breakawaybooks.com, printer of my book and Max's old outboard book and many other fine sports books. Beautiful job! Garth is using a small lug rig for sail, not the sharpie sprit sail shown on the plans, so I will continue to carry the design as a prototype boat. But he has used it extensively on his Bahamas trip towed behind his Cormorant. Sort of like having a compact car towed behind an RV.
And a Deansbox seen in Texas:
Another prototype Twister is well along:
A brave soul has started a Robbsboat. He has a builder's blog at http://tomsrobbsboat.blogspot.com. (OOPS! He found a mistake in the side bevels of bulkhead5, says 20 degrees but should be 10 degrees.) This boat has been sailed and is being tested. He has found the sail area a bit much for his area and is putting in serious reef points.
AN INDEX OF PAST ISSUES
THE WAY BACK ISSUES RETURN!
MANY THANKS TO CANADIAN READER GAETAN JETTE WHO NOT ONLY SAVED THEM FROM THE 1997 BEGINNING BUT ALSO PUT TOGETHER AN EXCELLENT INDEX PAGE TO SORT THEM OUT....
THE WAY BACK ISSUES
15jan22, Sail Area Math , Robote
1feb22, Bulkhead Bevels , Toto
15feb22, Trailering Boats , IMB
1mar22, Small Boat Rudders , AF4Breve
15mar22, Rudder Sink Weights , Scram Pram
1apr22, Sail Rig Spars , RiverRunner
15apr22, Water Ballast, Mayfly16
1may22, AF3 Capsize, Blobster
15may22, Mast Tabernacles, Laguna
1jun22, Underwater Board Shape, QT Skiff
15jun22, Capsize Lessons, Mixer
1jul22, Scarfing Lumber, Vireo14
15jul22, Rigging Lugsails, Frolic2
1aug22, Horsepower, Oracle
15aug22, Sharpie Sprit Sails, Cormorant
1sep22, Measuring Prop Thrust, OliveOyl
15sep22, Leeboard Issues, Philsboat
1oct22, Prismatic Coefficient, Larsboat
15oct22, Figuring Displacement, Jonsboat
1nov22, Lugsail Jiffy Reef, Mayfly14
15nov22, Sharpie Reefing, Piccup Pram
1dec22, Making Oars, Batto

