Jim Michalak's Boat Designs
1024 Merrill St, Lebanon, IL 62254
A page of boat designs and essays.
(1 July 2020) We discuss scarfing lumber. The 15 July issue will rig a lugsail.
THE BOOK IS OUT!
BOATBUILDING FOR BEGINNERS (AND BEYOND)
... is out now, written by me and edited by Garth Battista of Breakaway Books. You might find it at your bookstore. If not check it out at the....
ON LINE CATALOG OF MY PLANS...
...which can now be found at Duckworks Magazine. You order with a shopping cart set up and pay with credit cards or by Paypal. Then Duckworks sends me an email about the order and then I send the plans right from me to you.
Scarfing Lumber
SCARFING LUMBER...
There will be times when you can't buy lumber as long as you will need. This will be especially true for masts, but it can also be true for elements like wales and chine logs. At my lumber yard many boards max out at 16' long, although some such as 2 x 10's can still be got in 20' lengths (if you can lift them). The standard solution to the length problem with lumber is to scarf it together.
Here is what a proper scarf joint looks like:
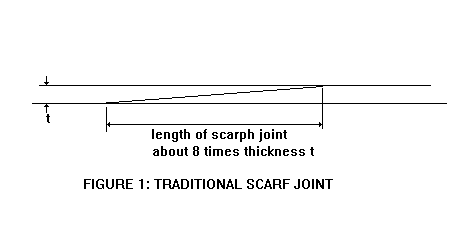
The reason scarf joints have always been used to joint lumber pieces lengthwise is that a butt joint, where one end of a board is glued directly to the next board with cuts at 90 degrees, never works even with modern glues. The joint is all end grain to end grain with no chance of getting a good glue line as you would with a scarf joint, or even with a butt block joint where the glue is loaded in shear instead of tension. By using a scarf with a 6:1 slant, the glued area is over six times the area of a straight butt joint.
I've shown how to piece plywood sheets together with butt plates instead of scarf joints, to make sheets longer than the standard 8' lengths. That usually won't work well with lumber elements. For example, if butt blocks were to joint the boards that make up your mast, the butt blocks would have to be on the outside of the mast to be effective. It could be done but would look clunky is nothing else. As for length, if you were joining 3/4" lumber with a 3/4" thick butt block, the block would need to be 12" long to get the 8:1 scarf ratio that might be considered to be the minimum.
SAWING THE SCARFS...
Actually scarf joints are easy except for cutting the scarf angle. There are fixtures made for circular saws that cut a scarf automatically like this:

Pro builders use these to cut scarfs on plywood, but the plywood has to be thin. The usual circular saw protrudes about 3" maximum below the guide, so if you are scarfing at an 8:1 ratio, the thickest wood you can cut this way is 3/8". Still, for a pro scarfing plywood it is very useful. But useless for scarfing 3/4" lumber.
Let's say you need to join 3/4" x 1-1/2" lumber to make wales or chine logs for your boat. An 8:1 scarf in 3/4" thick lumber will be 6" long, like this:

It's easy to draw the cut on the end of your sticks. You can try cutting it with a really good handsaw. It pays to practice. I've been able to cut the stick with a really good saber saw or circular saw but the guide has to be set exactly at 90 degrees and you can't waver in your cut. If you get a bad cut, you can try again on the same end. In fact if pays here to start with extra lengths of lumber so you can try several cuts on each board until you get the knack. You can also try working the cut to shape with a plane or rasp. If you have a power plane, you might try whacking the scarf to shape with only that. When you think you have two good ends cut, clamp one against a firm surface such as a length of 2x4, like this:

Slide the mating piece into position and check the fit. Remember that as you glue these up they must be straight. I think they should fit within about 1/32" to make a good glue joint with thickened epoxy. Like this:

ROUTING THE SCARFS...
When I built a Birdwatcher a while back I needed to join a lot of lumber since the boat was 24' long and the mast longer. I built a simple fixture for my router for cutting the scarfs. It looks like this:

The base plate of the router needs to be removed (three screws) and replaced with a one wide enough to span the fixture opening in all positions. The fixture needed to be wide enough to scarf the 3" wide boards I was using for the mast.
Here is how I make a scarf cut with this fixture. The board is clamped into the fixture such that the router will cut no more than about 1/4" deep. The router is turned on and worked around the fixture until it has cut all the available material. Like this:

Then the board is unclamped and slid forward into the fixture such that once more the router will slice off another 1/4" of material, only this time there will be a lot more wood to cut. And so forth until the the entire scarf is cut. Or is it? I've found it best to avoid a total feather edge at the end of the scarf cut - leaving about 1/32" uncut seems ot work best, like this:

That's all there is to it. One of the nice things about this fixture is that it is pretty compact. So instead of moving those long boards to the fixture, it is usually a lot easier to move the fixture to the boards, a nice feature when you start working with really long boards.
GLUING THE SCARF...
Now it is time to glue the boards together. Best to glue them up on a piece of 2x4 such that they will be straight as you glue them. Cover the 2x4 with waxed paper so that the backup board doesn't become a permanent part of your boat! Clamp the first board on like this:

Trial fit the second board. Butter it well with epoxy thickened to about mayonaise consistancy. Push it into place but not so hard that all the glue squeezes out. Now clamp the second piece to the backup 2x4. If you are going to have problems with gluing the joint I think it will be with glue squeezing out too much and also with lifting of the first board at the feather end of its scarf. You can help that out by carefully drilling a pilot hole for a screw right through the scarf and carefully installing a temporary screw with a backing washer like this:

That temporary screw will help a lot for overall alignment while the glue sets. It's a fact that glue is very slippery until it sets up and tapered clamped joints like this can slowly slide apart without really good clamping.
DON'T PLAY WITH THE SCARFED LUMBER UNTIL THE GLUE HAS CURED REALLY HARD! It may take a few days, depending on your glue and your climate conditions. Almost no glues set well below about 70 degrees. When I did the Birdwatcher mast scarfs it was in the middle of a wicked winter. I cut the scarfs with the router fixture, glued and clamped them up, covered them with a blanket blasted a salamander kerosene heater under the blanket. It got well over 100 degrees under there and they cured very quickly. Those scarfs are still holding!
Once your glue is completely cured the joint should be as strong as the basic wood and you can go on building as if there were no joint there. But it doesn't hurt to be prudent. I try to locate the scarfs in wales and chine logs where the curvature will be the least. I try to locate the scarfs in masts towards the top, where the bending loads are the least. And on elements that have several boards with scarfs, such as wales with multiple laminations and boxed masts, I stagger the scarfs such that they are not all one atop the other.

Vireo14
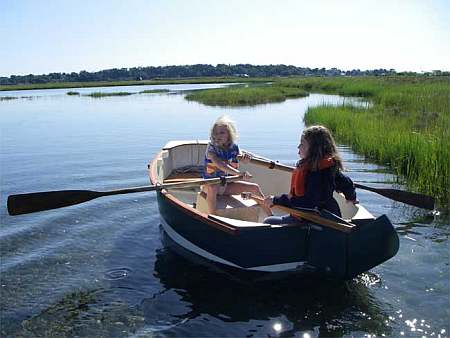
VIREO14, ROWBOAT, 14' X 3.5', 80 POUNDS
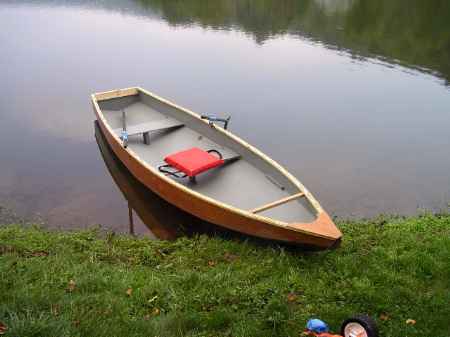
Vireo14 is a 14' version of the original 12' Vireo which was quite popular with all of its builders. In this case the extra length comes from a straight "stretch" of the original design. By that I mean that the same cross sections were used but now spaced 14" apart instead of 12". Another way to lengthen a boat is to add a straight "plug" in the center as is sometimes done to even completed boats and full size ships. I doubt if the stretch has any advantages over the plug except maybe in looks. Even there a short plug is hardly noticable, for example in the case of where I put a 30" plug in my Toto canoe to make Larsboat.
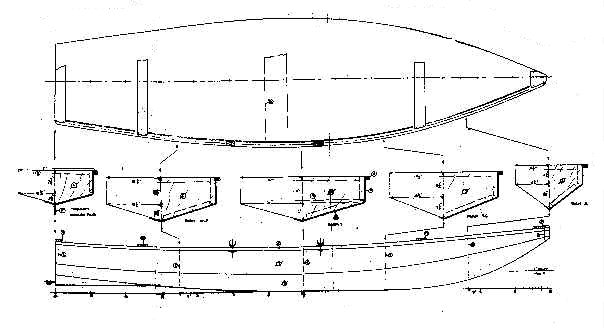
The extra length usually gives a bit more speed for the same power in a low powered boat, at least until windage gets to be a big factor. And in the case of Vireo it means about 110 pounds more capacity. The original 12' boat will float 290 pounds before the chines start to enter the water. Beyond that I would expect the boat to slow noticably, although boats with bows shaped like Vireo are superior in this respect. So you see that it is a push to float two large adults in the 12' Vireo. The Vireo14 will float the same way at 400 pounds and will be much better with the two adults. Hull weight will increase by 10 or 15 pounds, of course.
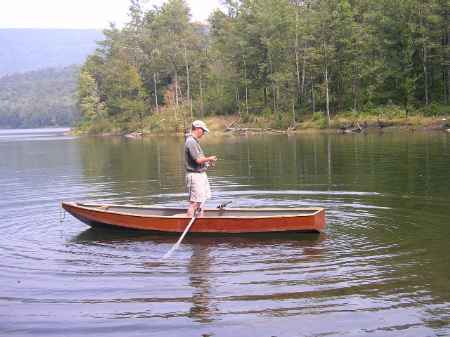
The prototype Vireo14 shown in these photos was built by Steve Fisher in New York in a matter of a few weeks. If you look at his construction photo below you will see that there is not a helluvalot involved. Steve elaborated on some of the details but with these small simple boats often there are between twenty and thirty pieces of wood to make counting everything.
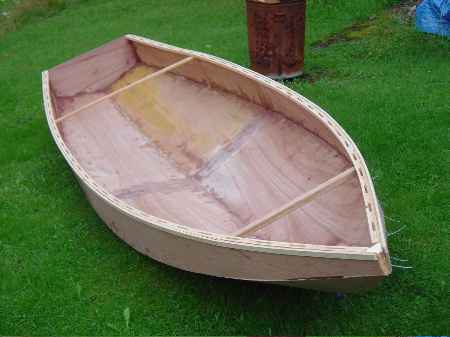
Vireo14 uses taped seam construction needing four sheets of 1/4" plywood.
Vireo14 plans are $20.
Prototype News
Some of you may know that in addition to the one buck catalog which now contains 20 "done" boats, I offer another catalog of 20 unbuilt prototypes. The buck catalog has on its last page a list and brief description of the boats currently in the Catalog of Prototypes. That catalog also contains some articles that I wrote for Messing About In Boats and Boatbuilder magazines. The Catalog of Prototypes costs $3. The both together amount to 50 pages for $4, an offer you may have seen in Woodenboat ads. Payment must be in US funds. The banks here won't accept anything else. (I've got a little stash of foreign currency that I can admire but not spend.) I'm way too small for credit cards.
We have a Picara finished by Ken Giles, past Mayfly16 master, and into its trials. The hull was built by Vincent Lavender in Massachusetts. There have been other Picaras finished in the past but I never got a sailing report for them...
And the Vole in New York is Garth Battista's of www.breakawaybooks.com, printer of my book and Max's old outboard book and many other fine sports books. Beautiful job! Garth is using a small lug rig for sail, not the sharpie sprit sail shown on the plans, so I will continue to carry the design as a prototype boat. But he has used it extensively on his Bahamas trip towed behind his Cormorant. Sort of like having a compact car towed behind an RV.
And a Deansbox seen in Texas:
Another prototype Twister is well along:
A brave soul has started a Robbsboat. He has a builder's blog at http://tomsrobbsboat.blogspot.com. (OOPS! He found a mistake in the side bevels of bulkhead5, says 20 degrees but should be 10 degrees.) This boat has been sailed and is being tested. He has found the sail area a bit much for his area and is putting in serious reef points.
AN INDEX OF PAST ISSUES
THE WAY BACK ISSUES RETURN!
MANY THANKS TO CANADIAN READER GAETAN JETTE WHO NOT ONLY SAVED THEM FROM THE 1997 BEGINNING BUT ALSO PUT TOGETHER AN EXCELLENT INDEX PAGE TO SORT THEM OUT....
THE WAY BACK ISSUES
15jul19, Rigging Lugsails, Vamp
1aug19, Rigging Sharpie Spritsails, Oracle
15aug19, Rowing1, Cormorant
1sep19, Rowing2, OliveOyl
15sep19, BC Scram Pram, Philsboat
1oct19, Herb's OliveOyl, Larsboat
15oct19, Herb's OliveOyl 2, Jonsboat
1nov19, Herb's OliveOyl 3, Shanteuse
15nov19, Herb's OliveOyl 4, Piccup
1dec19, Taped Seams, Ladybug
15dec19, Plywood Butt Joints, Sportdory
1jan20, Sail Area Math, Normsboat
15jan20, Trailering, Robote
1feb20, Bulkhead Bevels, Toto
15feb20, Cartopping, IMB
1mar20, Small Boat Rudders, AF4Breve
15mar20, Rudder Sink Weights, Scram Pram
1apr20, Two Totos, River Runner
15apr20, Water Ballast, Mayfly16
1may20, Water Ballast Details, Blobster
15may20, Mast Tabernacles, Laguna
Table of Contents

